

Подключение к Wi-Fi Raspberry Pi
1. Графический интерфейс
Проще всего подключиться к сети Wi-Fi через графический интерфейс. Для этого просто щёлкните по значку сети в верхнем правом углу экрана и выберите нужную сеть, затем введите для неё пароль:

Готово. Теперь подключение к Wi-Fi Raspberry Pi настроено.
2. raspi-config
Подключится к Wi-Fi через терминал ненамного сложнее. Здесь нам понадобится утилита raspi-config. Запустите её из главного меню и выберите Network Options:

Затем выберите Wi-Fi:

Дальше вам нужно ввести SSID вашей сети:

А потом пароль к ней:

Настройка завершена. Если проводного подключения нет, то устройство должно подключится к этой сети. Если вы не знаете, какой SSID (имя) у вашей Wi-Fi сети, смотрите следующий пункт.
3. Добавление Wi-Fi сети вручную
Сначала нужно посмотреть доступные Wi-Fi сети. Для этого используйте команду:

Вам нужен параметр ESSID. Чтобы не хранить пароль к сети в открытом виде, воспользуемся утилитой wpa_passphrase для его шифрования:

Полученную конфигурацию сети нужно добавить в файл /etc/wpa_supplicant/wpa_supplicant.conf:
Далее попросить систему перечитать конфигурацию сетевых интерфейсов с помощью команды:

Убедится, что всё прошло успешно, вы можете, выполнив:

Если после слов inet addr содержится IP-адрес, значит вы подключены к этой сети. Если же нет, проверьте правильность ввода ESSID и пароля. Также можно попытаться получить IP-адрес командой:
Если вы хотите пользоваться 5ГГц Wi-Fi, то кроме всего этого вам нужно указать вашу страну в wpa_supplicant.conf:
Настройки Raspberry Pi Wi-Fi завершена. Теперь устройство будет автоматически подключаться к выбранной сети после загрузки.
Find Out Your Network Information
The first step is to find out your default gateway IP. This is the local IP address of your network router. The computers on your network use it to communicate with the router and access the internet. If you already know what it is, just skip this step. If not, do continue…
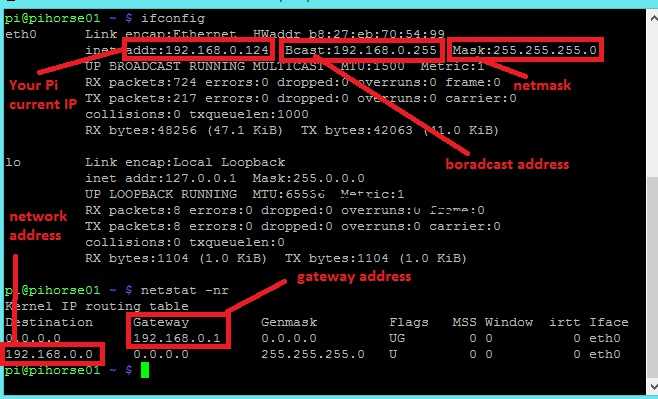
Power up and log into your Raspberry Pi via WiFi or ethernet, then enter at the command prompt to see your network routing information:
Under the “Gateway” column, you can see your default gateway IP (10.0.0.1 in my case). The “Iface” column lists the names for each connection – ethernet (eth0) and WiFi (wlan0). Write down your default gateway IP, we’ll need it in a minute.
Now we need to find out the IP addresses of your domain name servers. Your Pi sends the domain names you enter into your browser (i.e. www.google.com) to domain name servers, which convert the domain names to IP addresses (i.e. 8.8.8.8). Your Pi then uses the IP address to access the website’s server.
Enter at the command prompt to find the list of domain name servers:
Copy these IP addresses to a text editor on your PC or write them down for later.
1. Конфигурация DHCP
ОС Raspberry Pi (ранее известная как Raspbian) использует DHCP (протокол динамической конфигурации хоста) для автоматического назначения IP-адреса Raspberry Pi при каждой перезагрузке.
Чтобы изменить это поведение таким образом, чтобы он каждый раз использовал один и тот же статический IP-адрес, вам необходимо изменить файл конфигурации для демона клиента DHCP, dhcpcd.conf .
Перед этим вам понадобится некоторая информация о вашей текущей настройке сети, чтобы вы могли добавить необходимые данные в файл конфигурации. Вам потребуется следующая информация:
• Тип сетевого подключения. Это либо wlan0, если ваш Raspberry Pi подключен к маршрутизатору по беспроводной сети, либо eth0, если он подключен с помощью кабеля Ethernet.
• Текущий назначенный IP-адрес Raspberry Pi – безопаснее всего повторно использовать его для его статического IP-адреса, чтобы вы могли быть уверены, что последний еще не был на другом устройстве в сети. Если нет, убедитесь, что другое устройство его еще не использует.
Чтобы узнать текущий IP-адрес Raspberry Pi, введите следующую команду в окне терминала:
• IP-адрес шлюза вашего маршрутизатора – тот, который используется для связи с ним из локальной сети, а не его общедоступный IP-адрес. Он зависит от модели маршрутизатора, но обычно начинается с 192.168.0.1.
Чтобы найти его, введите следующую команду и обратите внимание на первый указанный IP-адрес:
• IP-адрес DNS (системы доменных имен) вашего маршрутизатора. Обычно это то же самое, что и его адрес шлюза, но может быть установлено другое значение для использования альтернативного DNS, например 8.8.8.8 для Google или 1.1.1.1 для Cloudflare.
Чтобы узнать текущий IP-адрес DNS, введите команду:

Обратите внимание на IP-адрес после сервера имен – это DNS-адрес – а затем нажмите Ctrl + X, чтобы закрыть файл
Настройка DHCP на Raspberry
Что такое DHCP
DHCP (Dynamic Host Configuration Protocol) – это протокол, который автоматически назначает IP-адреса устройствам в сети.
Зачем настраивать DHCP на Raspberry
Настройка DHCP на Raspberry позволит автоматически назначать IP-адреса другим устройствам в сети, что упростит процесс их настройки и сделает систему более удобной в эксплуатации.
Как настроить DHCP на Raspberry
Чтобы настроить DHCP на Raspberry, нужно установить пакет isc-dhcp-server с помощью следующей команды в терминале: sudo apt-get install isc-dhcp-server
Затем, нужно настроить файл /etc/dhcp/dhcpd.conf, добавив в него настройки для диапазона IP-адресов, который будет назначаться DHCP. Пример настроек:
- subnet 192.168.0.0 netmask 255.255.255.0 {
- range 192.168.0.10 192.168.0.100;
- option routers 192.168.0.1;
- option domain-name-servers 192.168.0.1, 8.8.8.8;
- option domain-name «local-network»;
- option broadcast-address 192.168.0.255;
- default-lease-time 86400;
- max-lease-time 604800;
- }
После изменений в файле dhcpd.conf нужно перезапустить DHCP-сервер командой: sudo service isc-dhcp-server restart
Теперь вы можете присоединить другие устройства к сети и DHCP автоматически назначит им IP-адреса из указанного диапазона.
Things You Will Need
To follow this article, you will need the following:
- Raspberry Pi 3 or Raspberry Pi 4
- Micro-USB (Raspberry Pi 3) or USB Type-C (Raspberry Pi 4) power adapter
- 16 GB or 32 GB microSD card with Raspberry Pi OS flashed
- Network connectivity on the Raspberry Pi
- Laptop or desktop computer for VNC remote desktop access or SSH access
NOTE: If you do not want to access your Raspberry Pi system remotely via SSH or VNC, you will need to connect a monitor, a keyboard, and a mouse to your Raspberry Pi system, as well. I will not need any of these, as I will be connecting to my Raspberry Pi system remotely via VNC or SSH. My setup is called the headless setup of Raspberry Pi.
If you need any assistance with flashing the Raspberry Pi OS image on the microSD card, check out the article How to Install and Use Raspberry Pi Imager at linuxhint.com.
If you are a Raspberry Pi beginner and you need assistance installing Raspberry Pi OS on your Raspberry Pi system, check out the article How to Install Raspberry Pi OS on Raspberry Pi 4 at linuxhint.com.
Also, if you need any assistance with the headless setup of Raspberry Pi, check out the article How to Install and Configure Raspberry Pi OS on Raspberry Pi 4 Without External Monitor at linuxhint.com.
Alternatives to DNSMasq as DHCP Server on Raspberry Pi
As explained at the beginning, DNSMasq is the easiest way to get a basic DHCP server running on Raspberry Pi, but it’s not the only option. You might want something more complex, with more features or a better interface. I got you covered below with other solutions you can try.
Wireless Router with Firewall
My first suggestion is to do something similar but use the two interfaces (if you have a recent model). For example, you can use your Raspberry Pi 3B+ or 4 as a wireless access point, set up the DHCP server on this interface and even add some security features with a firewall. The Ethernet card will be used to access the Internet.
That could be a great project to add a guest Wi-Fi network in a small business, but whether you’re doing this for a valid reason or just for fun, it’s an interesting project to learn a few network skills.
I have an in-depth article explaining all the steps to put this into practice, from the conception to the installation and configuration of everything. I highly recommend checking it out, even if you just need some clarification about this article.How to use Raspberry Pi as a Wireless Router with Firewall.


Pi-Hole
Pi-Hole is a well-known ad-blocker, free and open-source that can be installed on Raspberry Pi.Most of the time, it will be only used as your DNS server, and each request will be filtered to check if it’s an ad or not.
The installation is pretty easy: one command line and a few questions to answer.Once installed, you’ll have access to a web interface with many configuration options. One of them allows you to enable a DHCP server in a few clicks.

If having a web interface to configure everything is important to you, that’s probably the best option.You can configure everything here, and you can see and set DHCP leases just below.
Want to give it a try? Check out my tutorial on how to set up Pi-Hole in 5 minutes on your Raspberry Pi.And I also have a tutorial here on how to install Pi-Hole on Ubuntu, if you prefer using Ubuntu on a Raspberry Pi or another computer.
Recently, AdGuard is becoming more and more popular and do similar things. You can read more about it here: Getting Started With AdGuard Home On Raspberry Pi (vs Pi-Hole).
Love Raspberry Pi & writing?
Combine your passions and get paid.
Write for RaspberryTips!
ISC-DHCP-Server
Another option is to use ISC-DHCP-Server, eventually coupled with Bind for the DNS server. It should work on Raspberry Pi, but it’s a bit more complicated to configure these services, so I don’t recommend using them.
If you have an important network where you need a more advanced solution, the Raspberry Pi is probably not the best option for you anyway. So, even if ISC-DHCP-Server is often used on Linux, I don’t think we need it on Raspberry Pi, DNSMasq is perfect in this case.
Also, for more important networks, Pfsense is not (yet?) available on Raspberry Pi, but as explained in my article here, there are still great firewall options that you can use on Raspberry Pi.
Установка minidnla
Ставим приложение
Правим конфиг
раскоментируем строчку чтобы не запускать от рута
Прописываем списком все папки где лежат наши медиа файлы (могут быть разбросаны в разных папках и на разных дисках)
можно там прописывать сразу и тип файлов:
A-аудио P-картинки V-видео PV-картинки и видео,
если не указывать то minidlna сам определит тип файлов
Прописываем в конфиг папку, в которой будет хранится кеш-база медиа-ресурсов (чтобы не насиловать SD карту, прописываем на HDD), предварительно создав каталог на HDD.
Если нужно все папки выше указанные собрать в одну корневую, а не по отдельности то прописываем
Чтобы телек долго не ждал пока появится сервер в списке медиа ресурсов, прописываем чтобы minidnla каждые 15 секунд кричал в сеть что он работает
Рестартуем сервис
Добавляем генерацию превьюшек для видео
Создаем файл со скриптом:
Запускаем скрипт, добавляя параметром каталог с видео, сгенерируются файлы превьюшек с таким же именем что и видео.
Configure a Static Ip Addresses on Ethernet
If you want to set a static IP for your raspberry pi 3 or other versions where you use ethernet or wifi, try running the following command:
sudo nano /etc/dhcpcd.conf
Then write down the following lines at the top of your code:
- interface eth0
- static ip_address=192.168.1.XX/24
- After that, write static routers=192.168.1.1 on the next line
- Then, static domain_name_servers=192.168.1.1 on the next one.
- Lastly, type sudo reboot, and run the program.
Remember: you need to do this for all the new Jessie updates.
However, leave the lines /etc/network/interfaces alone. Now, to check if the assigned code worked, open any browser and enter your router address.
Once it opens up, double-check if your Raspberry Pi comes up as ‘Static.’ If it does, this means your configuration setup is working.
Установка сервера OpenVPN
Устанавливаем PiVPN
при установке спросит пароль, потом захочет статический ip (если настраивали ранее, то просто соглашаться), выбираем пользователя, которому настроить VPN соединение (пользователей можно будет потом добавить из командной строки
потом установщик будет пугать что без автоматических обновлений (unattended upgrades) будет несекьюрно и предложит их включить, нажимаем Yes.
Потом выбираем какой протокол будем использовать UDP или TCP (наш выбор UDP).
Далее вводим номер порта на котором будет слушать VPN сервер (лучше нестандартный).
Далее выбираем использовать ли лучшую защиту (если у нас клиентские версии openvpn от 2.4), нам старье не нужно, поэтому нажимаем Yes.
После этого выбираем скольки битным шифрованием ECDSA шифровать соединение (256 соответствует 3072 бит RSA), выбираем золотую середину 384 между рекомендуемым размером и размером для параноиков.
Далее выбираем внешний белый IP для соединения снаружи или динамический DNS если белого IP у нас нет.
Затем выбираем провайдера DNS для подключаемых клиентов VPN (есть готовый список или можно забить свой), просто не паримся и выбираем Google, он и так о нас всё знает.
Далее на запрос Custom Search Domain отвечаем No.
На этом установка закончена и будет предложено ребутнуть систему.
Можно прописать в файле /etc/openvpn/server.conf версию протокола, добавив 4.
Далее создаем .ovpn файл который включает в себя ключ доступа, и который нужен для vpn клиента:
далее будет запрошено имя пользователя, срок действия сертификата (1080 дней по умолчанию), пароль для ключа, который будет запрашиваться при каждом подключении по VPN (защита на случай если сопрут ключ).
Сгенерированный файл сохраняется в каталоге /home/Пользователь/ovpns.
Перетаскиваем файл конфигурации на устройство с клиентом и настраиваем на роутере форвардинг порта на внутренний ip raspberry.
How to Give Raspberry Pi Its Personalized Static IP Address
If you want to set a raspberry pi static IP, you will need to open your Terminal or do it via SSH. After that, you should run the following command on text editor:
sudo nano /etc/dhcpcd.conf file
Then, scroll down the bottom by holding down on your keyboard. After that, you can copy and paste the following command. Just change the details of numbers that are bolded to any IP that you wish to have:
- interface eth0
- static ip_address=192.168.0.2/24
- static routers=192.168.0.1
- static domain_name_servers=192.168.0.1
- interface wlan0
- static ip_address=192.168.0.2/24
- static routers=192.168.0.1
- static domain_name_servers=192.168.0.1
If you live at your house, the part of routers= and domain name servers will both be equal to the IP addresses of your raspberry pi router. Otherwise, the name server will be your DNS records’ IP, and your router address will be the IP of the gateway.
Now press Ctrl X and Y on your keyboard to save changes. Afterward, reboot Raspberry Pi, and your Static IP address will be ready!
If you want to check your raspberry pi static IP, do so by opening Terminal or SSH and running the “ifconfig” file.
Шаг 2. Авторизуем ID (доступно-после-активации-тарифа)
Авторизация — это успешная привязка Raspberry Pi или сервера на Linux к статическому IP адресу после создания и включения в нем PPTP-клиента (один из протоколов передачи данных). Все необходимые сведения, включая Логин и Пароль, есть в табличке Настройки PPTP-клиента.
По истечении 10 минут после того, как был создан PPTP-клиент или изменен протокол авторизации, проверьте в статус Устройства. Видите надпись «Подключено»? Отлично, теперь можно переходить к следующему «Шагу 3. Проброс портов».
Если же в течение 15 минут подключение не произошло, то стоит обратиться к списку Частых ошибок авторизации. Они находятся ниже блока Настройки PPTP-клиента в этом Шаге.
и — это ip-адреса для настройки PPTP-клиента и они не используются для удаленного доступа.
Данные, написанные , полностью выделяются и копируются в буфер обмена по клику. Вам остается лишь вставить их SSH консоль ![]()
Дальнейшие действия выполняем через SSH консоль.
- Установите PPTP-клиент, если ранее этого не делали. Выполните команду:
- Скопируйте в SSH консоль следующий код для создания файла авторизации:
- Включите автоматическую авторизацию и переподключение. Скопируйте в консоль код и нажмите Enter
- Добавьте задание в Cron запускать /birevia/ping_check.sh каждые 5 минут.
Следующую команду можно выполнять только один раз! Если Вы ранее уже выполняли эту команду на этом ПК, то пропустите этот пункт.
Что-то пошло не так? Не отчаивайтесь! Нажмите на ошибку и узнаете ее решение:
- После авторизации пропал доступ к интернету
Это случилось, потому что через наш IP адрес заблокирован выход в интернет (). В конфигурационном файле PPTP-клиента должен находиться параметр . В графическом интерфейсе найдите и отключите пункты наподобие:
- Выбран неправильный протокол
Проверьте созданного подключения. Должно быть PPTP. Если это не так, удалите подключение и создайте PPTP-клиент заново. Все получится!
- В Системном журнале мелькает строчка
Это значит, что существует какая-то проблема с пропуском PPTP-трафика со стороны оператора, через модем или вышестоящий роутер. Решить ее можно такими способами:
- Несколько раз отключите и включите питание модема;
- Включите в настройках вышестоящего роутера или модема;
- Разрешите пропуск протокола в межсетевом экране роутера/ПК, или отключите все правила и перезагрузите роутер/ПК;
- Удалите созданный PPTP-клиент. В выберите другой Протокол, откройте заново или обновите Инструкцию по авторизации. Проделайте все шаги сначала.
- Ошибка в , или
Внимательно копируйте все данные из таблички .
- Самая распространенная ошибка
В графиеском интерфейсе не расставили все галочки как в примере или в раскрывающихся списках активны другие параметры.
- Не подключается.
Почти всегда решение такое же, как и у третьей ошибки. Дерзайте!
- Все работало и перестало
Сделайте , про который написано в самом низу страницы. Полный порядок диагностики ищите .
For Static IP on LAN Connection
First, you need to find settings for your local network. You can easily do that with Raspberry Pi while using the DHCP server. However, the commands for them might differ on other systems.
Start by running up -4 addr show | grep global. This will give you the following IP addresses:
- inet 10.1.1.30/24 brd 10.1.1.255 scope global eth0
- inet 10.1.1.31/24 brd 10.1.1.255 scope global wlan0
Here, the first result is your Pi’s IP address on your network, whereas the part which comes after the slash is your network’s size.
On the other hand, the second address is the broadcast address of your network.
Then to find the IP address of your gateway or router, run the following
- IP route | grep default | awk ‘{print $3}’
- 10.1.1.1
Lastly, write down the DNS server IP address that is often similar to your gateway.
After that, run the following:
- cat /etc/resolv.conf
- # Generated by resolvconf
- nameserver 10.1.1.1
When that’s done, choose any method from the following, which is quite common for Raspbian.
a) The dhcpcd.conf File Method
Let /etc/network/interfaces be at the default settings. It would help if you changed/etc/dhcpcd.conf as:


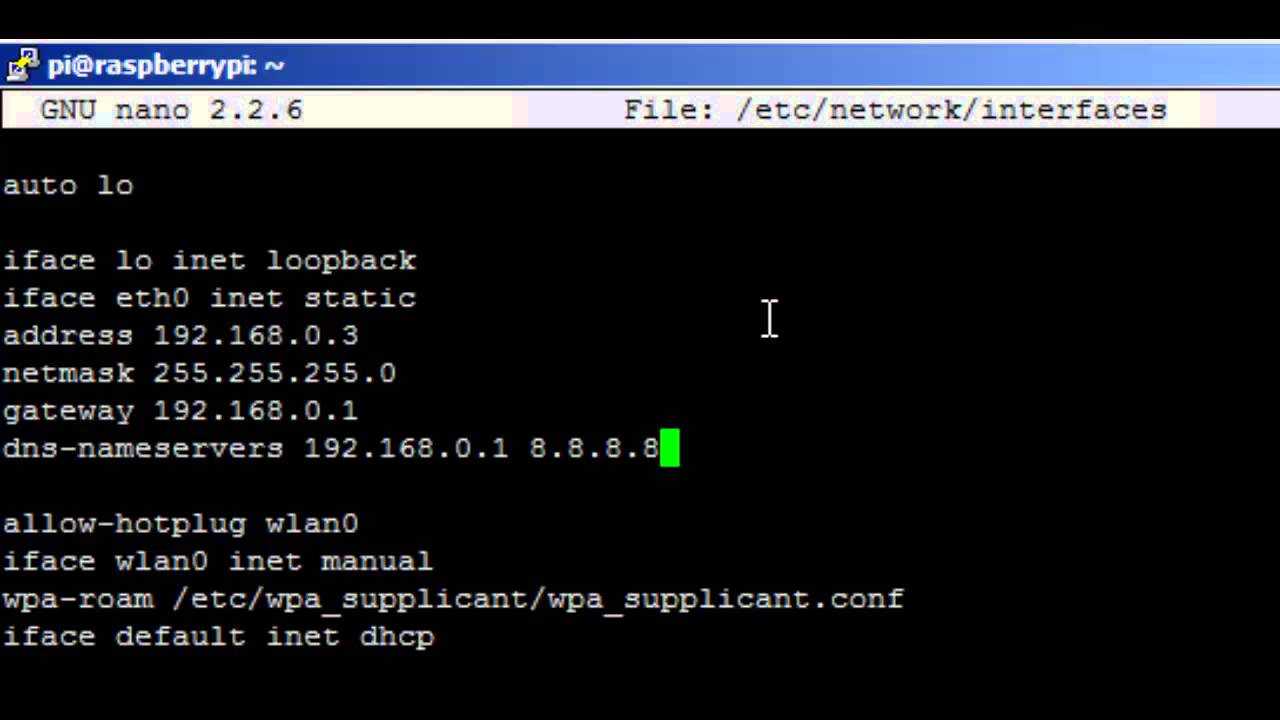
(This is one of the examples that configure your raspberry pi static address, DNS, and routes.)
- interface eth0
- static ip_address=10.1.1.30/24
- static routers=10.1.1.1
- static domain_name_servers=10.1.1.1
Here’s another example for interface wlan0
- interface wlan0
- static ip_address=10.1.1.31/24
- static routers=10.1.1.1
- static domain_name_servers=10.1.1.1
b) Network Interfaces Method
We do not recommend using this method because it will only work if you have disabled the DHCP client daemon.
You can configure your raspberry pi static IP address by running the following:
- auto eth0
- iface eth0 inet static
- address 10.1.1.30
- netmask 255.255.255.0
- gateway 10.1.1.1
- allow-hotplug wlan0
- iface wlan0 inet static
- address 10.1.1.31
- netmask 255.255.255.0
- gateway 10.1.1.1
- WPA-conf /etc/wpa_supplicant/wpa_supplicant.conf
You can also try to specify your raspberry pi DNS server name. However, it is not necessary. You can either setup eth0, or wlan0.
After that, you need to disable your DHCP client daemon by switching to Debian networking by running the following command sudo:
sudo systemctl disable dhcpcd
sudo systemctl enable networking
Then lastly, reboot to make the changes effective by typing the following:
sudo reboot
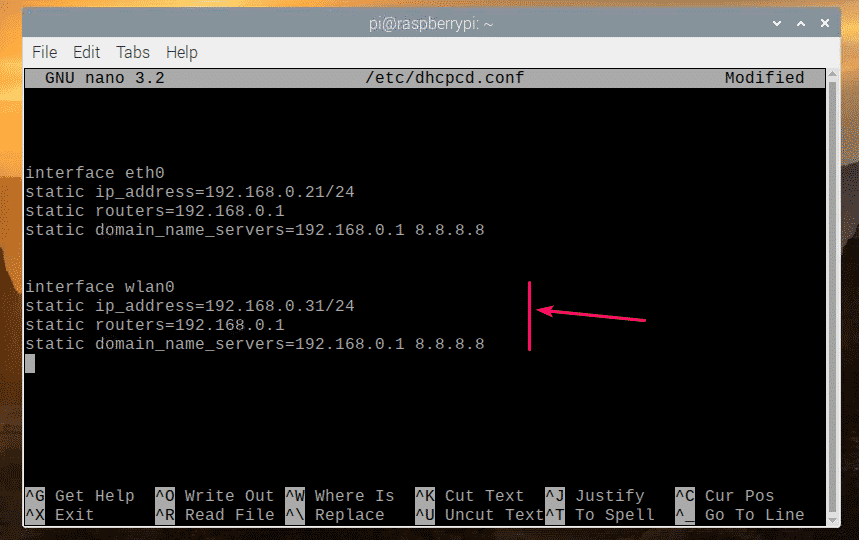
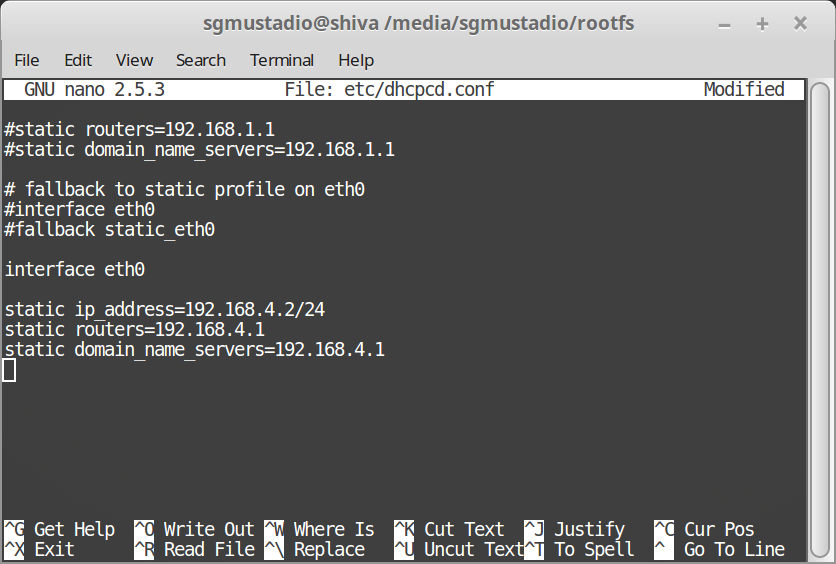
Step4: Set up the dhcpcd.conf file
Open /etc/dhcpcd.conf with your favorite text editor. scroll down until you see the following commented out lines of code.
# Example static IP configuration:
#interface eth0
#static ip_address=192.168.11.13
#static routers=192.168.11.1
#static domain_name_servers=8.8.8.8
Now copy the following snippet and put it right under the code shown above.
interface wlan0
static ip_address=192.168.11.13
static routers=192.168.11.1
static domain_name_servers=8.8.8.8
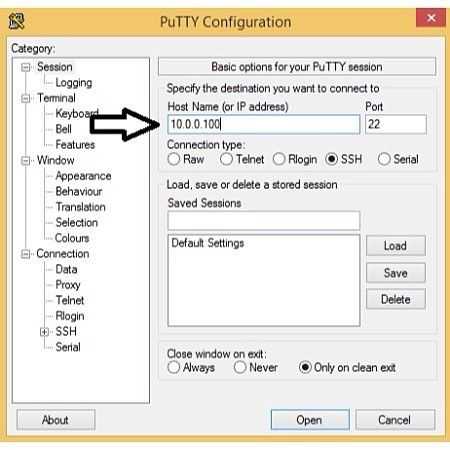
You will need to set up the static ip_address and static routers tag to fit your network setup. Don’t forget to save the file. And, if you plan to use SSH, also don’t forget to enable SSH via sudo raspi-config! Now you should be able to connect to your Raspberry Pi via SSH by using the static IP you’ve just set up.
In the case you never used SSH before, here’s a hint on how to get started. Download putty (if you’re on Windows) and open it.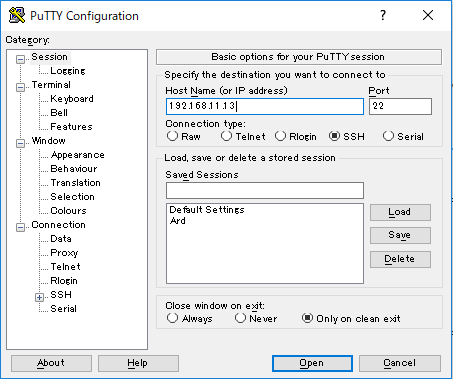 You will see a dialog box like the one above. Writing your Raspberry Pi’s static IP in the Host Name field will be all that’s needed to start a SSH session.
One last thing. Now that you have enabled SSH it is a very good idea to change your Raspberry Pi’s password. If you have not already done this, do this now. The password can be changed by typing passwd.
Set a static IP in the command line
On a Lite edition of Raspberry Pi OS, a static IP address can be configured in /etc/dhcpcd.conf. It will force the system to use this IP address instead of the one assigned by the DHCP server.
Here are the steps to follow:
- Open the configuration file with:
- Paste these lines at the end of the file:
- Change the interface if needed (eth0 for a wired connection, wlan0 with Wi-fi).
- Change the IP addresses according to your network.The first one is the IP address you want to use, followed by the network mask (/24 in most cases).The second is your gateway (the Internet router in general).And finally, the DNS server (often the router if you didn’t change it).
And that’s it. Once, you have a good idea of your network configuration and know where to change the Raspberry Pi configuration, it’s not that complicated.
I hope this article was useful, and if you want to learn more about network administration, you should check these other tutorials on the website:
- How to use Raspberry Pi to monitor network?
- Network Boot With Raspberry Pi: Everything you need to know
- How to use your Raspberry Pi as a DNS Server (And Speed Up Internet)
The boot Folder
Edit this on GitHub
In a basic Raspberry Pi OS install, the boot files are stored on the first partition of the SD card, which is formatted with the FAT file system. This means that it can be read on Windows, macOS, and Linux devices.
When the Raspberry Pi is powered on, it loads various files from the boot partition/folder in order to start up the various processors, then it boots the Linux kernel.
Once Linux has booted, the boot partition is mounted as .
Boot Folder Contents
bootcode.bin
This is the bootloader, which is loaded by the SoC on boot, does some very basic setup, and then loads one of the files. is not used on the Raspberry Pi 4, because it has been replaced by boot code in the .
These are binary blobs (firmware) that are loaded on to the VideoCore GPU in the SoC, which then take over the boot process.
is the basic firmware, also includes camera drivers and codecs, can be used for debugging purposes and is a cut-down version of the firmware. removes support for hardware blocks such as cameras, codecs and 3D as well as having initial framebuffer limitations. The cut-down firmware is automatically used when is specified in .
, , and are equivalent firmware files specific to the Raspberry Pi 4-series (Model 4B, Pi 400, Compute Module 4 and Compute Module 4S).
More information on how to use these files can be found in .
ssh or ssh.txt
When this file is present, SSH will be enabled on boot. The contents don’t matter, it can be empty. SSH is otherwise disabled by default.
wpa_supplicant.conf
This is the file to configure wireless network settings (if the hardware is capable of it). Edit the country code and the network part to fit your case. More information on how to use this file can be found in .
Device Tree files
There are various Device Tree blob files, which have the extension . These contain the hardware definitions of the various models of Raspberry Pi, and are used on boot to set up the kernel .
Kernel Files
The boot folder will contain various image files, used for the different Raspberry Pi models:
| Filename | Processor | Raspberry Pi model | Notes |
|---|---|---|---|
|
kernel.img |
BCM2835 |
Pi Zero, Pi 1 |
|
|
kernel7.img |
BCM2836, BCM2837 |
Pi Zero 2 W, Pi 2, Pi 3 |
Later Pi 2 uses the BCM2837 |
|
kernel7l.img |
BCM2711 |
Pi 4, Pi 400 |
Large Physical Address Extension (LPAE) |
|
kernel8.img |
BCM2837, BCM2711 |
Pi Zero 2 W, Pi 2, Pi 3, Pi 4, Pi 400 |
. Raspberry Pi 2 with BCM2836 does not support 64-bit kernels. |
| Note | The architecture reported by is for systems running a 32-bit kernel (i.e. everything except ), and for systems running a 64-bit kernel. The in the case refers to the architecture being little-endian, not as is indicated by the in the filename. |
The sub-folder contains Device Tree overlays. These are used to configure various hardware devices that may be attached to the system, for example the Raspberry Pi Touch Display or third-party sound boards. These overlays are selected using entries in — see .
Step1: Check the available interfaces
On your Raspberry Pi, type ifconfig to get all the available network interfaces. If you are using a Raspberry Pi 3, you should see the wlan0 interface somewhere in the output.
eth0: flags=4099<UP,BROADCAST,MULTICAST>  mtu 1500
        ether b8:27:eb:7d:ab:a7  txqueuelen 1000  (Ethernet)
        RX packets 0  bytes 0 (0.0 B)
        RX errors 0  dropped 0  overruns 0  frame 0
        TX packets 0  bytes 0 (0.0 B)
        TX errors 0  dropped 0 overruns 0  carrier 0  collisions 0

lo: flags=73<UP,LOOPBACK,RUNNING>  mtu 65536
        inet 127.0.0.1  netmask 255.0.0.0
        inet6 ::1  prefixlen 128  scopeid 0x10
        loop  txqueuelen 1  (Local Loopback)
        RX packets 0  bytes 0 (0.0 B)
        RX errors 0  dropped 0  overruns 0  frame 0
        TX packets 0  bytes 0 (0.0 B)
        TX errors 0  dropped 0 overruns 0  carrier 0  collisions 0

wlan0: flags=4163<UP,BROADCAST,RUNNING,MULTICAST>  mtu 1500
        inet 192.168.11.13  netmask 255.255.255.0  broadcast 192.168.11.255
        inet6 fe80::5a23:446c:74dd:b255  prefixlen 64  scopeid 0x20
        ether b8:27:eb:28:fe:f2  txqueuelen 1000  (Ethernet)
        RX packets 84  bytes 8120 (7.9 KiB)
        RX errors 0  dropped 0  overruns 0  frame 0
        TX packets 98  bytes 15493 (15.1 KiB)
        TX errors 0  dropped 0 overruns 0  carrier 0  collisions 0
Настройка статических IP-адресов графически
Если вы используете OS Raspberry Pi в среде рабочего стола, вы можете очень легко настроить статический IP-адрес для желаемого сетевого интерфейса из графической среды рабочего стола.
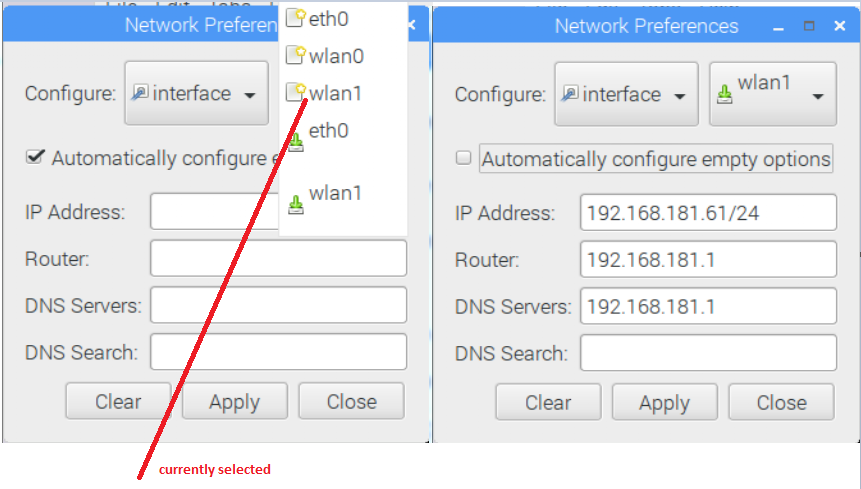
Щелкните правой кнопкой мыши (ПКМ) значок сети и выберите «Параметры беспроводной и проводной сети».
Убедитесь, что в раскрывающемся меню выбран интерфейс.
Щелкните пустое раскрывающееся меню.
Выберите сетевой интерфейс, который вы хотите настроить.
- eth0 — проводной сетевой интерфейс ethernet.
- wlan0 — интерфейс беспроводной (Wi-Fi) сети.
Предположим, вы хотите настроить сетевой интерфейс wlan0 Wi-Fi вашей системы Raspberry Pi.
После выбора сетевого интерфейса, который вы хотите настроить, вы должны увидеть следующее окно.
Введите желаемый статический IP-адрес, адрес шлюза (маршрутизатора), адрес DNS-сервера и т. д.
При желании вы также можете ввести IP-адрес в нотации CIDR, например 192.168.0.110/24 . Здесь 24 — длина маски подсети. 24 эквивалентен маске подсети 255.255.255.0 .
Чтобы добавить несколько адресов DNS-серверов, просто разделите их пробелом.
Если вам известен только IP-адрес, который вы хотите установить, и ничего больше о вашей домашней или офисной сети, то при выборе параметра Автоматически настраивать пустые параметры будет запрашиваться конфигурация сети с DHCP-сервера и будет настроена только сетевая информация, которую вы здесь не указали.
Если вам известна вся необходимая информация о сети, мы рекомендуем вам снять флажок «Автоматически настраивать пустые параметры», поскольку это устраняет необходимость в DHCP-сервере в сети.
Если вам не нужен IPv6, установите флажок «Отключить IPv6».
Когда вы закончите, нажмите Применить.
Затем нажмите «Закрыть», чтобы закрыть окно «Сетевые настройки».
Чтобы изменения вступили в силу, перезагрузите систему Raspberry Pi с помощью следующей команды:
$ sudo reboot
После загрузки Raspberry Pi желаемый статический IP-адрес должен быть установлен на желаемом сетевом интерфейсе.
Вы можете подтвердить это с помощью следующей команды:
$ ip a
Частный и публичный IP
Общедоступный IP-адрес используется для идентификации вашей локальной сети в более широком Интернете. Обычно это меняется каждый раз, когда ваш маршрутизатор подключается к Интернету, хотя вы можете сделать его статическим в зависимости от вашего интернет-провайдера.

![Setting a static ip address on a raspberry pi [with screenshots]](https://nephros-crimea.ru/wp-content/uploads/f/a/3/fa3ccc5317762f9679b55337a07e4b98.jpeg)


Вы можете найти общедоступный IP-адрес в системе Linux, такой как Raspberry Pi OS, введя специальную команду терминала или просто выполнив поиск в Интернете по запросу «Какой у меня IP?». Это требуется только в том случае, если вы собираетесь подключиться к устройству за пределами вашей сети, о чем мы здесь не будем говорить.
Вместо этого мы смотрим на частные IP-адреса, используемые для идентификации каждого устройства в вашей локальной сети. Хотя для той же цели можно зарезервировать определенный адрес для вашего Raspberry Pi в настройках вашего беспроводного маршрутизатора, здесь мы покажем вам, как установить статический IP-адрес из самого Raspberry Pi.
Prerequisites: Get the network configuration
I put the word “random” in quotation marks in my introduction because there is nothing truly random with computers. Before picking an IP address and trying to configure it on the Raspberry Pi, we need to take a few minutes to study the current network.
Get the IP address of your router
On most networks, especially at home, the main router is your Internet provider box. It provides Internet access for all devices and is often the DHCP server too (the main equipment in charge of assigning IP addresses to all devices).
By accessing its web interface, you can generally get a clearer overview of the network configuration.If you don’t know its IP address, it should be mentioned as “gateway” in the network configuration of any computer connected to the Internet. It’s often the DNS server too.
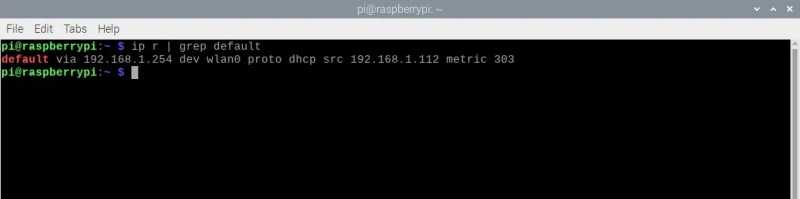
From a Raspberry Pi or Linux computer, you can use this command to find the IP address:

In my case, my router IP address is 192.168.222.1 (because I configured it). But in most cases, it will be 192.168.1.1 or 192.168.1.254.
Once you have the IP address, you can try to access the web interface via your web browser. It will be password protected, so you may need to find your Internet provider documentation to access it.
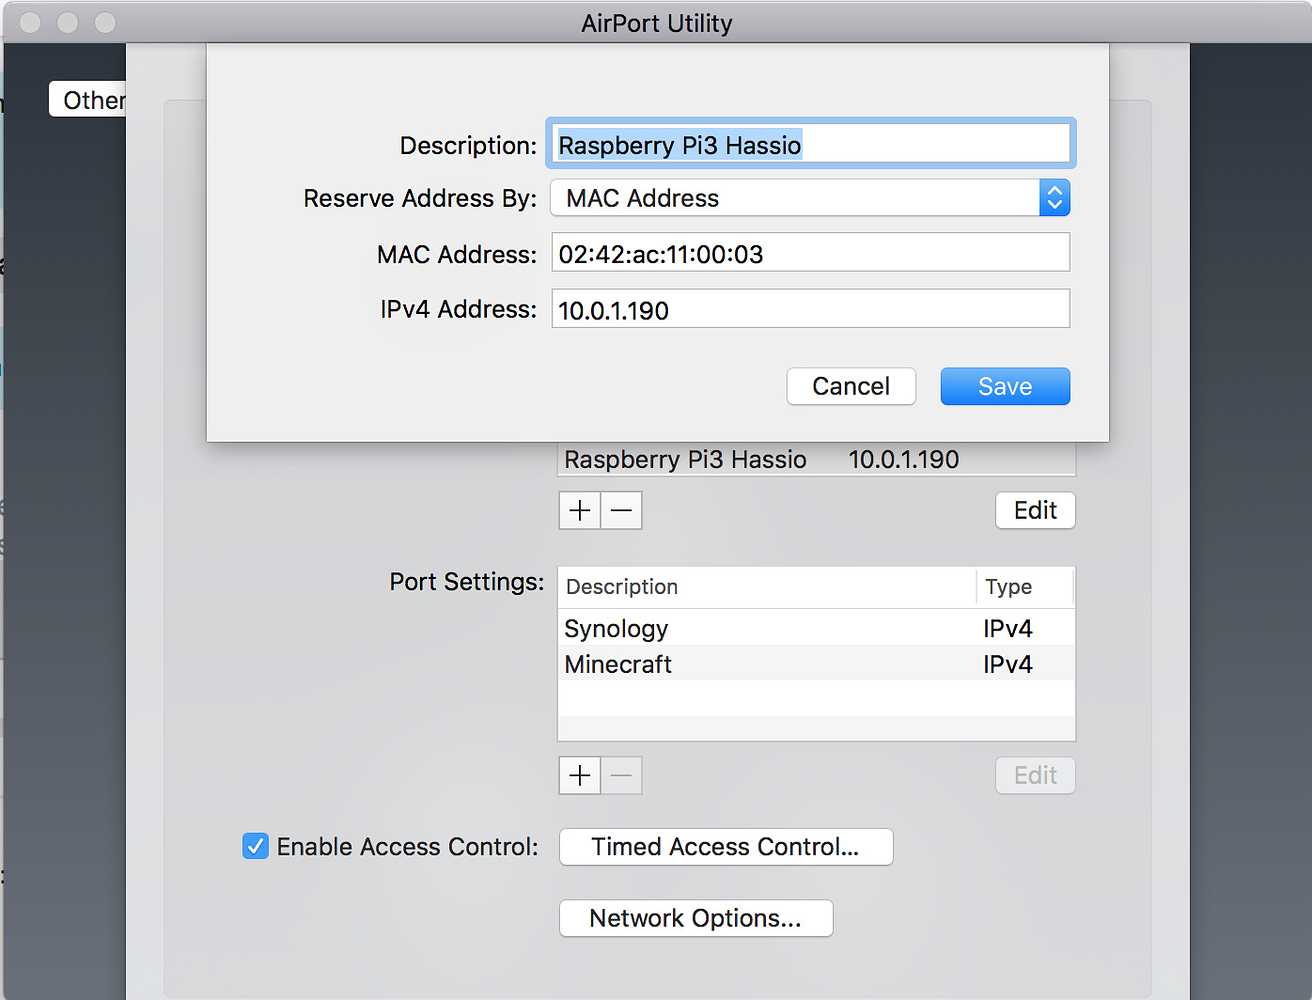
Set a static IP for the Raspberry Pi on the router
If the network main router is also the DHCP server, the easiest way to set a static IP address for the Raspberry Pi is to use its web interface. We call this a DHCP lease, and it’s possible to set a static lease for any equipment already connected to the network.
The interface will be slightly different for each provider and router brand, but in my case, it looks like this:

I can pick the name of any device on my network, and set a static IP address. I can also enter a MAC address if the device is not listed (here is how to find the MAC address on Raspberry Pi).
If you can find something similar on your router, it would be the easiest solution. Nothing to change on the Raspberry Pi, and even when you reinstall the Raspberry Pi, it will stay with the same IP address.It will also avoid most issues as it’s configured directly on the DHCP server.
Get the DHCP range
If you can’t or don’t want to use this recommended method, you need a bit more information before configuring the Raspberry Pi manually.
First, you need to find the DHCP range. In general, you have a network that goes from 192.168.1.1 to 192.168.1.254, but the DHCP range is maybe only from 1.100 to 1.150. This will be useful to avoid any conflict.
We don’t want to set the Raspberry Pi IP address to 1.110 if the DHCP may assign it to your computer.
You can also find this information in your DHCP server configuration (so your Internet provider router in most cases). For me, it looks like this:

Well, I guess my configuration is not typical, as it covers all the IP addresses, probably because I changed it.A smart move, if you have something similar, would be to reduce the range (from 222.2 to 222.100 for example).Anyway, we’ll do a quick audit after that to choose a free IP address.
If you find that your DHCP range is from 1.100 to 1.150 for example, we’ll just avoid picking an IP address in this range. You can for example use 1.160 if it’s not taken by another device with a static IP.How do you know? That’s the last step before changing the Raspberry Pi configuration.
Love Raspberry Pi & writing?
Combine your passions and get paid.
Write for RaspberryTips!
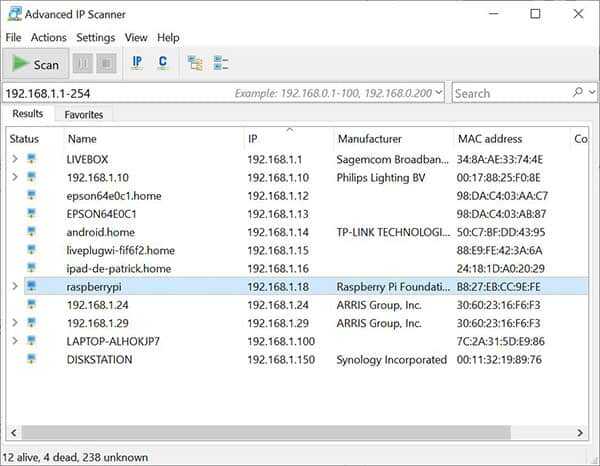
Get a list of the currently used IP addresses
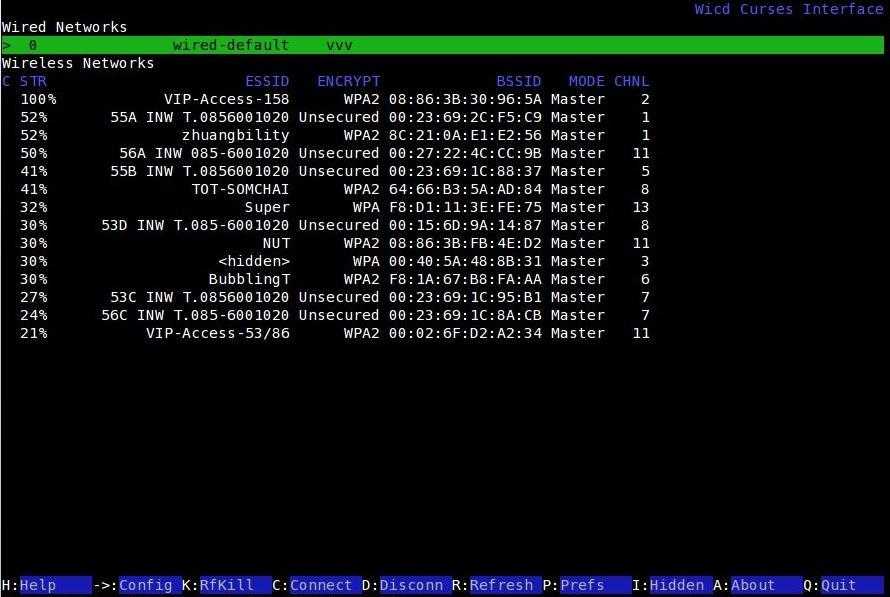
To be safe, it’s a good practice to get a list of the IP addresses that are currently used on the network. This can be done from the router interface directly, or via a network scan.
On the router configuration page, you may have access to a list of all the computers and other devices connected to your network, with their current IP addresses. Not only the one assigned by the DHCP server but all of them.
This will give a good overview of the current state of the network. If you can’t find this, don’t worry, you can also do a network scan.
From a Windows computer, you can use the Advanced IP Scanner tool, which will give you something like:
And on Linux, you can install nmap with:And use it to do a network scan:So, for example:

In most cases, your DHCP server assigns IP addresses at the beginning of the range. In both examples, all IP addresses are given between 2 and 40. IP addresses 100 and 150 are static IPs.So, if I pick something like 200 for my Raspberry Pi, it should be safe (192.168.222.200).
At this point, you should know which IP address you’ll configure on your Raspberry Pi. I’ll give you 2 methods, one from the desktop environment, and the other one in the command lines.
Are you a bit lost in the Linux command line? Check this article first for the most important commands to remember and a free downloadable cheat sheet so you can have the commands at your fingertips.