
Дополнительные методы устранения ошибки
Если предыдущий способ не помог решить проблему, попробуйте выполнить следующие действия для устранения ошибки 0x80248007:
- Воспользуйтесь встроенным средством устранения неполадок обновления. В Windows 11 его можно найти в Настройки — Система — Устранение неполадок — Другие средства устранения неполадок — Центр обновления Windows. В Windows 10: Настройки — Обновление и безопасность — Устранение неполадок (в списке слева) — Дополнительные средства устранения неполадок — Центр обновления Windows.
- Если по каким-то причинам вы не можете получить доступ к средству устранения неполадок в интерфейсе «Параметры», это же средство устранения неполадок Центра обновления можно загрузить с сайта Microsoft в виде отдельного файла: https://aka.ms/wudiag
- Загружаемые обновления Windows также можно загрузить вручную, просто найдите их номер KB в официальном каталоге обновлений и выполните загрузку — https://www.каталог.обновить.microsoft.com/Home.aspx, Затем запустите загруженный файл. Попробуйте выполнить эту процедуру с проблемным обновлением, это может решить проблему. Некоторые обновления при поиске в каталоге (в частности, обновления для Windows Defender) в списке поддерживаемых версий ОС указывают Windows 10, но не указывают Windows 11, но при этом являются таковыми для версии 11.
- Если при установке обновления драйвера какого-либо устройства возникает ошибка, вы можете скачать драйвер устройства с официального сайта производителя устройства (он может быть более новым), и вам не потребуется устанавливать его через Центр обновления.
- В редких случаях проблема может быть вызвана сторонним антивирусом, установленным на компьютере. Если у вас установлены сторонние антивирусные программы, попробуйте временно отключить их и переустановить обновление.
- Выполните восстановление репозитория компонентов Windows и восстановление системных файлов. По этой теме
- Восстановление репозитория компонентов Windows 11
- Восстановление целостности системных файлов Windows 11
- Восстановление хранилища компонентов Windows 10
- Восстановление системных файлов Windows 10
- Запустите проверку ошибок системного диска с помощью команды chkdsk C: /f Убедитесь, что на системном разделе диска (диск C) достаточно свободного места.
- Для опытных пользователей: попробуйте использовать инструмент Сброс обновления Windows.
3. Check If Windows Update Services Are Enabled
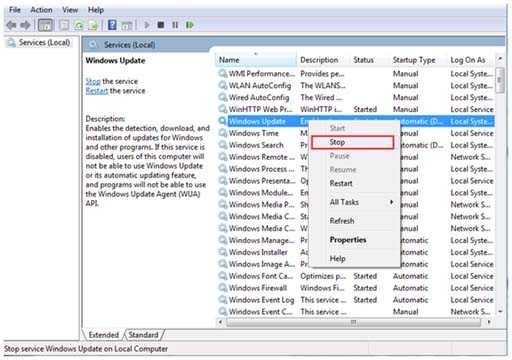
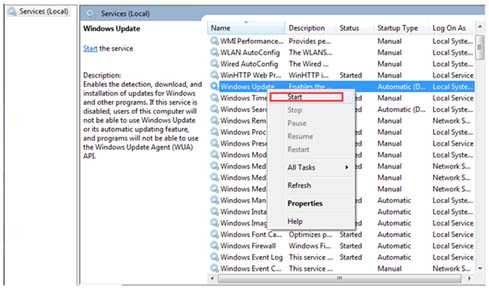
Various services need to be enabled for Windows updates to work correctly. The Windows Update service is the most obvious one, but there are others that also need to be running. So, make sure required update services are enabled and running like this:
- Open Services as specified in the opening steps of method two.
- Double-click Windows Update to view options for that service.
- If the service is disabled, select an Automatic startup type option on the drop-down menu shown directly below.
- Click the Start option for Windows Update.
- Select Apply to save the new service options.
- Press OK to close the Windows Update Properties.
Aside from Windows Update, there are quite a few other services to check. Repeat the above steps for the following services:
- Cryptographic Services
- Background Intelligent Transfer Service
- DCOM Server Process Launcher
- RPC Endpoint Mapper
- Windows Installer
- Windows Update Medic Services
- Application Identity
Üçüncü taraf bir virüsten koruma yazılımını devre dışı bırakın
Windows Defender yerine üçüncü taraf bir virüsten koruma programı kullanarak güncelleştirmeleri yüklerken sorun yaşayabilirsiniz. Bu, virüsten koruma yazılımı güncelleme dosyalarını yanlışlıkla tehdit edici veya güncellemeyle uyumsuz olarak işaretlerse meydana gelebilir.
Bunu önlemek için, güncelleme işlemi sırasında antivirüsünüzü geçici olarak devre dışı bırakmanız önerilir. Bazen, düzgün çalışmasını sağlamak için güncelleme tamamlandıktan sonra virüsten koruma yazılımınızı tamamen kaldırıp yeniden yüklemeniz gerekebilir.
Not: Üçüncü taraf antivirüs yazılımını bilgisayarınızdan nasıl kaldıracağınızı göstereceğiz.
Adım 1: basın Windows tuşu Klavyede şunu yazın Kontrol Paneli , Ve tıklayın açmak.
Adım 2: Programlar altında, tıklayın «Programı kaldır».
3. adıma geçin: Bir program seçin antivirüs Kimi istiyorsun Kaldır bilgisayarınızdan ve tıklayın Kaldırma.
Programı ve ilişkili dosya ve klasörleri buradan kaldırmak için talimatları izleyin. Her programın bilgisayardan kaldırmak için farklı bir işlemi olduğunu unutmamak önemlidir, bu nedenle buna göre ilerleyin.
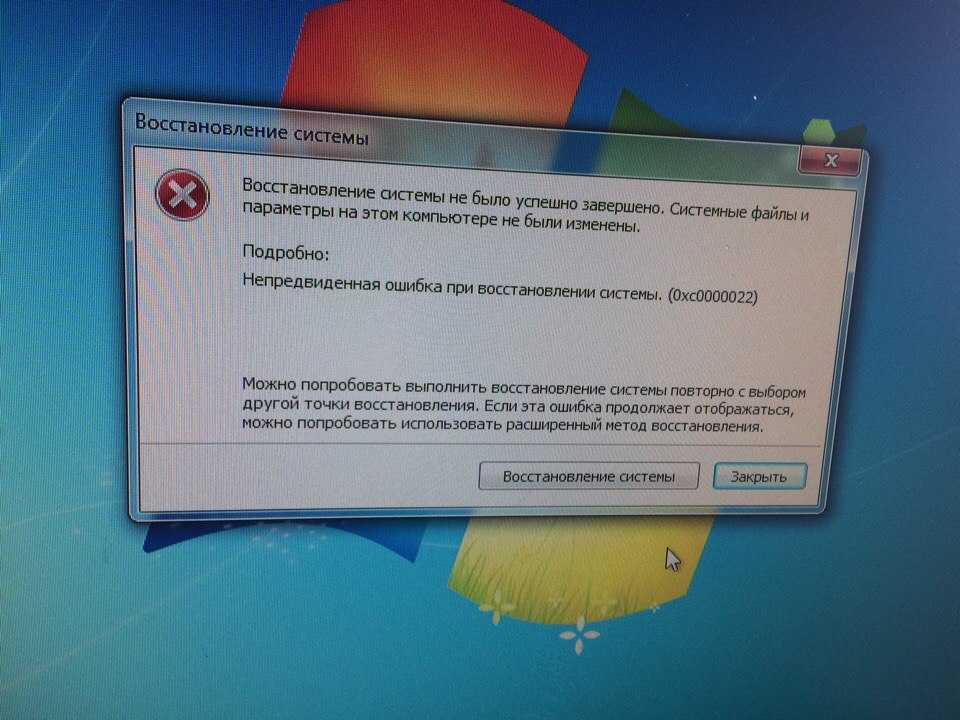
Восстановите Windows до более ранней даты
Восстановление системы может быть бесценным инструментом для исправления различных ошибок Windows. Этот инструмент эффективно восстанавливает Windows из резервной копии. Таким образом, вы можете восстановить свой компьютер до того времени, когда вам больше не нужно исправлять ошибку Центра обновления Windows 0x80248007.
Также обратите внимание, что при возврате Windows к предыдущему снимку системы (кроме точки восстановления) будут удалены приложения, установленные после даты точки. В этом случае может потребоваться переустановка некоторых пакетов приложений после отката операционной системы
Если это не проблема для вас, продолжайте и восстановите Windows до более раннего времени:
- Щелкните значок линзы на панели задач и введите Восстановить В поле поиска.
- Выберите результат поиска Создайте точку восстановления системы.
- Нажмите кнопку «Восстановление системы» на открывшейся вкладке.
- Нажмите «Далее», чтобы просмотреть доступные точки восстановления.
- Выберите самую старую точку восстановления, к которой вы можете получить доступ (которая, скорее всего, исправит ошибку 0x80248007) из доступных.
В качестве дополнительного шага нажмите кнопку Сканировать на наличие уязвимых приложений, чтобы отобразить окно точки восстановления системы, показывающее приложение, которое точка восстановления удаляет. Взгляните на подробности и нажмите «Закрыть», чтобы выйти.
- Нажмите «Далее» еще раз, чтобы выбрать вариант «Готово».
- Попробуйте проверить наличие новых обновлений Windows после восстановления системы.
Проверять Последние проблемы с обновлением Windows 10 и как их избежать.
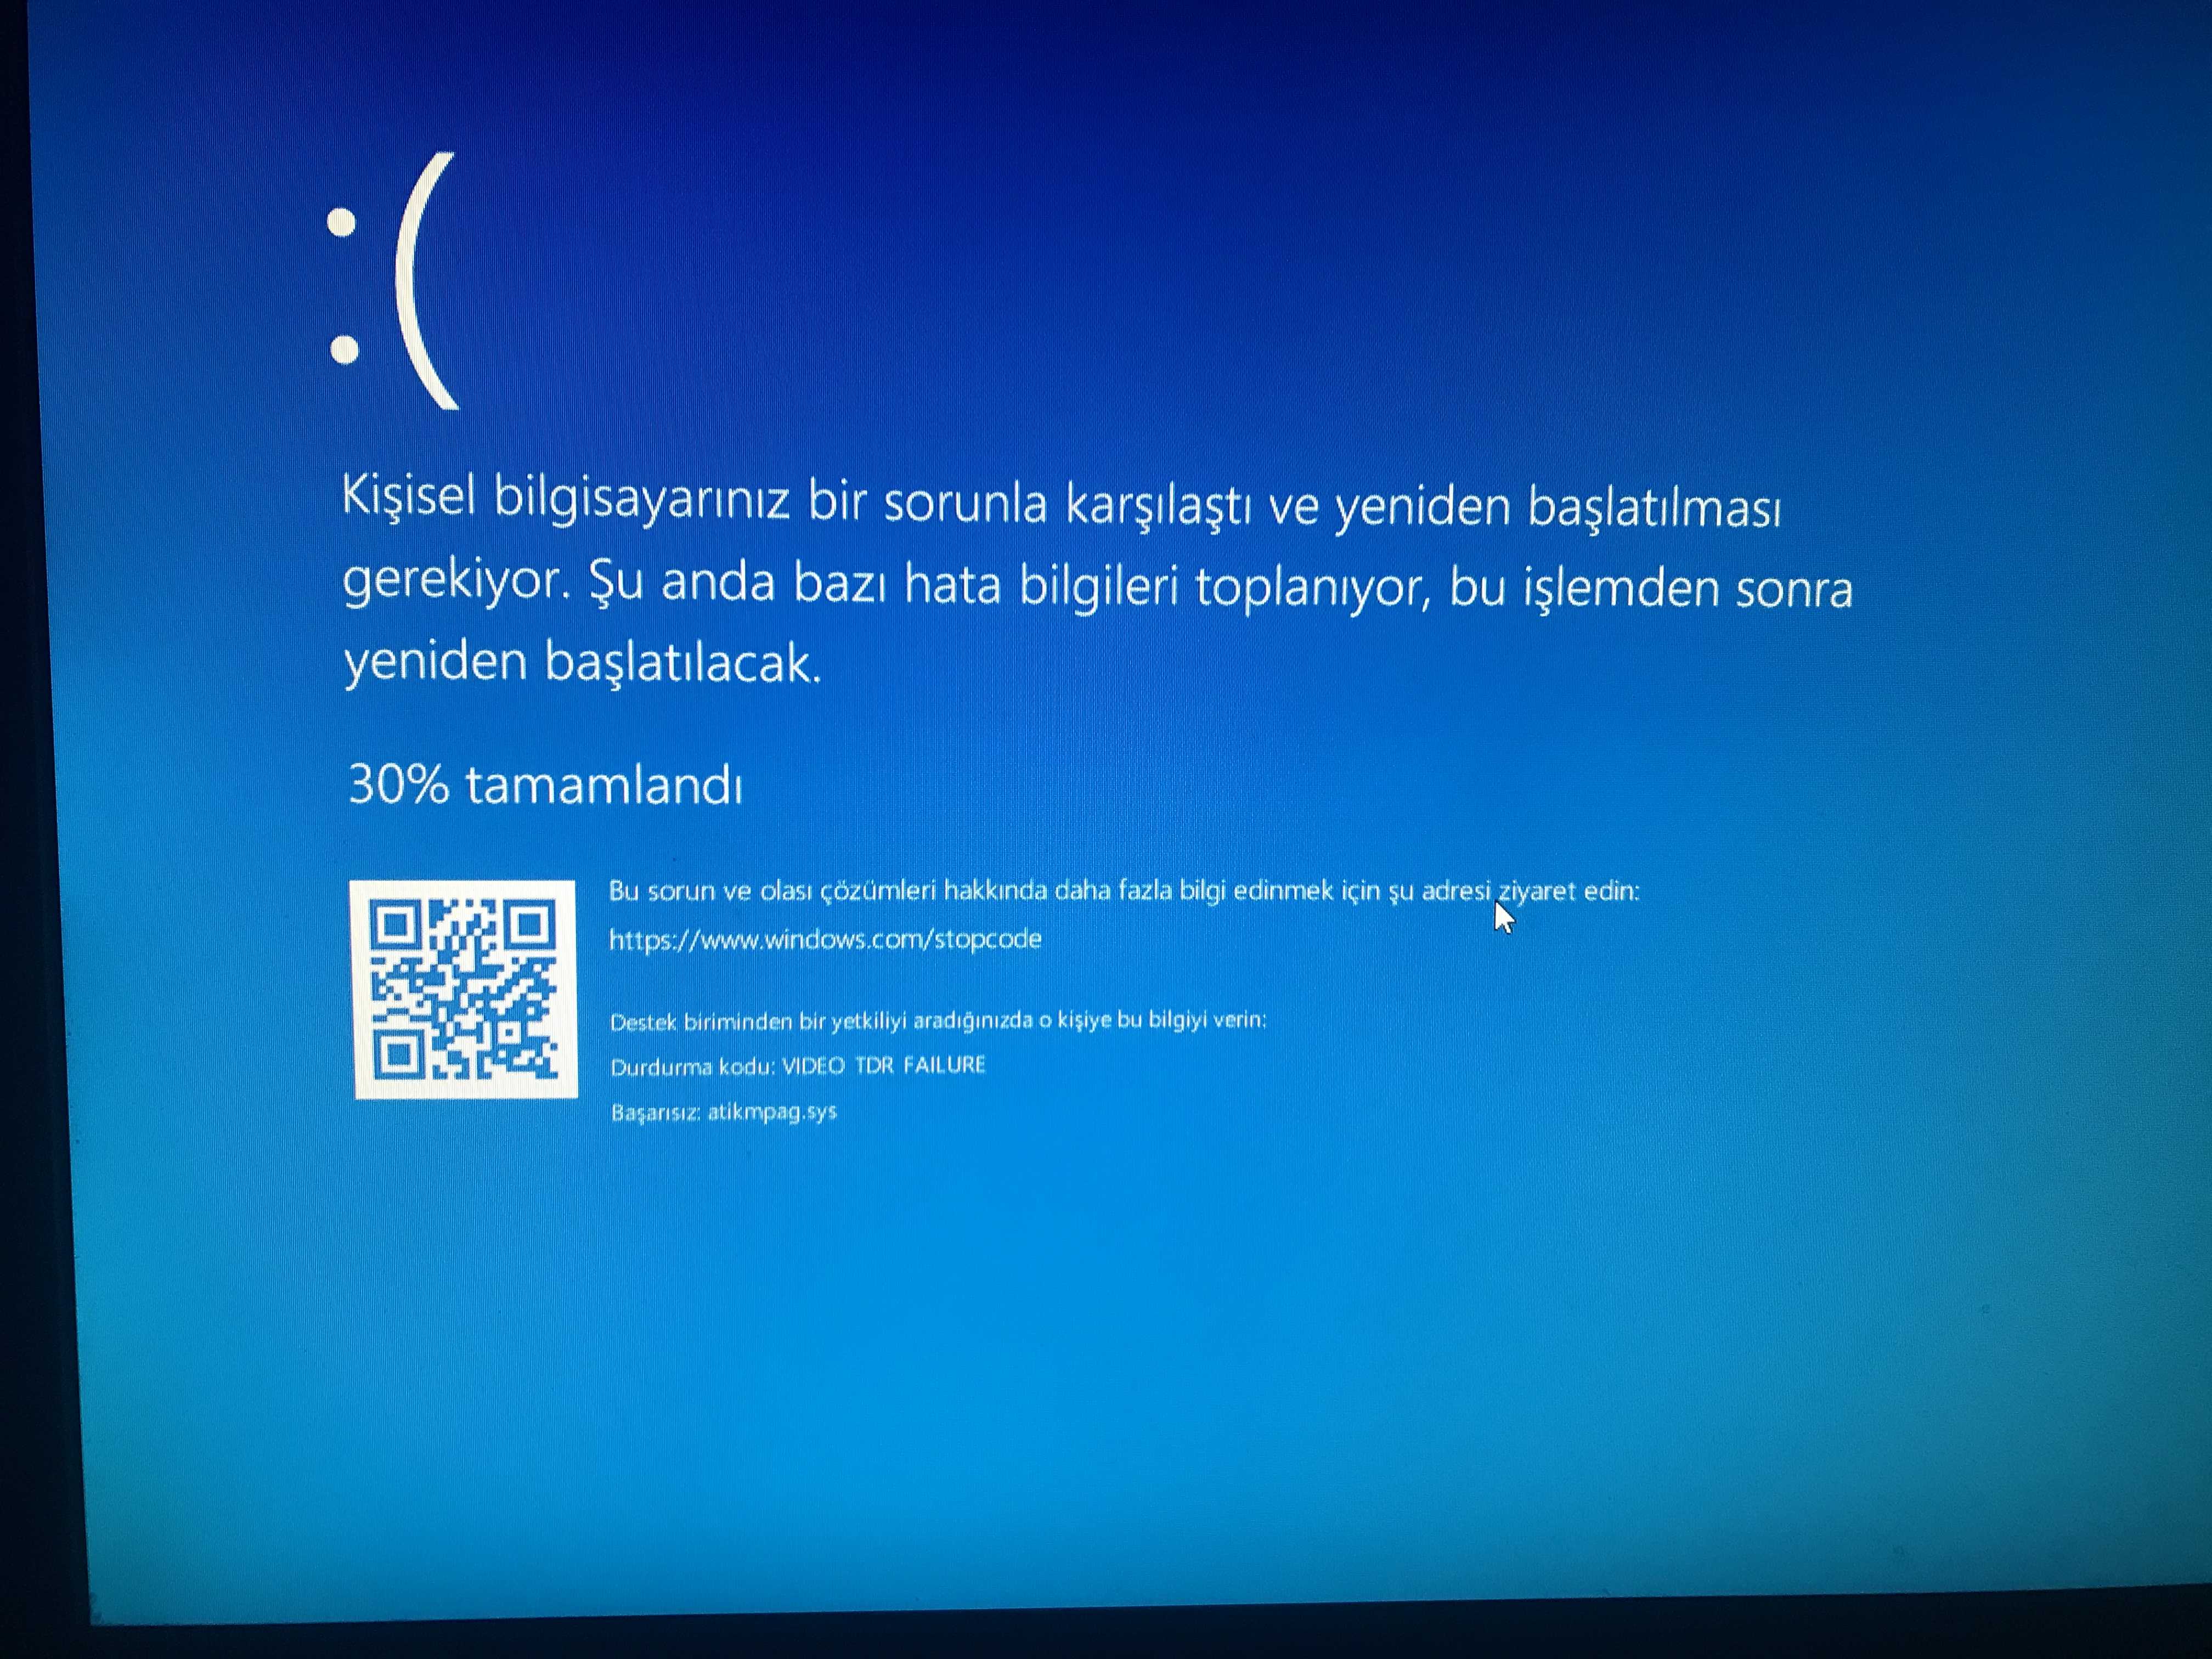
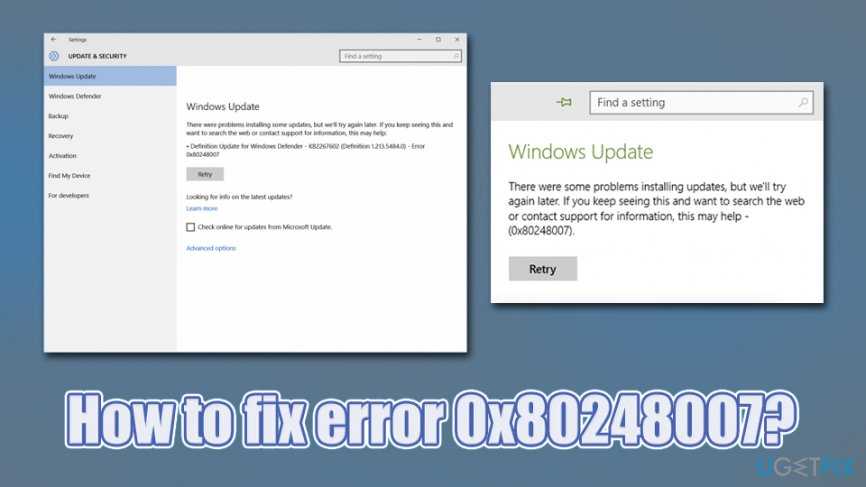
When do you see Windows Update Download Error 0x80248007?
The error code 0x80248007 appears when you’re trying to update Windows or any Windows drivers using Windows Update. You encounter Windows Update error 0x80248007 where there are either missing files in the Windows Update or Windows Update can’t locate the Microsoft Software License Terms.
The below screenshot illustrates the Windows update download error 0x80248007 when attempting to download the latest Windows updates online. There is a retry option which basically attempts to download and reinstall the KB4023057 update. However, the retry option didn’t help much in my case.
Recommended: How to Uninstall Windows 11 22H2 Update Rollback Build
Info: The KB4023057 update includes files and resources that address issues that affect the update processes in Windows and may prevent important Windows updates from being installed.
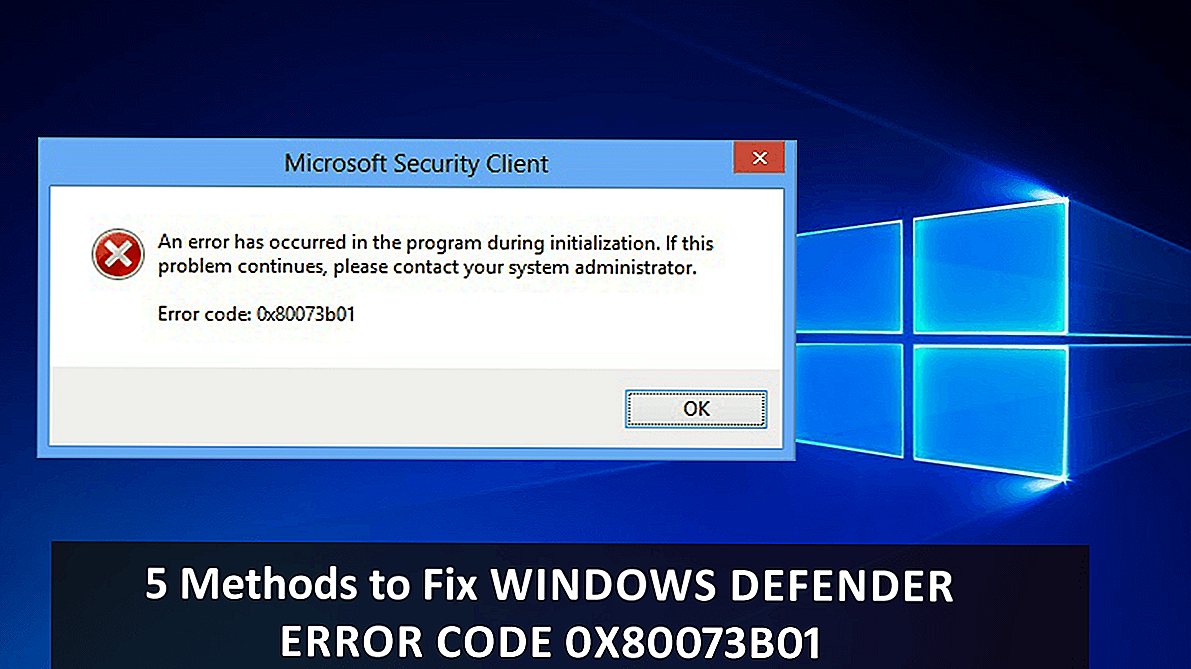
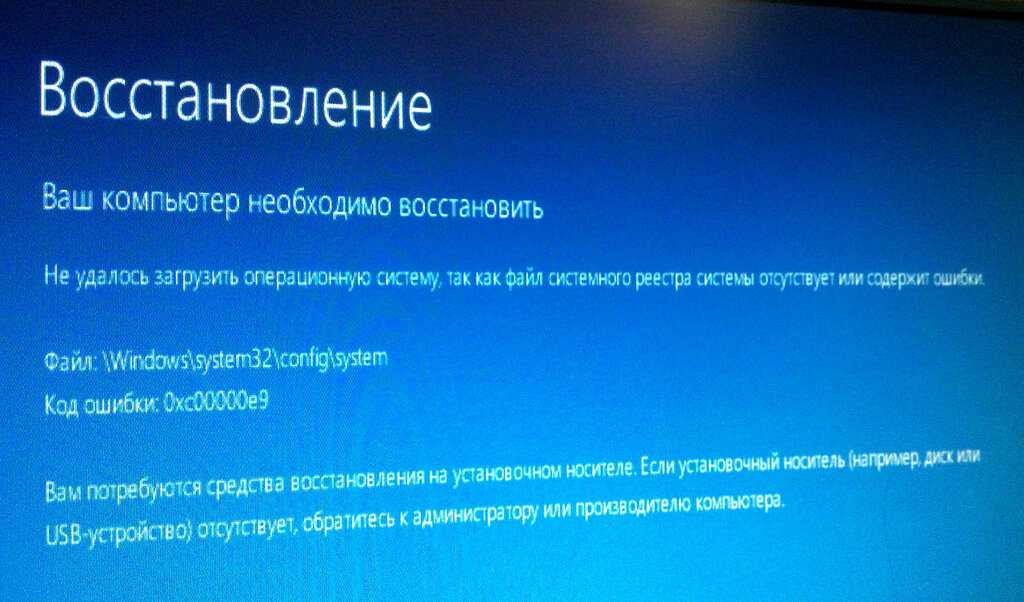
Windows Update Error 0x80248007
Windows hatalarıyla ilgili sorular ve cevaplar
1. Windows 11 İndirme Hatası 0x800704c7 nedir?
Windows 11 indirme hatası, 0x800704c7, Windows’un eski bir sürümünden Windows 11’e yükseltmeye çalışırken oluşabilecek bir hata kodudur. Hata kodu genellikle indirme işlemi sırasında görünür ve indirme işleminde bir sorun olduğunu gösterir. Bu hata, ağ bağlantınızla ilgili sorunlar, virüsten koruma yazılımı veya diğer sistem hataları dahil olmak üzere çeşitli nedenlerle ortaya çıkabilir.
2. 80000000 Windows 11 hata kodu nedir?
Windows 11 hata kodu 80000000, birkaç durumda meydana gelebilecek genel bir hatadır ve bu da daha spesifik bilgi olmadan kesin nedeni belirlemeyi zorlaştırır. Bu hata kodunun yaygın nedenlerinden biri, bir Windows güncellemesi veya bir sistem sorunudur.
Ayrıca, en az başlangıç programı ve hizmetiyle bilgisayarınızda temiz bir önyükleme gerçekleştirmek, hataya neden olan çakışmaların belirlenmesine yardımcı olabilir. Son olarak, Windows Update bileşenlerini sıfırlamak güncelleme sorunlarını çözebilir.
4. Reset Update Components
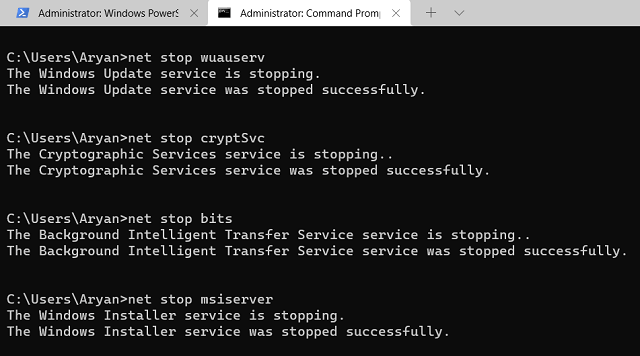
Restoring Windows Update components to their original state can often be the solution for a wide range of update errors. To do so, you’ll need to rename the catroot2 and SoftwareDistribution folders in the following steps:
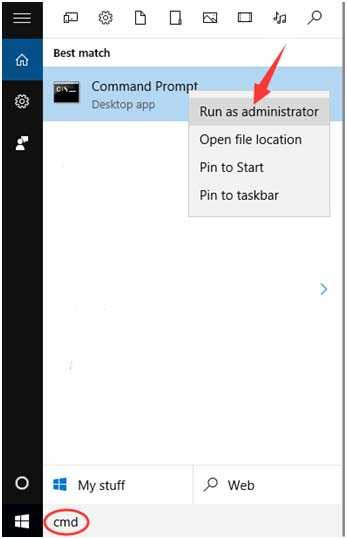
- First, you’ll need to open an elevated Command Prompt by entering cmd in the search box at the top of your Start menu. Select Run as administrator for the Command Prompt app.
- Disable some update services by entering these different commands (press Enter after each:
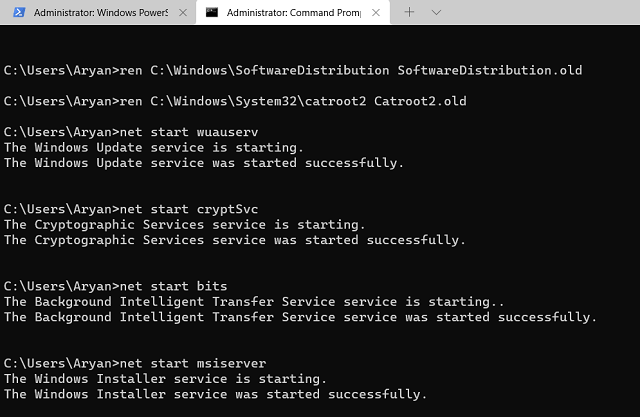
- Then type (or copy and paste) in this rename command for the SoftwareDistirbution folder and hit Return:
- Modify the catroot2 folder by entering this command and pressing Return:
- Enter this series of separate commands for restarting services:
- Then restart your Windows 11 PC.
Update Error Code 0x80248007 Solutions
If you are not able to install pending updates on your PC, try out these workarounds in the exact order as specified below.
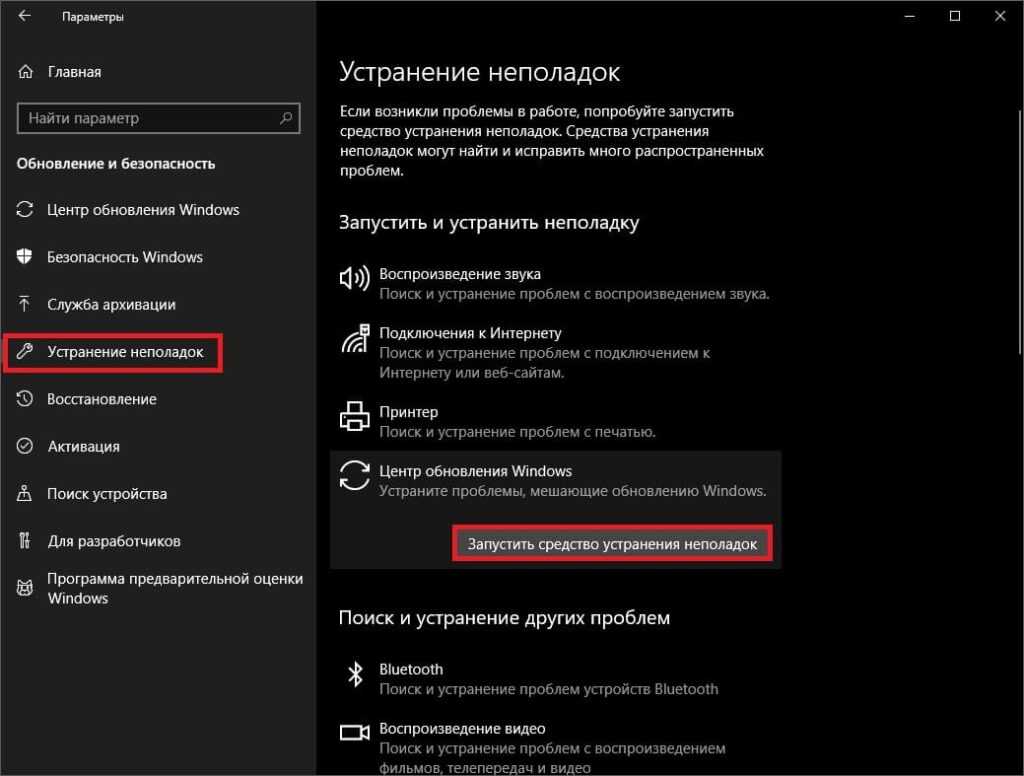
1] Run Windows Update Troubleshooter
Troubleshooting Windows Update is the first thing to do in case you are getting an update-related issue. Here’s how to run this tool –
- Right-click on the Windows icon and select Settings. Alternatively, you may also press Win + I to enter the Settings page.
- Select System on the left navigation and head over to the right pane.
- Click Troubleshoot and then Other troubleshooters.
- Under “Most Frequent”, you will find Windows Update. Hit the Run button available next to it.
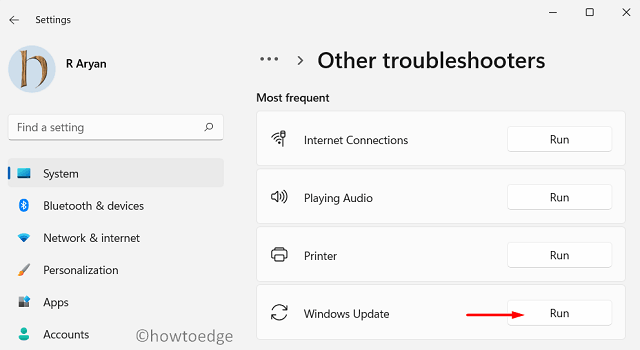
- The system will start detecting problems and will initialize the diagnostic page.
Wait for a few seconds while this keeps on finding and resolving the underlying causes.

Go and check if the update issue resolves on your PC. In case it is still occurring, hit No, and provide feedback to Microsoft.
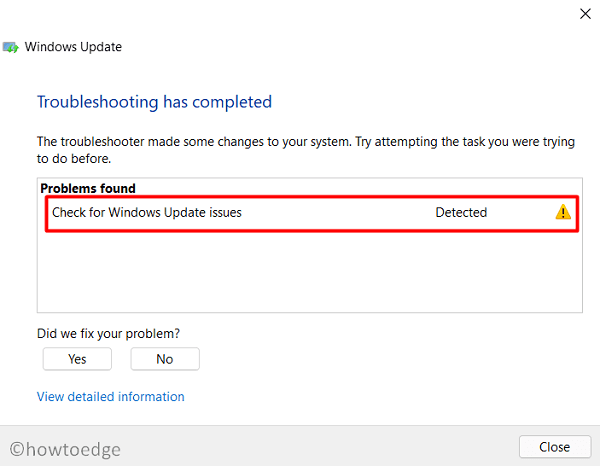
If this indeed solves the problem, click Yes and close this window.
Restart your PC next so that changes made come into effect from the subsequent logon.
2] Run SFC/DISM scans together
The update error code 0x80248007 may also occur when your system is lacking some important files or they have been corrupted somehow. In order to overcome this issue then, you must run both SFC and DISM scans together. The first will find and resolve any problems with the system files and folders whereas the DISM tool will repair any corruption inside the System image. Here’s how you may run both these tools –
- Press Win + X, and choose Windows Terminal (Admin).
- When the terminal comes into the view, execute the below command –
- Wait till this tool completes the scanning/repairing process.
- Once this is over, copy/paste this code, and press Enter –
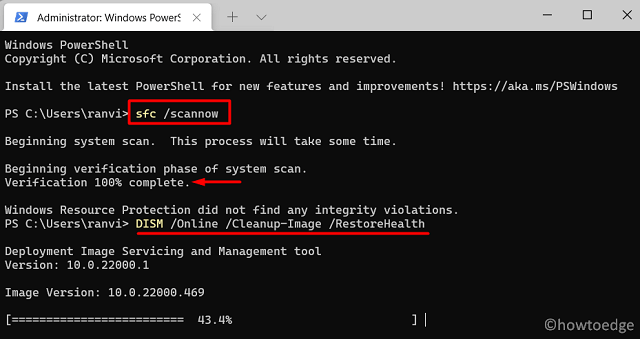
When this utility program completes repairing the corrupted system image, restart your computer.
Sign back into your device again and attempt updating/installing updates on your Windows 11 PC.
3] Restart Windows Installer Service
Update-related problems may occur when the Windows installer service stays disabled on your device. Go and check this service and if you find it disabled, restart it.
- Press Win + R to launch the Run dialog.
- Type “” and hit OK.
- When the Services window launches, scroll down and locate the “Windows Installer” service. See its current status.
- If it is displaying “Stopped”, right-click on it and hit Start. Otherwise, right-click on Windows Installer and click Restart.
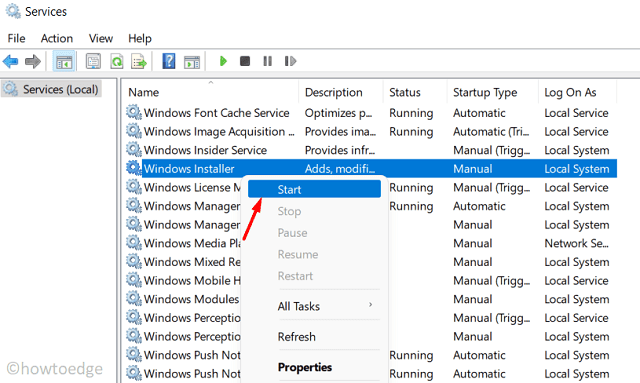
Close Services, and restart your PC.
From the subsequent login, check if you are now able to install pending updates on your computer.
4] Reset update components
The presence of too many cache files inside SoftwareDistribution and Catroot2 folders may also prevent your Windows from updating. If that’s the case, you need to purge the contents of both these folders. Before you do so, make sure to disable all update-related services on your computer. Here’s a guide on how to reset update components on your PC –
![0x80248007 error in windows update in windows 10 [solved] - driver easy](https://nephros-crimea.ru/wp-content/uploads/4/6/6/46619c4bd25c48f68898a0a2d718b365.jpeg)
- Launch CMD as administrator.
- On the elevated console, run these codes one after another. Make sure to press Enter after each command –
Rename SoftwareDistribution and Catroot2 folders by running these two codes –
Restart all those services that you have stopped earlier by executing these codes –
- Type “exit” and press Enter to come out of Command Prompt.
- Restart your PC and see if this resolves the update error code 0x80248007 on your device.
5] Manually install pending updates
If the update error code 0x80248007 is still occurring while downloading or installing available patches, you better get the recent standalone packages from Update Catalog.
For each security/non-security/optional update that comes for Windows 11, Microsoft uploads a copy of it at its official site. Visit the Windows update history page, and click the top link on the left navigation. Note down the KB number that appears on the right pane.
Next, visit Microsoft’s Update Catalog, and paste the copied number on its search bar. Press Enter to view all available standalone packages. Pick your system architecture, and hit the Download button. Click over the top link to start downloading it. When the download completes, double-click on the setup file to update your Windows operating system.
Windows Update Hizmetini yeniden başlatın
Bu yöntem, yukarıdaki yöntemin bir uzantısıdır. Servis aracındaki değişiklikler nedeniyle Windows 0’de güncellemeleri indirirken veya kurarken bazen 80248007×11 hatası oluşuyor. Aşağıdaki adımları izleyin.
Adım 1: basın «Windows tuşu + R» iletişim kutusunu açmak için klavyede «koşmak».
Not: Alternatif olarak, klavyenizde Windows Key + X tuşlarına basın ve Çalıştır yazın.
Adım 2: Metin alanına aşağıdaki komutu yazın ve tıklayın TAMAM.
3. adıma geçin: Listeden الخدمات , aşağı kaydırın ve seçin Windows Installer Ve üzerine sağ tıklayın.
Adım 4: Listeden bağlam seçin Yeniden.
Hepsi bu kadar. Yukarıdaki adımları tamamladıktan sonra, Windows Update sayfasına geri dönün ve güncellemeyi indirmeyi veya yüklemeyi deneyin. Bu sefer çalışması gerekir, ancak çalışmazsa bir sonraki yönteme geçin.
Ayrıca okuyun: Windows 11’de hizmetleri açmanın hızlı yolları
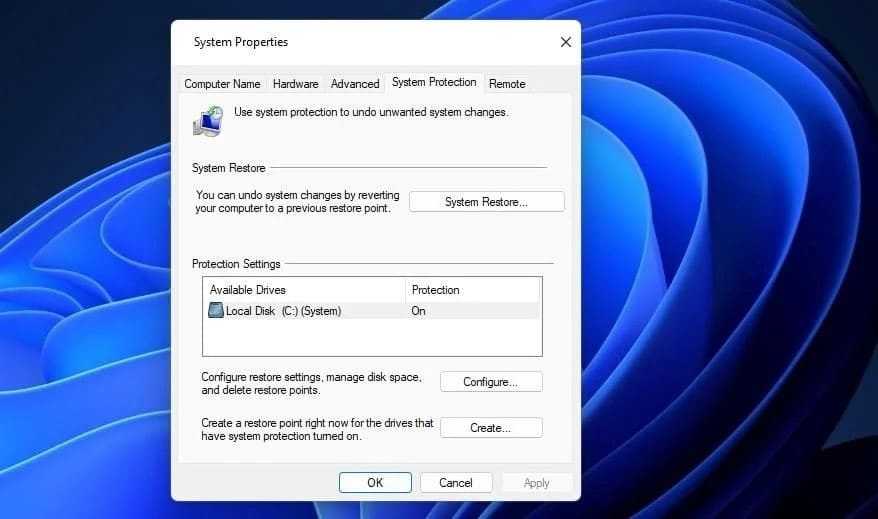
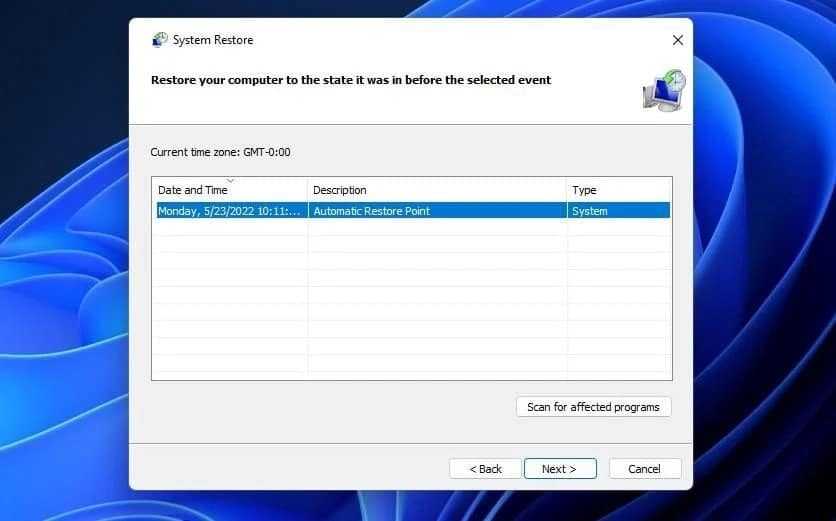
6. Restore Windows to an Earlier Date
System Restore can be an invaluable tool for fixing a wide variety of Windows errors. That tool effectively restores the Windows OS to a backup copy. So, you might be able to restore your PC to a time when you didn’t need to fix Windows Update error 0x80248007 on it with that utility.
It should also be noted that rolling Windows back to a previous system snapshot (otherwise restore point) will remove software you installed after its date. In which case, you might have to reinstall some software packages after rolling back the OS. If that’s not an issue for you, go ahead and restore Windows to an earlier time like this:
- Click your taskbar’s magnifying glass icon, and type System Restore in the search box.
- Select the Create a System Restore point search result.
- Press the System Restore button on the tab that opens.
- Select Next to view available restore points.
- Choose the oldest restore point you can (which will more likely fix error 0x80248007) from those available.
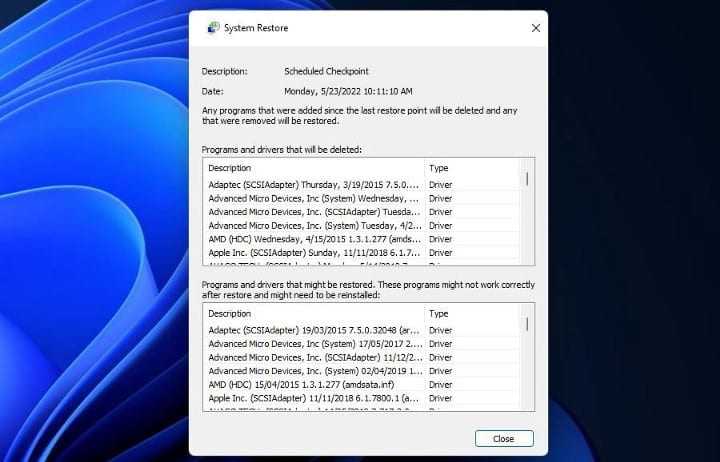
- As an optional step, click the Scan for affected program button to view a System Restore point window that shows you what software a restore point removes. Have a look at the details provided there, and click Close to exit.
- Click Next again to select a Finish option.
- Try checking for new Windows updates after the system restoration.
Windows Installer Hizmetini Başlatın
Windows Installer hizmeti, güncelleme sorunlarını manuel olarak düzeltmenize olanak tanır. Tek yapmanız gereken hizmetler konsoluna erişmek. Aşağıda listelenen adımları izleyin.
Adım 1: basın «Windows tuşu + R» iletişim kutusunu açmak için klavyedeتشغيل».
Not: Alternatif olarak, klavyenizdeki Windows tuşuna basın ve çalıştır yazın.
Adım 2: Metin alanına aşağıdaki komutu yazın ve tıklayın TAMAM.
3. adıma geçin: Listeden الخدمات , aşağı kaydırın ve seçin Windows Installer Ve üzerine sağ tıklayın.
Adım 4: Bağlam menüsünden hiç.
Hizmet yeniden başlatıldıktan sonra şu adrese gidin: Windows Update Sorunun çözülüp çözülmediğini kontrol etmek için çalıştırın. Sorun devam ederse, aşağıdaki yöntem yardımcı olabilir.
Сканирование на наличие вредоносных программ.
И последнее, но не менее важное — это вредоносное ПО, которое может повлиять на вашу систему и вызвать вышеупомянутые проблемы. Если вы уверены, что испробовали все вышеперечисленные решения в соответствии с нашим руководством, тогда стоит попробовать просканировать вашу системы на предмет наличия вредоносных программ
Известно, что вредоносные или нежелательные программы могут вызвать различные повреждения или беспорядок в конфигурации самой системы. Поэтому рекомендуется провести тщательное сканирование, чтобы проверить, так ли это на самом деле. Вы можете использовать обычный Защитник Windows или попробовать установить более продвинутый антивирус, разработанный Malwarebytes — надежной и талантливой группой экспертов, постоянно обновляющих свое программное обеспечение для борьбы как с локальными, так и глобальными угрозами. Вы можете загрузить его прямо сейчас, используя ссылку ниже, и попробовать 14-дневную пробную версию полноценной защиты от вредоносных программ бесплатно.
Главное окно Malwarebytes Настройки Malwarebytes Результаты сканирования Malwarebytes
Скачать Malwarebytes
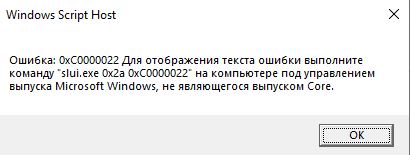
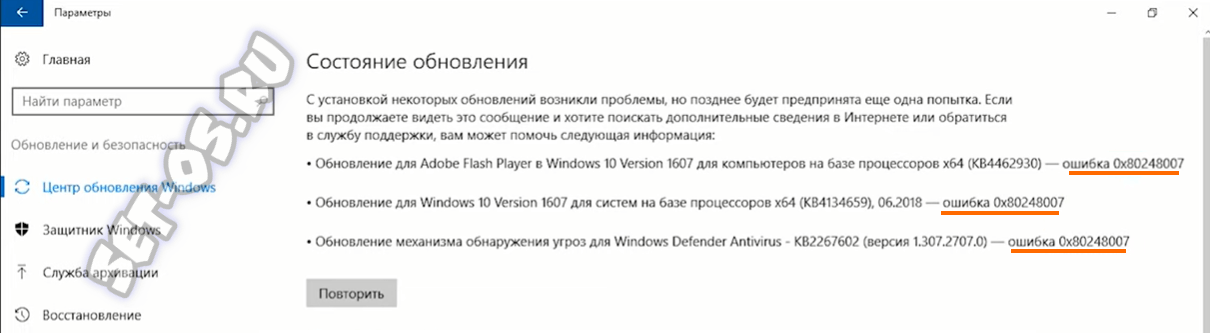
Как исправить ошибку 0x80248007 при обновлении Windows?
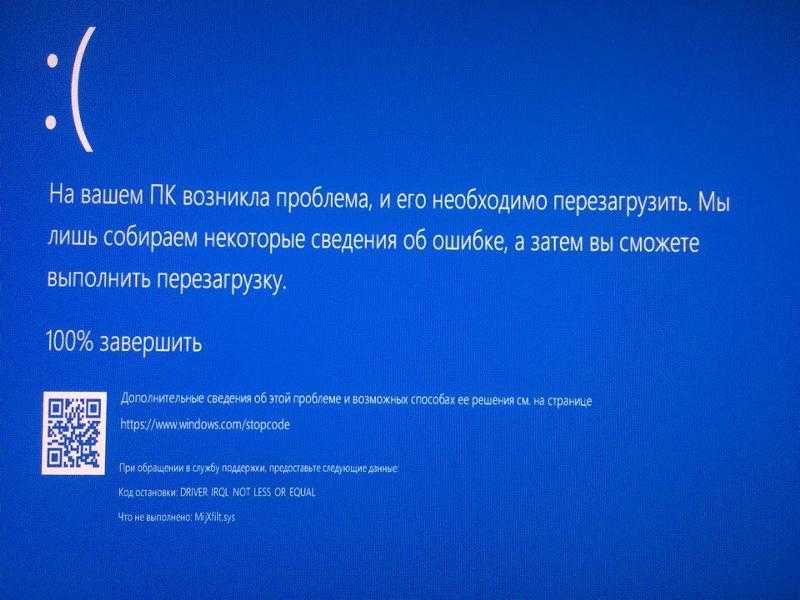
Ошибка 0x80248007 означает, что в “Центре обновления Windows” не хватает каких-то файлов или “Центр обновления Windows” не может найти условия лицензионного соглашения на использование программного обеспечения.
Данная ошибка обычно случается, когда вы пытаетесь обновить Windows или любые драйвера для операционной системы используя “Центр обновления Windows”. Обновление не сможет скачаться и установить себя, и вы будете получать эту ошибку, чтобы вы не делали.
Microsoft были в курсе данной проблемы и должны били исправить ее в обновлении для Windows. Но она до сих пор возникает в системе у достаточного количества пользователей.
Windows’u daha önceki bir tarihe geri yükleyin
Bu, tüm yöntemler sorunu çözemezse herhangi bir Windows sorununu çözmenin en popüler yollarından biridir. Ve birlikte Yani, bir sistem geri yükleme noktası oluşturmuş olmalısınız. bu yöntem için. Varsa, aşağıdaki talimatları izleyin.
Adım 1: Bir tuşa basın Windows Klavyede şunu yazın Geri yükleme noktası, Ve tıklayın Aç.
Adım 2: Içinde «Sistem özellikleri» , Tıklayın Sistem Geri Yükleme.
3. adıma geç: geri yükleme içinde Sistem dosyaları ve Ayarlar , Click Sıradaki.
Adım 4: bir nokta seç Restore Listeden ve tıklayın Sıradaki.
Adım 5: Son olarak, «bitirme».
İşte buradasın. Bu, cihazınızdaki Windows Update indirme hatası 0x80248007’yi düzeltmelidir. Bu sorunu çözmezse sonraki yöntemi kontrol edin.
5. Run an SFC Scan
System file corruption is another possible cause for Windows Update error 0x80248007. Running a System File Checker scan (preferably combined with a Deployment Image Servicing) in the Command Prompt is one way you can repair corrupted system files. Follow these steps to run an SFC scan in Windows 11:
- Bring up the Command Prompt as covered in resolution four.
- Enter and execute this command:
- Type in the following text and press Enter to run a System File Checker scan:
- Don’t close the Command Prompt before System File Checker has finished scanning and displayed an outcome.
- Then try installing updates after restarting Windows.
En Son Çözüm — Windows’un Temiz Bir Kopyasını Kurun
Yukarıdaki yöntemlerin tümü işe yaramazsa, o zaman… Windows sürümünü yükleyin Bilgisayarınızda bir temizlik son çaredir. Aşağıdaki adımları dikkatlice takip edin.
Adım 1: Bir uygulama açın Ayarlar kullanma Windows Arama Veya tıklayın Windows tuşu + I.
Adım 2: set Sistem Kenar çubuğundan ve tıklayın geri ödeme.
3. adıma geçin: set “Bu bilgisayarı sıfırla»İçinde kurtarma seçenekleri.
Adım 4: «Bu bilgisayarı sıfırla”, set «Dosyalarımı sakla».
Adım 5: Şimdi seçin «Yerel Yeniden Yükleme».
Adımları izleyin ve hepsi bu kadar. Bilgisayarınız, Windows Update hatası 0x80248007’yi çözecek temiz bir Windows sürümüyle güncellenecektir. Daha fazla sorunuz var mı? Aşağıdaki Sıkça Sorulan Sorular bölümüne göz atın.


2. Clear Temporary Windows Update Files
Sometimes, clearing up Windows update’s temporary files can help fix this issue. Here’s how to do that:
- Hold down the Windows keyboard key and press R at the same time.
- Input services.msc within the Run dialog that opens, and select the OK option.
- Next, right-click Windows Update service to select its Stop option.
- Press Windows and E keyboard buttons at the same time to open File Explorer.
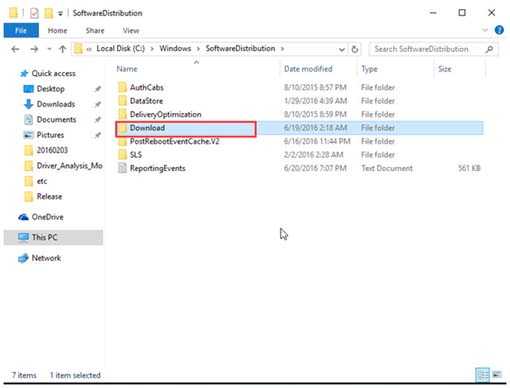
- Open the C:\Windows\SoftwareDistribution\DataStore folder.
- Then select everything inside DataStore by pressing the Ctrl + A hotkey.
- Click the Delete (trash can) option on Explorer’s command bar.
- Return to the SoftwareDistribution folder.
- Open the Download subfolder from there.
- Erase everything in the Download folder as outlined in steps six and seven.
- Bring up the Services utility as covered in the first couple of steps.
- Restart Windows Update by right-clicking that service and selecting Start.
Сбросьте компоненты Центра обновления Windows.
Еще одна рекомендация, которую стоит попробовать, — сброс настроек Центра обновления Windows. Статистически этот метод зарекомендовал хорошо в борьбе со многими проблемами обновлений. Вся процедура включает перезапуск служб BITS, Cryptographic, MSI Installer и Windows Update, а также переименование некоторых папок обновлений (SoftwareDistribution и Catroot2). Эти папки содержат временные файлы, необходимые для реализации обновлений Windows. Благодаря этому, мы заставим Windows удалить поврежденные элементы и создать компоненты обновлений с нуля. Ниже мы покажем вам два способа выполнения этого метода. Первый требует ввода и выполнения каждой консольной команды в последовательности вручную. Другой делается с помощью так называемого пакетного сценария, написанного в Блокноте и сохраненного в формате WUReset.bat. Особой разницы в том, какой из них вы решите использовать, — нет. Хотя вся процедура может показаться достаточно сложной, она не отнимет у вас слишком много времени и знаний. Просто следуйте последовательности шагов, указанной ниже:
Вручную
- Открытые Командная строка , введя в поле поиска рядом с Меню Пуск кнопку.
- Щелкните правой кнопкой мыши по Командная строка , а затем выбрать Запуск от имени администратора.
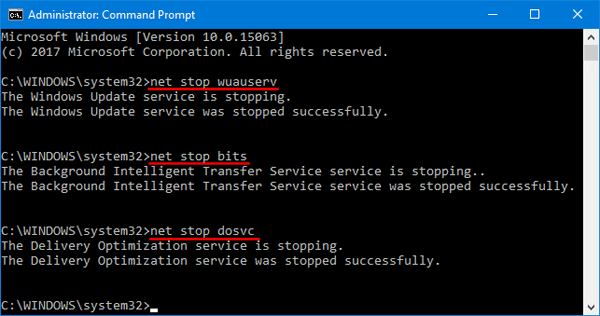
- Скопируйте и вставьте этот список команд одну за другой, нажимая Enter после каждой. (Это действие отключит службы, ответственные за Обновления Windows)
Затем мы должны переименовать вышеупомянутые папки. Просто вставьте эти команды, нажимая Enter после каждой.
Наконец, все, что осталось сделать, это вернуть отключенные службы. Введите эти команды так же, как мы делали ранее.
На этом все. Перейдите в центр обновления Windows и попробуйте выполнить установку снова.
С помощью Пакетного файла
Это альтернативный метод вышеописанному. Пакетный сценарий используется для выполнения того же набора команд для сброса всех компонентов Центра обновления Windows, служб шифрования и папок, таких как SoftwareDistribution. Это не так сложно, как может показаться на первый взгляд — даже проще, чем предыдущий способ. Все, что вам нужно, это Блокнот Windows и немного магии копирования-вставки. Пакетные сценарии лучше ручного ввода тем, что позволяют выполнять все необходимые команды одновременно. Если вы когда-нибудь столкнетесь с подобными проблемами в будущем, вы можете выполнить уже созданный .bat файл и для сброса компонентов обновления:
- Откройте новый Блокнот . Для этого щелкните правой кнопкой мыши на любую свободную область на рабочем столе, выберите Новинки и Текстовый документ.
- Затем вставьте этот список команд в блокнот:
После вставки всех команд, нажмите Файл > Сохранить как и назовите файл WUReset.bat, Обязательно установите Кодирование в ANSI и сохраните файл в любом месте.
Наконец, нажмите на файл правой кнопкой мыши и выберите Запуск от имени администратора и наслаждайтесь автоматическим сбросом компонентов обновлений Windows.
WINDOWS GÜNCELLEMESİNİ MANUEL OLARAK YÜKLEYİN
Bu yöntem, Windows Update bölümünü atlar ve Windows 0 veya 80248007’da güncelleme hatası 11×10 gibi herhangi bir hata mesajıyla uğraşmadan güncellemeyi doğrudan Microsoft web sitesinden indirmenize ve yüklemenize olanak tanır. Bu adımları izleyin.
Adım 1: Tercih ettiğiniz tarayıcıda Microsoft Update Kataloğu’nu açın kişisel bilgisayar Windows’u kim çalıştırıyor.
Adım 2: seçmek güncelleştirme güncellemeler listesinden yüklemek istediğiniz
3. adıma geçin: tık indirmek.
Adım 4: Bir pencerede Yeni , Click hiper bağlantı.
Bunu yaptığınızda, güncelleme otomatik olarak indirilmeye ve kaydedilmeye başlar. Dosyayı çift tıklayın ve etkili bir şekilde yüklemek için talimatları izleyin. Kurulduktan sonra, istenirse bilgisayarınızı yeniden başlatın. Ve işte buradasın! Bilgisayarınız yedeklendikten sonra, Windows güncelleme indirme hatası 0x80248007 gitmiş olmalıdır.
Bu yöntem işinize yaramadıysa aşağıdaki yöntem hatayı düzeltmenize kesinlikle yardımcı olacaktır; buna bir bak.
SFC ve DISM SCAN’ı ÇALIŞTIRIN
Bu yöntem, bozuk sistem dosyalarını taramanıza ve Windows Güncellemeleri ile ilgili sorunları düzeltmenize yardımcı olur. Bu yöntemde belirtilen işlevler, bozuk dosyaları düzeltmenize ve Windows Update hatasını çözmenize yardımcı olur. Aşağıda listelenen adımları izleyin.
Adım 1: kullanarak komut istemini yönetici olarak açın. Windows Arama.
tık نعم İstendiğinde.
Adım 2: Komut satırına aşağıdakini yazın ve tuşuna basın. Girin.
Komutun sistem dosyalarını taramasına ve onarmasına izin verin.
3. adıma geçin: Şimdi aşağıdaki komutu yazın ve Enter’a basın.
DISM yardımcı programı, bozuk dosyaları tarar ve sistem görüntüsünü kaldırır. Şimdi bilgisayarınızı yeniden başlatın ve hatanın devam edip etmediğini kontrol edin. Eğer öyleyse, o zaman belki aşağıdaki yöntem size yardımcı olacaktır.
Program dağıtım klasörünü temizleyin
Bu, birkaç Windows Update dosyasından oluşan önemli bir klasördür. Dosyalardan herhangi biri bozuk veya değiştirilmişse, Windows cihazınızı güncellemeye çalıştığınızda “Bazı güncellemeler yüklenirken sorunlar oluştu, ancak daha sonra tekrar deneyeceğiz” diyen bir hata göreceksiniz. Bu sorunu çözmenin bir yolu var. Aşağıdaki adımlara gidin.
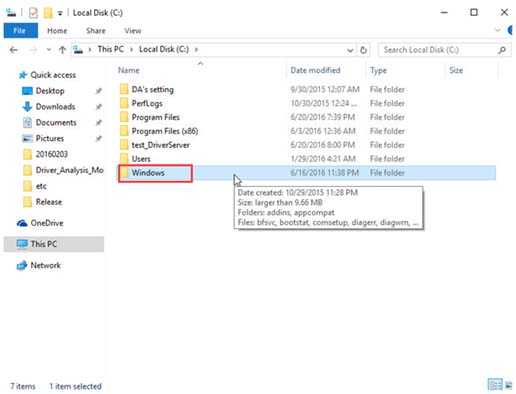
Adım 1: Klavyenizdeki Windows tuşuna basın, Dosya Gezgini yazın ve tıklayın. Açılış.
Adım 2: Adresine git bu bilgisayar Yan bölmeden OS (C:) öğesini seçin.
3. adıma geçin: set Windows klasörü.
4. Adım: Aşağı kaydırın ve seçin SoftwareDistribution klasörü.
Adım 5: Adresine git DataStore klasörü.
6. adıma geçin: Bir klasördeki tüm dosya ve klasörleri silin Bilgi deposu.
İpucu: Silmek için Ctrl + A tuşlarına basarak tüm dosyaları seçin ve klavyenizdeki Sil tuşuna basın.
Adım 7: Bittiğinde, klasöre geri dönün Yazılım Dağıtımı. Şimdi bir klasöre gidin İndirilenler.
Adım 8: altındaki tüm dosya ve klasörleri silin Klasörü indirin.
Not: Tüm dosyaları seçmek için Ctrl + A tuşlarına basın ve klavyenizdeki Sil tuşuna basın.
Bittiğinde, pencereyi kapatın ve bilgisayarınızı yeniden başlatın. Ve bu kadar! Sistem yeniden başlatıldığında Windows Update hatası kaybolmalıdır. Bu yöntem size yardımcı olmadıysa, sonraki yöntemi kontrol edin.
Windows Update sorun gidericisini çalıştırın
Bu yöntem, Windows Update’i denetler, sorun gidermenize yardımcı olur ve bunu size bildirir. Adımları takip etmek kolay ve basittir.
Adım 1: Klavyenizdeki Windows tuşuna basın ve yazın Ayarlar , Ve tıklayın açmak.
Adım 2: Kenar çubuğundan Sistem’i seçin, aşağı kaydırın ve tıklayın Giderme.
3. adıma geçin: içinde Sorun seçin Diğer sorun gidericiler.
Adım 4: Düğmesini tıklayın «koşuyor» Windows Update’in yanında.
Sorun giderici bazı testler yapacak ve hataları hızlı bir şekilde gözden geçirip düzeltecektir. Bu yapıldıktan sonra devam edin ve sorunun devam edip etmediğini kontrol edin; Bu olursa, sonraki yönteme geçin.
How Do I Fix 0x80248007 Windows Update Error
Here, in the below section of this blog, you will get to know how you can fix 0x80248007 Windows Update Error in Windows 10. These steps are very easy to try, and you don’t even have to take any technical help from experts. So, do not avoid trying these steps and make your PC run perfectly even without any issues.
Table of Contents
Trick #1: Via Windows Command Prompt
1: You need to run Windows Command Prompt with admin privileges, go to the Windows search box and enter command prompt now Right-click on the Command Prompt from the available result, and select Run as administrator.
2: Now in Elevated Command Prompt, enter net start msiserver and press Enter key from keyboard to run the command.

3: After it exits from the command prompt by clicking on the X or by typing Exit and executing the command.
This solution will fix the above-discussed update error and make you able to download all the available updates for your Windows system.
Tip: Windows Update error “0x80248007” could appear because of system file missing or Windows Update is missing or when the Windows update gets unable to find/locate the Microsoft Software License Terms. So it is suggested to first execute the Windows Update troubleshooter, this will surely help you to fix this issue.
But if you are unable to fix Windows 10 update issue then you should follow the below-given instructions in order to fix the problem by yourself.
Trick #2: Windows Update Service
# Reset Windows Update Service
1: Go to the Control Panel > Administrative Tools. And double click on Services. Sometimes you need to enter an administrator password or confirmation, enter the password or provide confirmation.


2: Search for Windows Update service and after finding right-click on it and select Stop option.
Trick #3: Remove Temporary Update Files from SoftwareDistribution Folder
Still, having a problem after trying the above two tricks? If yes, then delete the Windows update cache files. This is another solution that can work for you. In order to perform this task, you have to right-click the Start menu and then choose “CMD prompt” and then you have to click on Yes option to allow this to run with administrative privileges.
Or, at the command prompt, you can also type the below-mentioned command and then hit the option “Enter” so that it stops the Windows Update service and their related services.
1: Open system driver and go to the Windows folder.
2:SoftwareDistribution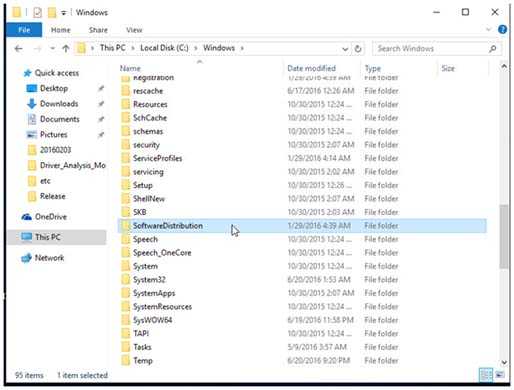
3:DataStore 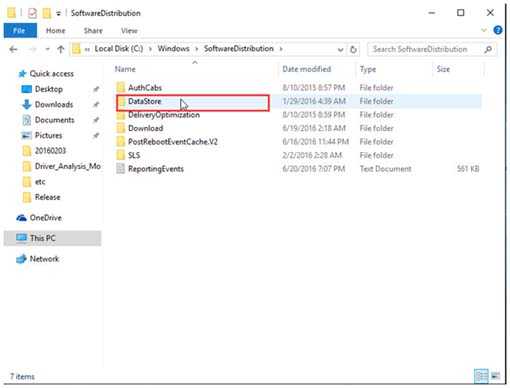
4: Again go back to the SoftwareDistribution folder and open the Download folder. Delete all the files present in this folder.
Trick #4: Restart Windows Update Service
1: Navigate to the Control Panel > Administrative Tools > Services > Windows Update.
2: Search for the Windows Update service, right-click on it, and select Start.
3: Select the Services window and the Administrative Tools window.
Trick #5: Delete Windows Update Cache Files
Another solution to fix 0x80248007 Windows update error is to delete Windows Update cache files. Follow the steps to do so:
- Click on Windows icon
- Type command prompt or cmd and right-click on it
- Select run as administrator
- Now type the following commands and press enter:
- Go to the C: > Windows > SoftwareDistribution > DataStore and delete the files from the folder.
- Now, go to C: > Windows > Software Distribution > Downloads folder and delete the files from the folder.
- After that restart the services stopped previously by the following commands and hit enter:
Now, restart your system and see if the problem is fixed or not, and then install the updates.
Сброс компонентов Центра обновления Windows
Восстановление компонентов Центра обновления Windows до их исходного состояния часто является ответом на широкий спектр ошибок обновления. Для этого вам нужно будет переименовать папки catroot2 и SoftwareDistribution, выполнив следующие действия:
- Сначала вам нужно будет открыть командную строку с правами администратора, введя CMD в поле поиска меню «Пуск». Найдите Запустить от имени администратора Чтобы применить командную строку.
- Отключите некоторые службы обновления, введя эти разные команды (нажмите Enter после каждого заказа):
net stop cryptsvc
net stop appidsvc
net stop bits
net stop wuauserv
Затем введите (или скопируйте и вставьте) эту команду переименования в папку SoftwareDistirbution и нажмите ВОЗВРАТ:
Ren %systemroot%\SoftwareDistribution SoftwareDistribution.old
Измените папку catroot2, введя эту команду и нажав ВОЗВРАТ:
Ren %systemroot%\System32\catroot2 catroot2.old
Введите эту серию отдельных команд, чтобы перезапустить службы:
net start cryptsvc
net start bits
net start wuauserv
net start appidsvc
Затем перезагрузите компьютер с Windows 11. Проверьте Лучшие способы исправить ошибки Центра обновления Windows в Windows 11.
Быстрая переустановка с исправлением системы и без удаления личных данных и программ
И последний вариант, который по сути является переустановкой системы с обновлением всех системных файлов, но с сохранением текущих настроек и программ:
- Если у вас есть ISO-образ с текущей системой, смонтируйте его в системе и запустите установочный файл.exe — пройдите все шаги установки.
- Если у вас нет образа, в случае с Windows 11 — скачайте оригинальный образ и воспользуйтесь шагом 1. В случае с Windows 10 перейдите на страницу https://www.microsoft.com/en/software-download/windows10, Нажмите «Download Remedy Now», запустите скачанную утилиту. На странице «Что вы хотите сделать?» оставьте выбранный пункт «Обновить этот компьютер сейчас» и следуйте дальнейшим инструкциям программы установки.
При использовании этого метода после завершения процесса, в зависимости от версии установленной ОС, вам может понадобиться одна из следующих инструкций: Как удалить папку Windows.old, Как удалить папку Windows.старый в Windows 11.