
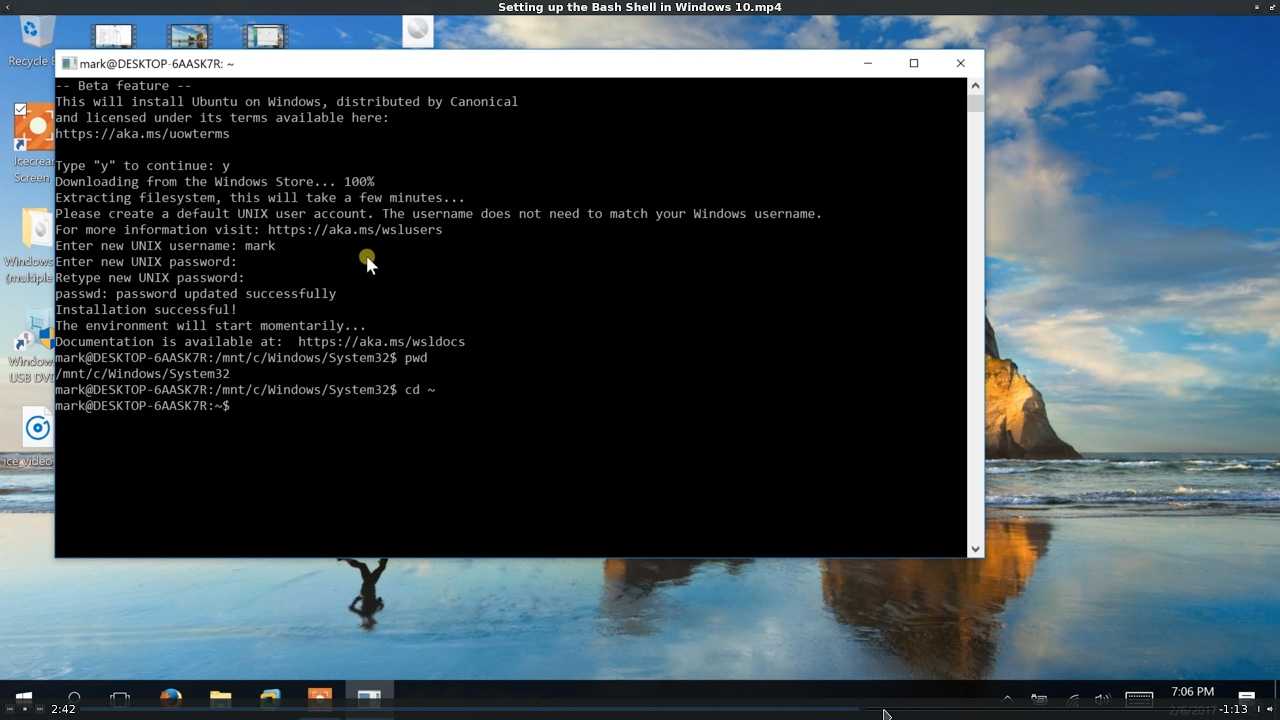
Введение
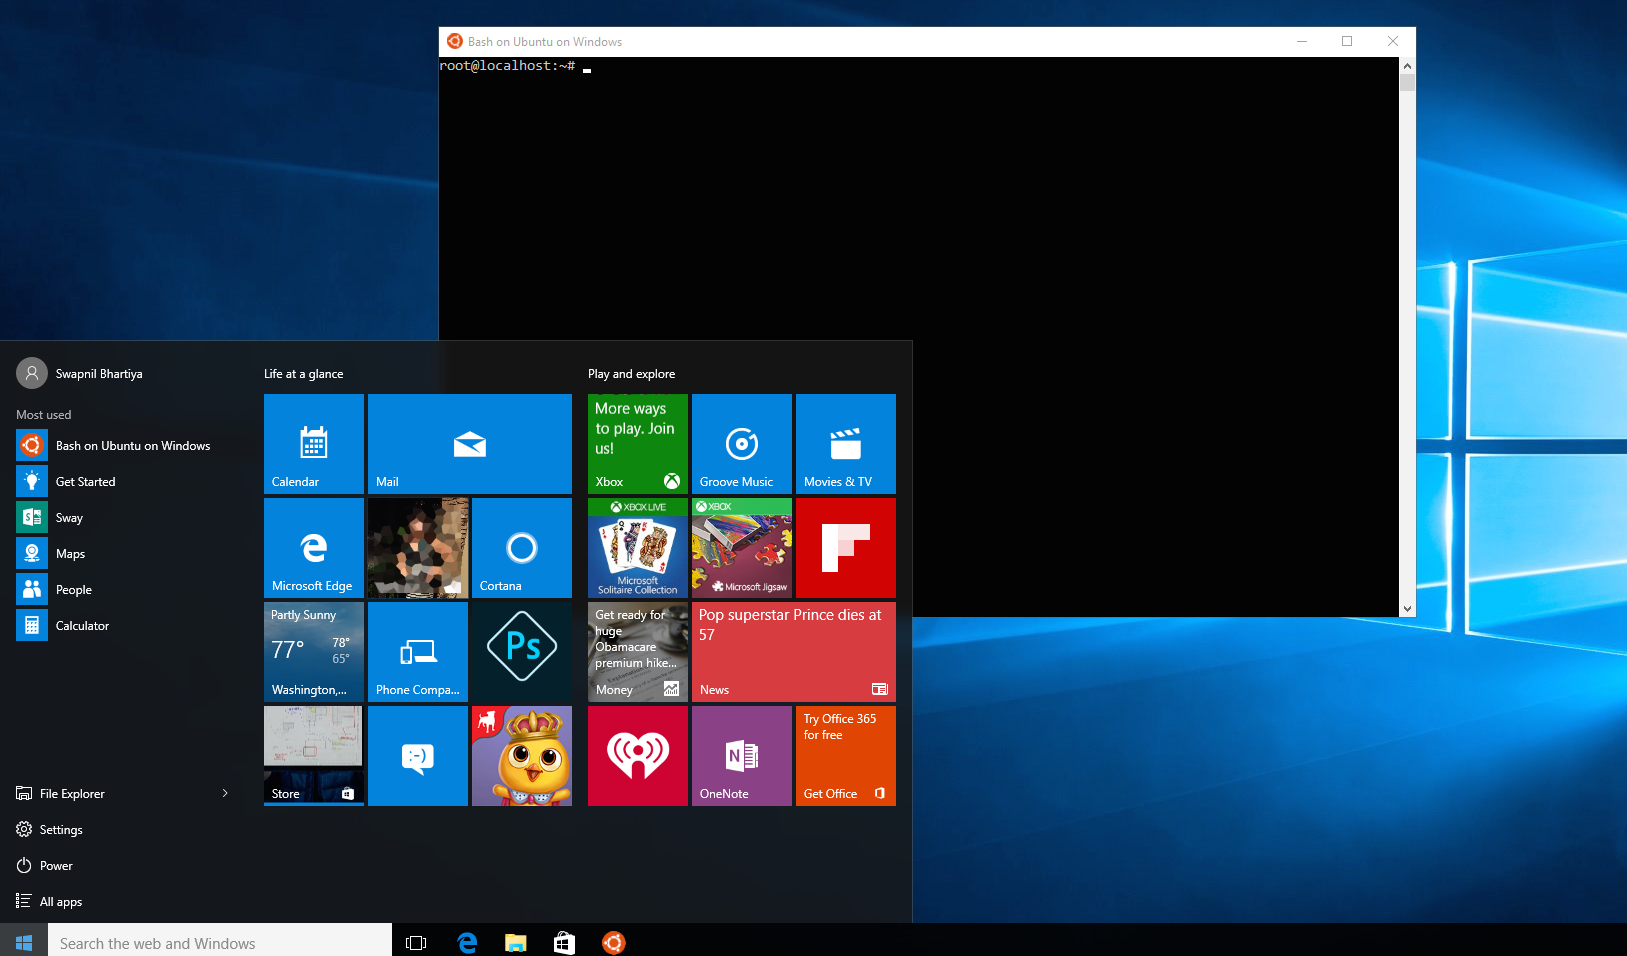
Официальное название — Windows Subsystem for Linux. Или сокращённо WSL.
WSL предоставляет возможность запуска родных линуксовых утилит в
Windows
.
Это стало возможно 2 августа 2016-го года. Когда в результате сотрудничества Microsoft и Canonical
стало возможным использовать оригинальный образ ОС
Ubuntu
14.04 для
непосредственного запуска поверх WSL множества инструментов и утилит из этой ОС без какой-либо виртуализации.
С 6 мая 2019-го года доступна WSL 2, которая работает на Hyper-V
В этой статье вы узнаете как установить WSL. О том как пользоваться командами
Bash
читайте в статье
«Основы Bash»
Если вам нужно просто выполнять несколько bash команд из-под Windows самым простым вариантом будет не WSL а
установка
The Windows Subsystem for Linux (WSL)
The Windows Subsystem for Linux (WSL) lets developers run a GNU/Linux environment — including most command-line tools, utilities, and applications — directly on Windows, unmodified, without the overhead of a traditional virtual machine or dual-boot setup. Particularly, by using the latest version of WSL2 under Windows 11 one can effortlessly run any Linux-based application including GUI applications under Windows 11.
Using WSL2, can install
(1) ns-2 and nam under Windows 11
(2) ns-3, NetAnim and NetSimulyzer under Windows 11
(3) OMNet++ with IDE under Windows 11
(4) SUMO with sumo-gui under Windows 11
There are countless possibilities for using WSL2 for a Linux-based research
How to Access the Linux Shell on Windows 11
Windows 11 includes a new terminal app (called Windows Terminal) that allows you to switch between PowerShell, Command Prompt, and other types of administrative windows. If you install and enable Windows Subsystem for Linux on Windows 11, you can use the new Windows Terminal to control your Linux shell.
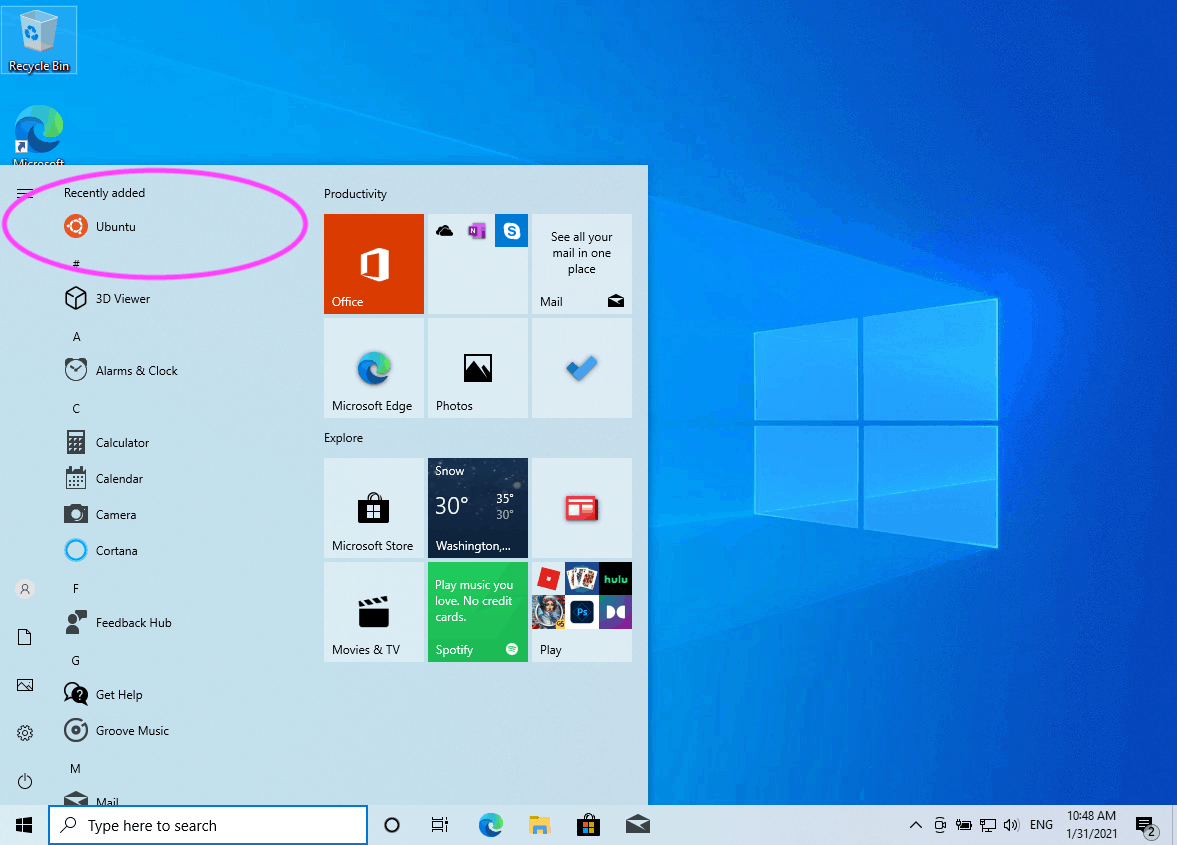
To do this, right-click the Start menu and select Windows Terminal (Admin). Next, select the + (plus) icon in the tabbed bar at the top, then choose your Linux distribution (e.g., Ubuntu) from the list.
If you don’t see it, launch Ubuntu from the Start menu first, then open the terminal—it will then appear in the dropdown.
You now have access to the Linux shell, just as if you were using a Linux PC. You can start learning and practicing Linux commands to operate it here, or you can use it to modify your Ubuntu settings.
Как полностью удалить дистрибутив Linux из WSL

Действительно, вы можете просто щелкнуть правой кнопкой мыши и удалить Ubuntu, Debian или любой другой дистрибутив Linux, который вы могли установить на WSL. Установить их так же просто, как загрузить из Microsoft Store, а удалить их так же просто, как и любое другое приложение Store. В качестве альтернативы вы можете сделать то же самое с winget в терминале, если вы поклонник использования диспетчера пакетов Windows.
Но это не убирает полностью все следы. Созданные данные и файловая система останутся позади, поэтому вам нужно указать WSL удалить их в терминале. Так что, в идеале, во-вторых, удалите приложение.
Вот что вам нужно сделать.
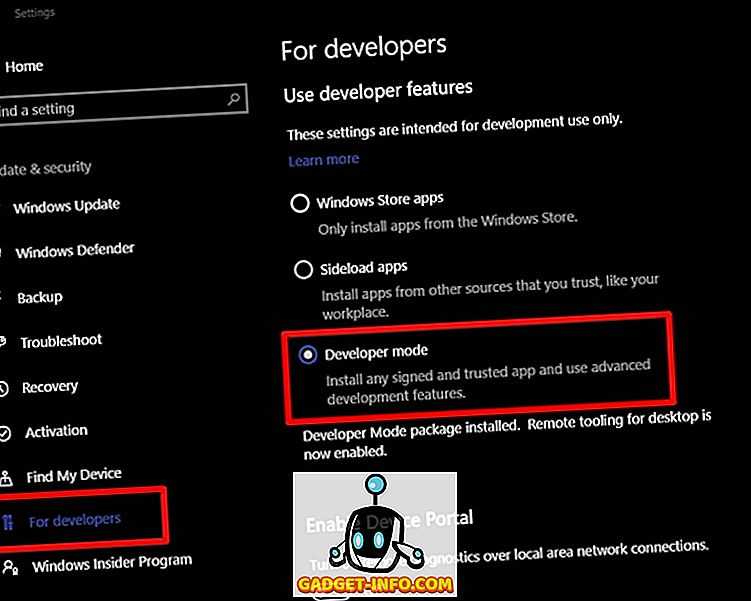
1. Откройте PowerShell.
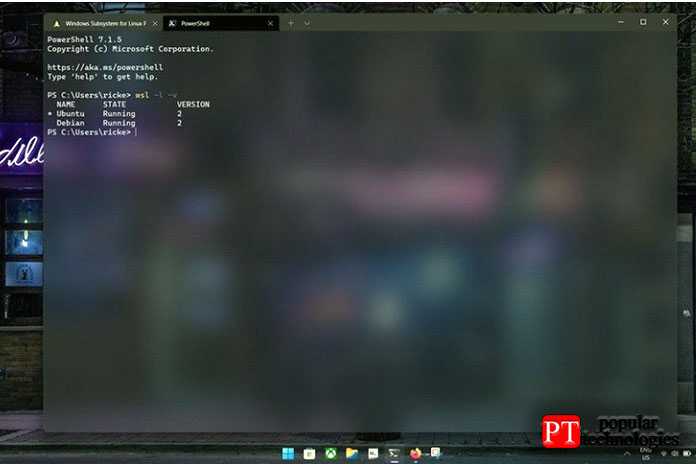
2. Чтобы получить точное название нужного вам дистрибутива, введите wsl -l -v.
3. Войдите в терминал .
Параметр отмены регистрации указывает WSL полностью уничтожить все следы файловой системы и все данные, содержащиеся в ней. Так, например, если вы хотите удалить установку Debian, ваша команда будет выглядеть так:
Он также чувствителен к регистру и должен быть точным, поэтому рекомендуется сначала запустить Шаг второй. У Ubuntu, например, есть несколько разных версий, и вам может потребоваться указать номер версии, например Ubuntu 20.04. Хотя это будет зависеть от того, какой пакет вы установили в первую очередь.
Как установить WSL с определенным дистрибутивом в Windows 11
Для моментальной установки программы при помощи командной строки, действуйте согласно инструкции:
- Для начала откройте «Командную строку» либо «Виндовс Терминал». Действуйте только от имени администратора компьютера, используя главное меню, либо при помощи «Пуск».
- Теперь введите необходимую команду, установите ВСЛ в Виндовс 11 и нажмите на клавишу «Энтер».
- Дождитесь загрузки и проведите перезагрузку компьютера.
Как только дистрибутив загрузится на устройство, автоматически включается инсталляция данных, запускаются дополнительные компоненты. Настройте скачанную утилиту под свое удобство и параметры, чтобы использовать было легче. Также предлагается вписать логин и пароль, чтобы вовремя открывать утилиту.
При особой необходимости установите дистрибутив на Линукс. Как только все шаги выполните согласно с требованиями, вы можете пользоваться установленными дистрибутивами в удобном формате. Все необходимые компоненты устанавливаются автоматически, в последней версии представлены дополнительные опции. Как видно, установить WSL в Windows 11 несложно, процедура занимает не больше 5-10 минут.
Установка и использование WSL
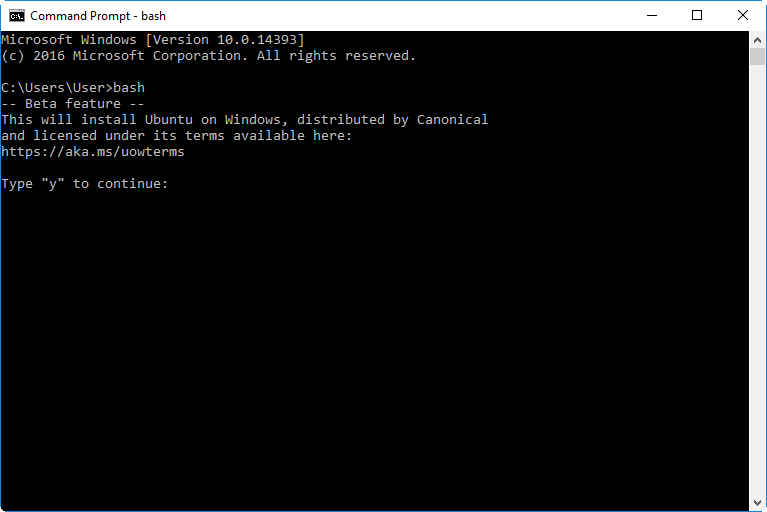
В Windows 10 версии 2004 и более новых для установки WSL теперь достаточно запустить приложение «Командная строка» или, к примеру, более продвинутый PowerShell с правами администратора, и ввести простую команду: “wsl.exe —install”.
Microsoft максимально автоматизировала процесс настройки поддержки WSL в Windows 10
После нажатия кнопки ввода система автоматически активирует все необходимые компоненты и установит дистрибутив Ubuntu и наиболее свежую версию ядра Linux на ПК. По завершении процесса потребуется перезагрузка, после которой запустится установленный дистрибутив Linux, чтобы завершить настройку.
Если пользователя той или иной причине не устраивает Ubuntu, с помощью команды “wsl.exe —list —online” можно вывести в консоль список доступных альтернатив. Выбрав наиболее подходящий дистрибутив, его можно установить, введя команду “wsl —install —d <название_дистрибутива>». Таким способом допускается установка как основного (по умолчанию), так и нескольких дополнительных дистрибутивов Linux.
Кроме того, разработчики из Microsoft предусмотрели несколько команд для управления ядром Linux в WSL2. К примеру, команда “wsl —update” позволяет обновить его до самой последней доступной версии, а “wsl —update rollback” – откатить до предыдущей.
Наконец, команда “wsl —status” выводит на экран сведения о конфигурации WSL на данной машине, в том числе дистрибутив по умолчанию и версию ядра Linux.
How to install Windows Subsystem for Linux on Windows 11
Earlier, the process to install Windows Subsystem for Linux is too complicated, involving many packages. You need to work around multiple settings and install WSL on your PC. Microsoft has now eased the process, and it is just a command away.
You can just enter a command and let the command take care of the entire process of installing Windows Subsystem for Linux on your PC. All you need to have is an account with administrative privileges, joined in the Windows Insiders Program on Windows 11.
To install Windows Subsystem for Linux (WSL) on Windows 11,
- Run Command Prompt as an administrator
- copy/paste the command wsl.exe –install and press Enter
- Restart your PC to make the installation ready for use.
To get started, open Command Prompt with administrative privileges from the Start menu and enter the following command, and press Enter.
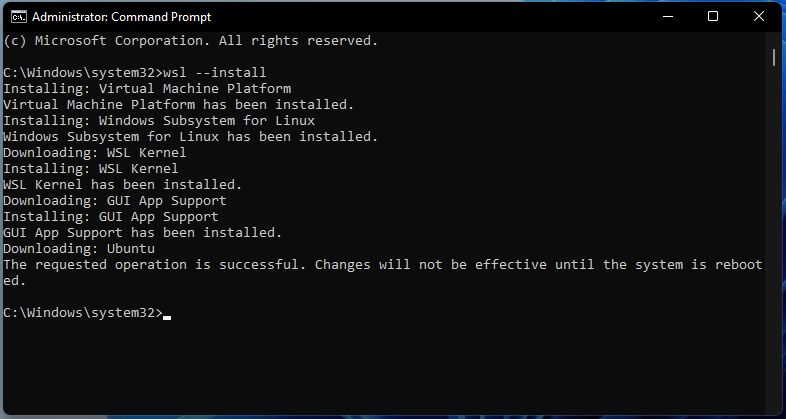
wsl --install
Now, the command will enable the WSL and Virtual Machine Platform components on your PC, eliminating all the manual steps that will install WSL. Then, it will download and install the latest version of the Linux kernel and then Linux distribution. You will see the status on Command Prompt window. When it is done, restart your PC with Windows Subsystem for Linux (WSL), read to use.
It will take a few minutes to open the WSL for a time after the installation as it needs to decompress files and store it on your PC. When the process is completed, create a user account for your WSL. After that, you would be able to open it in a jiffy.
How to see a list of available Linux distributions
In addition to the command to install Windows Subsystem for Linux (WSL) on your PC, there are a couple more commands that let you see the complete list of Linux distributions that are available to install on your PC.
To see them, open Command Prompt with administrator privileges and type the following command and press Enter:
wsl --list --online
It will show you the list out of which you can choose a version to install using the following command, where you have to replace the distribution name with the one you see in the list.
wsl --install -d <Distribution Name>
This command will stop installing the default version of Linux distribution and start installing the selected one. It can also be used to install additional Linux distributions to the existing installation. To see the Windows Subsystem for Linux status with general information of the configuration, distribution type, default distribution, kernel version, you can use the following command.
wsl --status
It will display all the information about the WSL on your PC.
How to manually update Windows Subsystem for Linux
There are commands available that can be used to update your WSL Linux kernel or roll back and update to the previous one.
To manually update the Windows Subsystem for Linux, type the following command in the Command Prompt and press Enter.
wsl --update
How to rollback Windows Subsystem for Linux
To roll back an update to the previous version, use the following command.
wsl --update rollback
These are the various commands which can be used to install Windows Subsystem for Linux (WSL) on your PC, see the list of available Linux distributions, update or roll back the updated WSL.
These commands are usable not only on Windows 11 but if you are on the Windows Insiders Program and have a preview build of Windows 10 OS (build 20262 or higher), you can use the commands to get all the above functionalities on your Windows 10 PC.
What can I do with Windows Subsystem for Linux?
With Windows Subsystem for Linux installed on your PC, you can use command-line Linux tools and apps along with the existing Windows tools. You can access all the files from the WSL using commands.
How do I manually install WSL?
You can install WSL on Windows 11/10 in two ways. The good-old method where you have to download all the installation packages, enable Virtual Machine Platform components on your pc, etc. Now, if you are on the Windows Insider Program and are in line with the latest builds of Windows 11/10, you can install using a command.


![How to install linux bash shell on windows [step-by-step guide]](https://nephros-crimea.ru/wp-content/uploads/0/a/3/0a35cfcdb22b32e5410c3a28cb9bf8e8.jpeg)

Related read: How to install Windows Subsystem for Linux 2 on Windows.
How to install Windows Subsystem for Linux in Windows 11
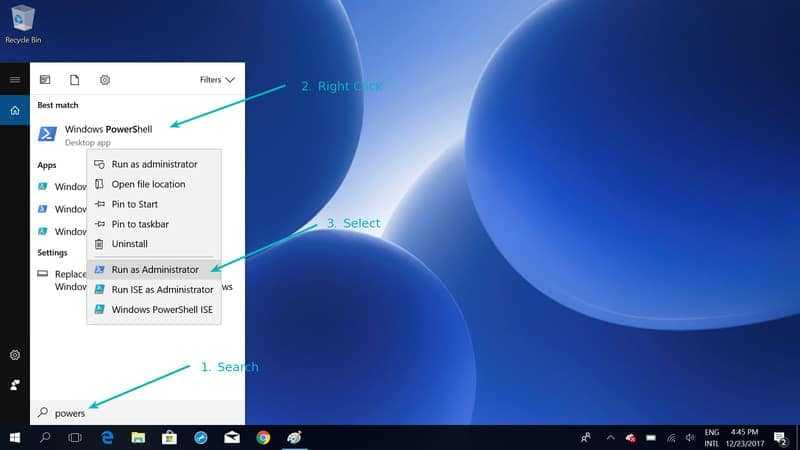
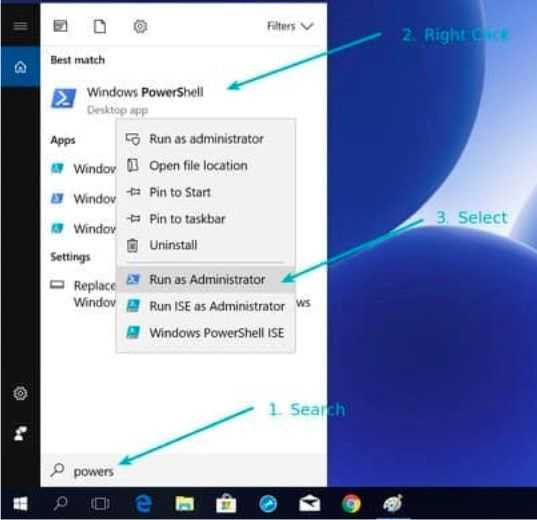
1. Launch either PowerShell or Command Prompt as the system’s administrator. This is most easily accomplished by searching for “PowerShell” or “Command Prompt” from the Start menu. Whichever option you choose, don’t just launch the command line by hitting “Enter,” because Windows isn’t going to let you install WSL as a regular user. Instead you should click “Run as administrator” from the search results.
(Image credit: Tom’s Hardware)
2. Enter the following command:
Assuming you launched PowerShell (as shown in our example) or Command Prompt as an administrator, that command should automatically enable the services WSL relies on, download the utility, and install everything it needs to function without any further input. It also downloads and installs Ubuntu, a popular Linux distribution that can be found in everything from single-board computers to enterprise-class servers, by default.
(Image credit: Tom’s Hardware)
3. Restart your PC. A notification should appear telling you that WSL has been installed and will be available to use after you restart your PC. You don’t have to restart your system right away, but if you don’t, WSL will remind you it needs to be restarted the next time you try to do anything with the utility. So restart as soon as is convenient.
WSL will install itself after your reboot.
4. Enter a username and password when prompted by WSL. These will be your credentials for WSL only.
(Image credit: Tom’s Hardware)
What to do if you’re told “The requested operation requires elevation”
If you enter “wsl —install” and see an error message like the one below, it’s because you aren’t running PowerShell or Command Prompt as an administrator, and you’ll need to do so if you want to install WSL. Refer to the first step for instructions on how to run the apps as an admin.
(Image credit: Tom’s Hardware)
Как удалить WSL в Windows 11?
- Нажмите Windows +I одновременно, затем выберите « Приложения », а затем « Приложения и функции ».
- В поле поиска введите Ubuntu , затем щелкните меню из трех точек и выберите « Удалить » .
- Теперь введите Linux и щелкните меню из трех точек рядом с Подсистема Windows для Linux WSLg Preview, а затем Удалить.
- Повторите шаг для обновления подсистемы Windows для Linux .
- Теперь вернитесь и получите доступ к дополнительным функциям в разделе « Приложения ».
- Нажмите « Дополнительные функции Windows » в разделе « Связанные настройки ».
- Теперь снимите флажок Платформа виртуальной машины , а также Подсистема Windows для Linux . Вот и все! Перезагрузите компьютер, чтобы применить сделанные изменения.
В этот момент WSL будет полностью удален с вашего компьютера, как вы и хотели.
Каковы преимущества использования WSL?
Поскольку у большинства разработчиков нет доступа к нескольким компьютерам, обычно программы разрабатываются на многих платформах.
Благодаря функциям подсистемы Windows для Linux (WSL), предоставляемым Microsoft, теперь довольно просто настроить среду разработки Linux на машине, на которой работает операционная система Windows.
До тех пор, пока Microsoft не выпустила WSL (подсистему Windows для Linux) в 2016 году, единственным способом разработки приложений Linux на компьютерах с Windows были удаленные подключения к хосту или виртуальные машины.
При использовании WSL вы можете устанавливать и запускать дистрибутивы Linux на 64-разрядных компьютерах с Windows 10 (начиная с версии 1607). Первоначально он поддерживал только дистрибутив Ubuntu Linux, но в настоящее время поддерживает большое количество дополнительных дистрибутивов Linux.
Используя WSL, можно запускать приложения и инструменты Windows вместе с инструментами командной строки Linux, используя меньше ресурсов (таких как ЦП, память и хранилище), чем запуск полной виртуальной машины на том же компьютере.
Он предлагает значительные преимущества в производительности по сравнению с виртуальными машинами (ВМ) для разработчиков, использующих компьютеры Windows для разработки приложений Linux.
Было ли это руководство полезным? Дайте нам знать в разделе комментариев ниже. Спасибо за прочтение!
Краткая история WSL
Александр Семенов, «Корус Консалтинг»: Последствия изменений для бизнеса растянутся еще на многие годы
Бизнес

Linux-приложения, запущенные через WSLg, поддерживают полноценное воспроизведение звука и запись с микрофона без изменения каких-либо настроек. Окна таких программ, по заявлению Microsoft, правильно отображаются в карусели запущенных приложений (вызывается по нажатию комбинации клавиш Alt+Tab) и на панели задач, а также в полном объеме поддерживают взаимодействие через буфер обмена. Наравне с «родными», Linux-приложения после установки попадают в меню «Пуск».
Сергей Казанцев, НЛМК: Монополия на «цифру» уходит в прошлое

Кроме того, заявлена поддержка аппаратного ускорения вывода изображения с помощью графического процессора (GPU). Данная функция позволяет системе отрисовывать элементы интерфейса плавно и быстро, не нагружая центральный процессор, однако требует специальной версии графических драйверов.
Installing WSL2 Under Windows 11
One may find a detailed installation procedure for installing WSL2 under Windows 11 and using GUI based Linux application in
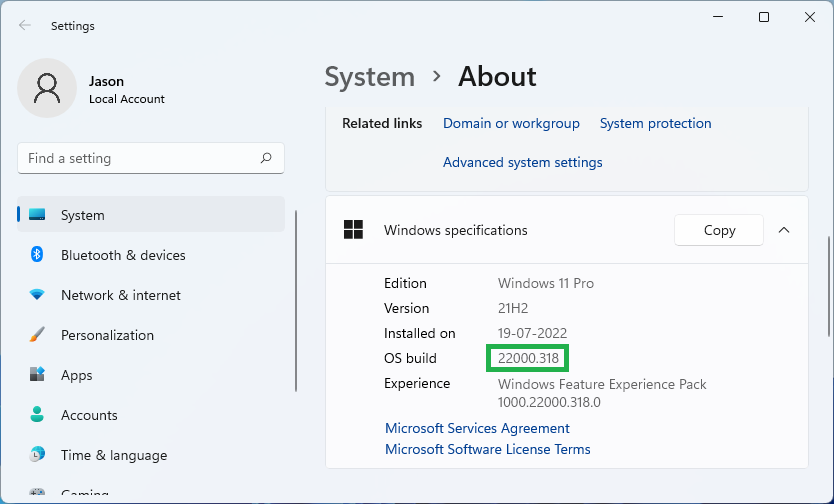
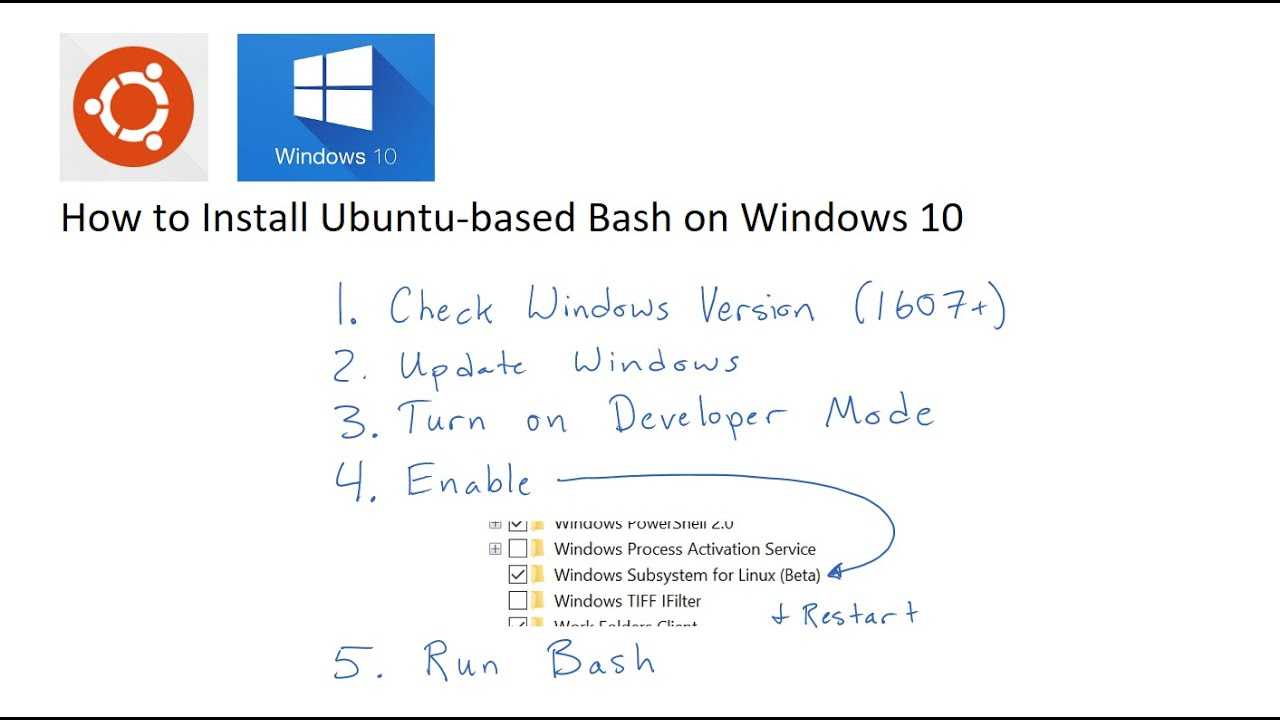
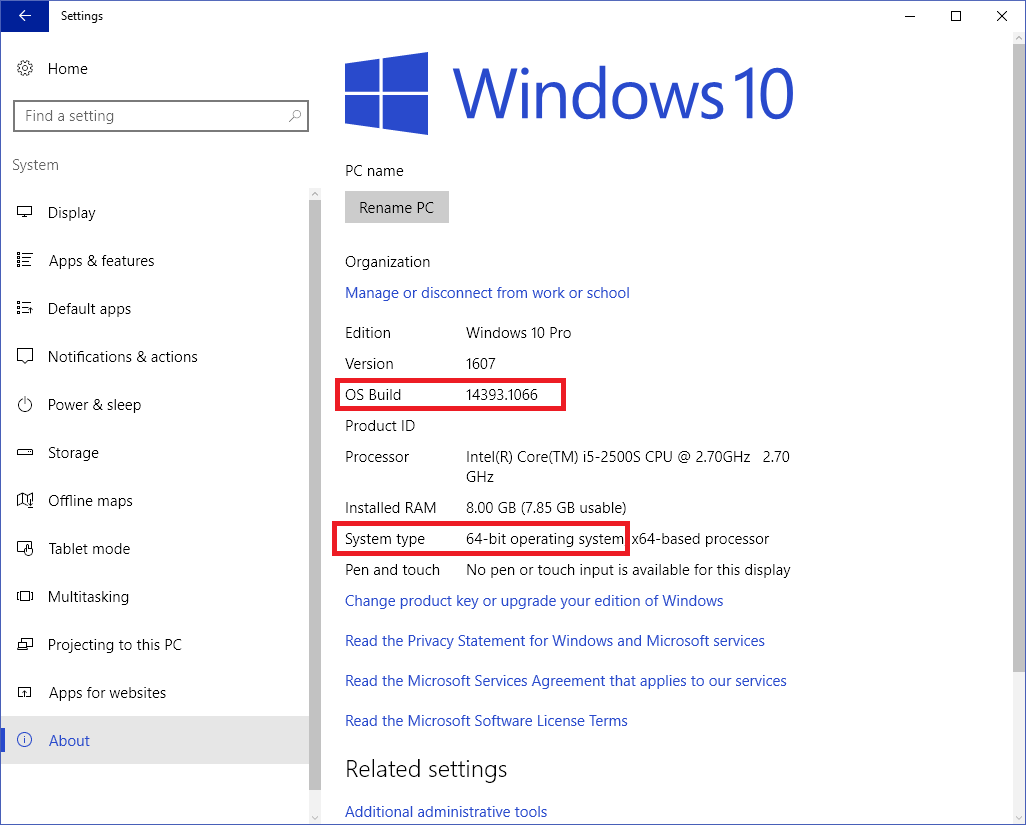
Step 1: Check the Windows ll Version
For running WSL2 with Linux GUI application support, we should use a suitable version of Windows 11. The OS build number of the Windows 11 must be higher than 22000. You may check it in System->About->Windows specifications section
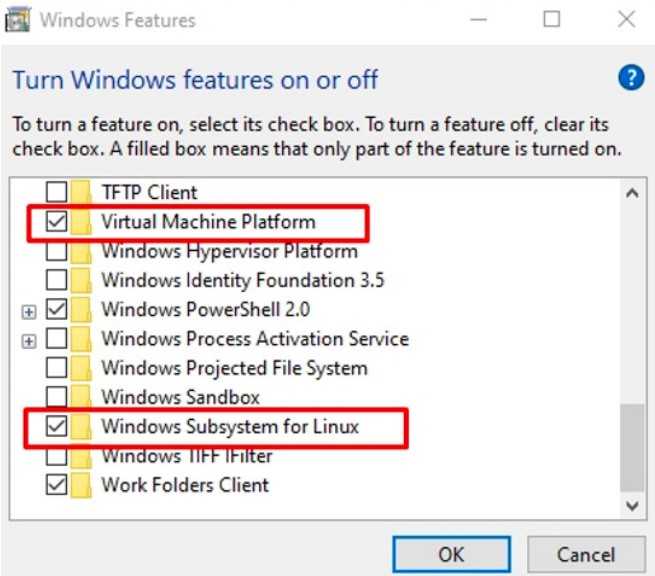
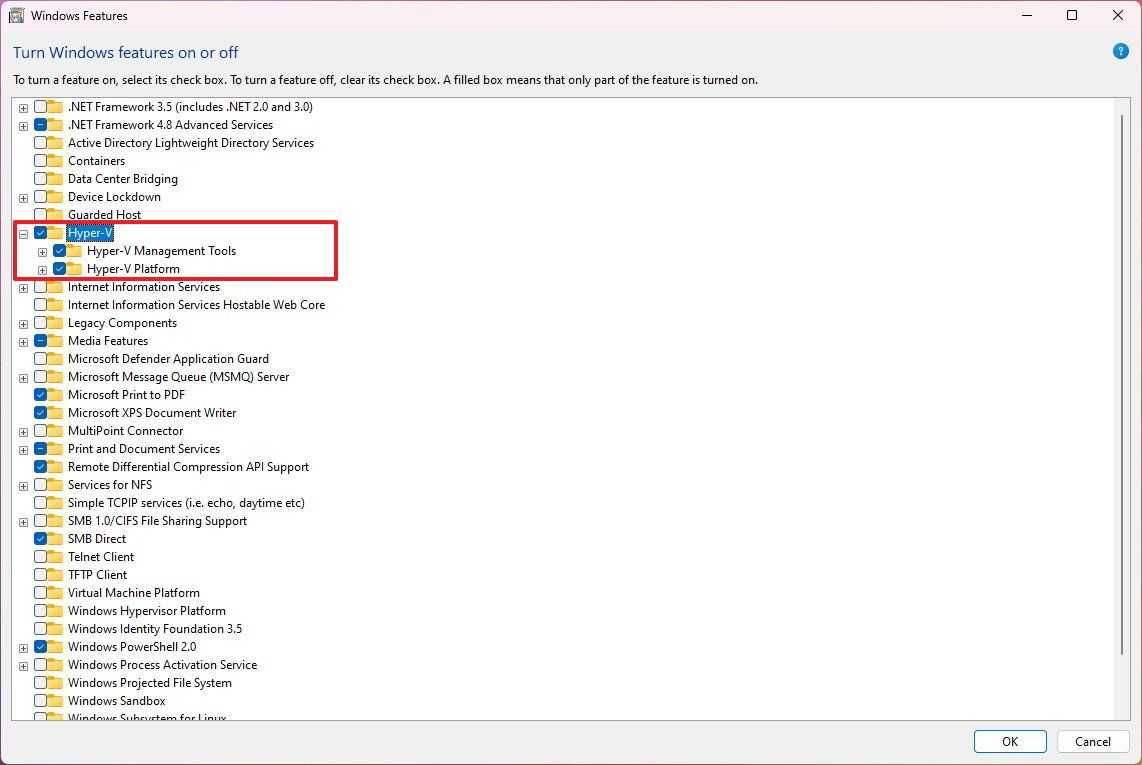
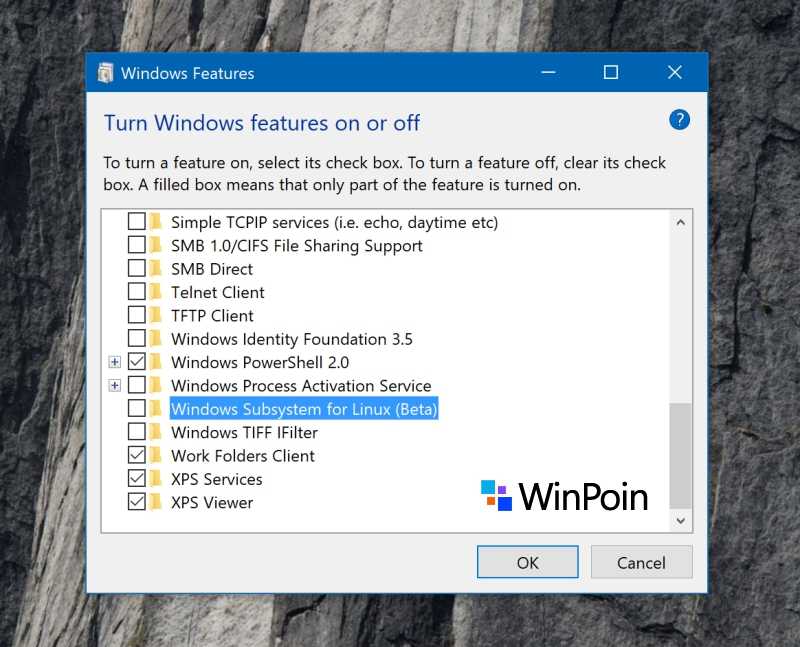
Step 2: Enable the Windows features “Virtual Machine Platform”
Open the “Turn Windows features on or off” window and enable the “Virtual Machine Platform” feature

Now we can install WSL2 support and suitable a Linux in it
Step 3: Install Windows Subsystem for Linux Preview
We can install “Windows Subsystem for Linux Preview” from the Microsoft Store. We may search for it in the search box and can find it and install it from here.
In fact, this preview version of WSL2 only supports running the Linux GUI application out of the box without any additional Xserver component. (it means, the X-server components are already buit-in with this WSL2 package)
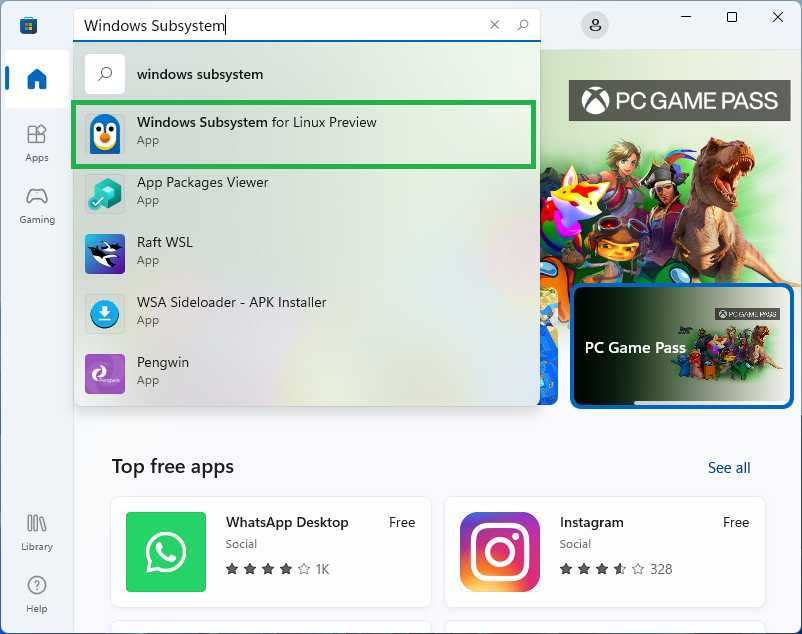
After the successful installation of “Windows Subsystem for Linux Preview” , we can run the command ‘wsl’ from the “Windows PowerShell” – but it will not contain the Linux system installed in it. So, before running ‘wsl’ command, we have to install a suitable version of Linux from the Microsoft Store.
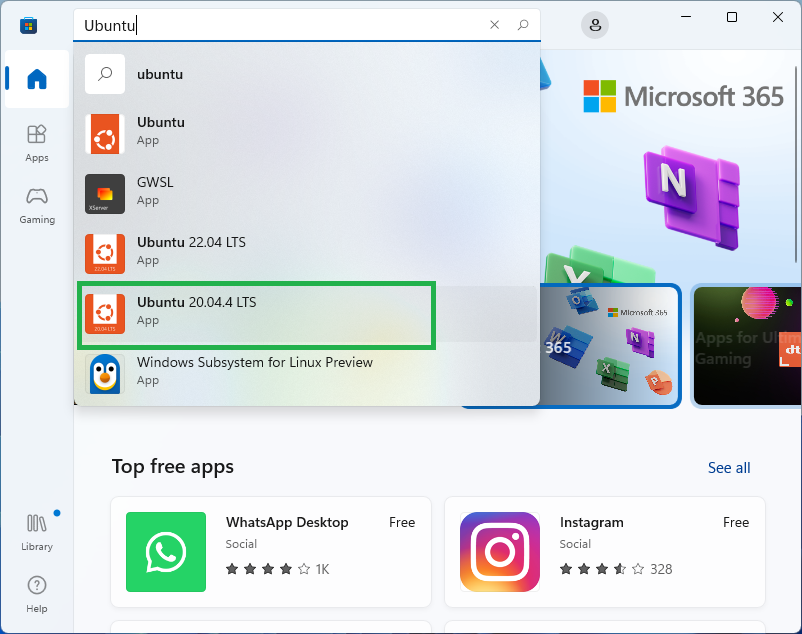
Step 4: Installing a Suitable Linux version from Microsoft Store.
We can install a suitable version of “Ubuntu” from the Microsoft Store. We may search for it in the search box and can find it and install it. Here we are installing Ubuntu 20.04.4 LTS version.
Step 5: Running Ubuntu
Now we can run the newly installed Ubuntu from the menu itself.
During the first run, it will ask and set a Linux user name and password. After that, it will directly run the terminal without asking username/password.
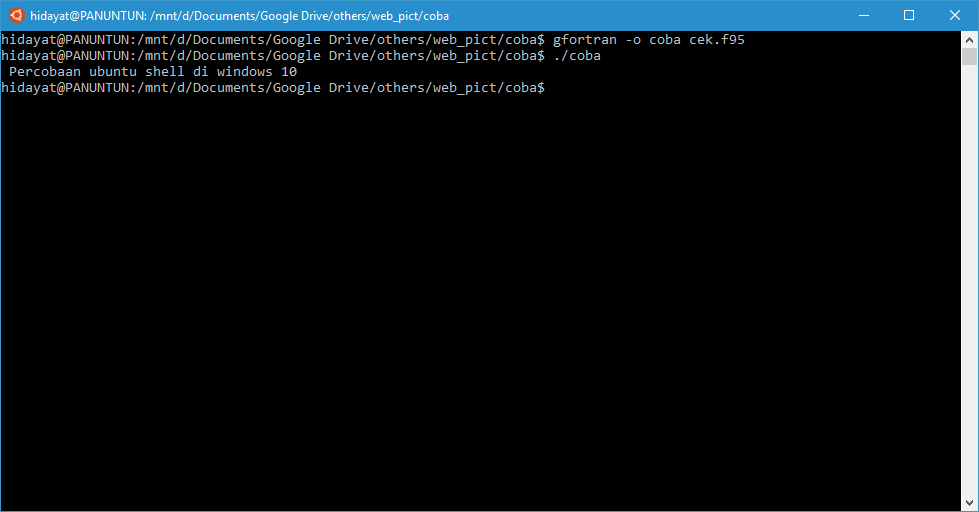
The following output shows the Ubuntu Terminal window which is running on WSL2. Here we may run any text-based and GUI-based Linux commands and applications.
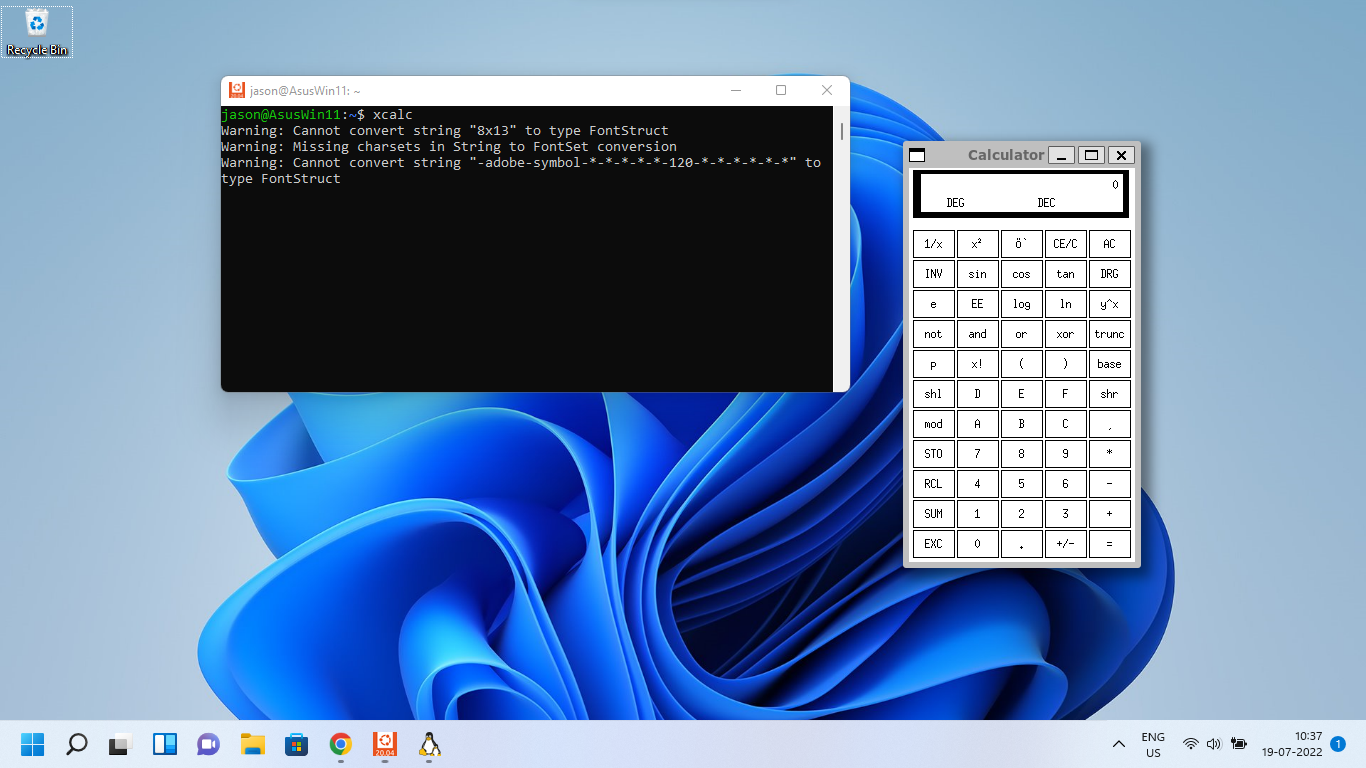
Step 6: Installing some x11-based applications
On the latest Windows 11, WSL2 comes with WSLg (the graphical support) enabled by default. WSLg allows you to run graphical linux applications. So, now we can install some simple x11-based GUI applications and test the working of Linux GUI applications on Windows 11.
First, update the Ubuntu package repository.
$ sudo apt update
(After that, if necessary, we can upgrade the entire system with the latest modifications)
Now, to test the GUI application support, we can install some basic X11 applications as follows:
$ sudo apt install x11-apps
Step 6: Running a sample GUI application
In the following example, we are running a Linux GUI application called “xcalc”. If you notice that, the new Linux GUI application which is running under WSL2 Linux environment is getting displaying its “window” on the host (Windows 11) desktop itself
How to Test Windows Subsystem for Linux on Windows 11
If you’re unsure how to test whether WSL is working, you can use the Windows Terminal to do so.
First, open a new terminal by right-clicking the Start menu and selecting Windows Terminal (Admin). In the terminal window, press + (plus), then select Ubuntu. Alternatively, launch Ubuntu from the Start menu.


Once you’re ready to use WSL, you can use a Linux game called Tux Racer to see if WSL is working correctly. These steps will only work if you’re using WSL with Ubuntu, Debian, or related distributions.
To do this, type the following commands in your Linux WSL terminal, one after another:
sudo apt update
sudo apt upgrade
You can also run them together (sudo apt update && sudo apt upgrade). Once these commands finish checking for updates, type the following command to install the game:
sudo apt install extremetuxracer
When the prompt asks if you want to continue, type Y and hit Enter.
Tux Racer takes a few seconds to install. Once it does, you’ll find the Linux app in the Start menu—press on it to run it like you would any other Windows app.
There you go! You’re now running your first Linux app on Windows 11. Have fun!
Conclusion
With the latest Windows 11 and its WSL2 support, we can run any GUI-based Linux applications under windows. The future version of WSL may even have excellent support for applications that may use 3D graphics subsystem.
Now we can install any text-based as well as GUI-based Linux application under this Ubuntu which is running under WSL2. So, now it is possible to install ns-3 with ‘NetAnim‘ (GUI) or ns-2 with the ‘nam‘ (GUI) OMNet++ with its ‘IDE’ (GUI), SUMO (GUI).
Note : But, you can not get good performance in terms of speed if you are comparing it with a native Linux installation on the same hardware. Even WSL may perform poor than some other virtualization solutions such as Virtual box (where it is possible to use a minimal, stripped version of Linux for better performance). So, if you are going to do some serious research work, I will advice using a simulator such as ns-3, only under a native Linux operating system and on native hardware.
The following Procedure explains the installation of ns-3 and NetAnim Under Windows 11 with WSL2 :
The following Procedure explains the installation of OMNet++ IDE Under Windows 11 with WSL2 :
Meantime, one may try the following installation procedures under WSL2.
Установка Kali Linux с графическим интерфейсом в Windows 10
Порядок установки Kali Linux с графическим интерфейсом (GUI) для подсистемы Windows для Linux будет состоять из следующих шагов (напоминаю: необходима версия Windows 10 2004 или новее):
- Включите компонент «Подсистема Windows для Linux». Сделать это можно в Панель управления — Программы и компоненты — Включение или отключение компонентов Windows. После установки перезагрузите компьютер.
- Этот шаг можно пропустить, если у вас включены компоненты Hyper-V, иначе запустите Windows PowerShell от имени администратора (можно сделать через правый клик по кнопке «Пуск» и выполните команду
dism.exe /online /enable-feature /featurename:VirtualMachinePlatform /all /norestart
- Скачайте и установите обновление ядра Linux WSL2 со страницы https://docs.microsoft.com/ru-ru/windows/wsl/wsl2-kernel
- Перезагрузите компьютер, запустите PowerShell от имени администратора и выполните команду
wsl --set-default-version 2
- Зайдите в магазин приложений Windows Store, используйте поиск чтобы найти и установить Kali Linux.
- После завершения установки в PowerShell от имени администратора выполните команду:
wsl --set-version kali-linux 2
- Запустите Kali Linux (пункт будет доступен в меню «Пуск»), выполните первоначальную настройку (имя пользователя и пароль), после чего по порядку выполните следующие команды (требуется подключение к Интернету, последний шаг может занять много времени.
sudo apt update
sudo apt dist-upgrade
sudo apt install -y kali-win-kex
- В ходе выполнения последней команды вам будет предложено выбрать клавиатуру. Я оставил значения по умолчанию, но, возможно, стоило выбрать русскую, так как в дальнейшем при включении русского языка интерфейса в ряде случаев кириллица не отрисовывается (не знаю, есть ли связь, лишь предположение).
- По завершении установки введите команду kex для запуска Kali Linux с графическим интерфейсом. При первом запуске вам будет предложено создать отдельный пароль, можно от этого отказаться.
В результате запустится Kali Linux с графическим интерфейсом в полноэкранном режиме. Для выхода из полноэкранного режима можете вызвать меню клавишей F8 и отключить опцию «Full Screen».
Если вам потребуется включить русский язык интерфейса для Kali Linux, у меня сработал следующий метод:
- В графическом интерфейсе Kali Linux запускаем терминал, вводим команду
sudo dpkg-reconfigure locales
- Выбираем ru_RU UTF-8 на двух экранах (отметку ставим пробелом, переключаемся на кнопку Ok клавишей Tab).
- Закрываем окно терминала и окно графического интерфейса, в терминале из которого мы запускали графический интерфейс вводим kex stop (если приглашение ввода не отображается, попробуйте изменить размер окна — у меня встретился такой баг).
- Снова запускаем kex — в результате интерфейс будет на русском языке.
Windows Subsystem for Linux
Back in 2016, Microsoft introduced Windows Subsystem for Linux (WSL). It allows developers to run a GNU/Linux environment on Windows without a dual boot or setting up a virtual machine. In this environment, you can run many command-line utilities, tools, and apps.
In 2019, WSL2, an improvement of version 1, is released. To get improved compatibility, this new version runs a full Linux kernel in a Hyper-V hypervisor. When enabling this feature, a Microsoft-built Linux kernel running in the background will be downloaded and Windows keeps the kernel updated.
To use WSL2, Windows 10 should be version 1903 or higher with Build 18362 or higher for x64 systems while for ARM64 systems, the system should be version 2004 or higher with Build 19041 or higher. Besides, if you are running Windows 11, all the editions including Home are supported.
Well then, how can you use WSL on Windows 11? Follow the guide below to do this work.
Как запустить Linux с виртуальной машиной в Windows 11
Если вы предпочитаете использовать более традиционную виртуальную машину с доступом к интерфейсу рабочего стола Linux, вам потребуется включить приложение Hyper-V Manager, создать виртуальную машину и установить нужный дистрибутив.
Включить Hyper-V в Windows 11
Чтобы включить Hyper-V в Windows 11, выполните следующие действия:
- Открыть настройки.
- Нажмите Приложения.
- Нажмите на страницу «Дополнительные функции» справа.
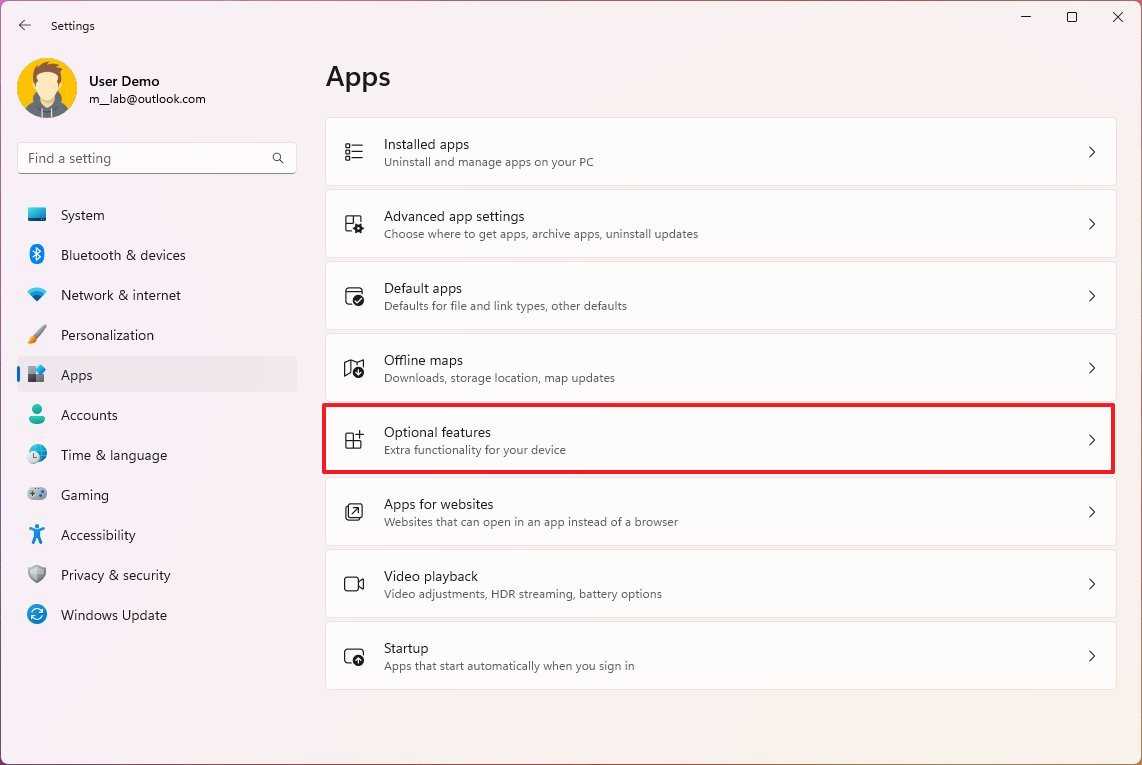
- В разделе «Связанные параметры» щелкните параметр «Дополнительные функции Windows».
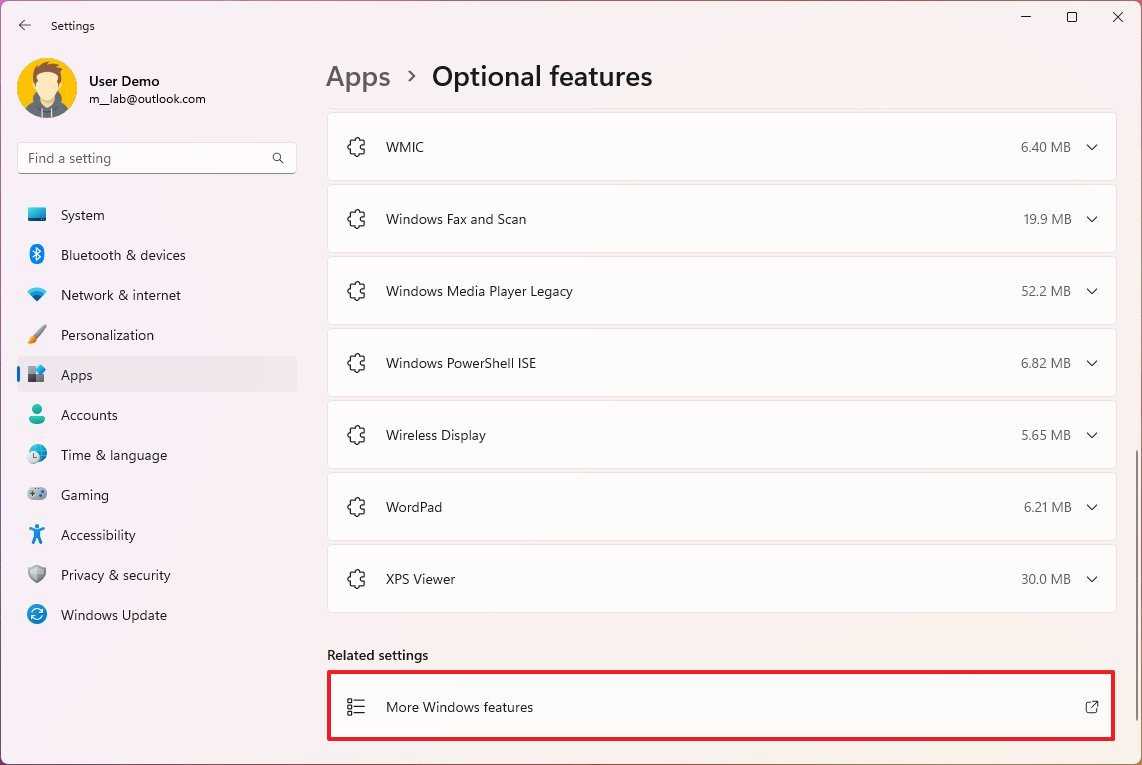
- Проверьте параметр Hyper-V.
- Нажмите кнопку ОК.
- Нажмите кнопку «Перезагрузить сейчас».
После того, как вы выполните шаги, вы можете приступить к созданию виртуальной машины.
Создать виртуальную машину Linux (быстро)
В Windows 11 у вас есть два способа создать виртуальную машину. Вы можете использовать быстрый метод, который загружает одну из доступных версий Ubuntu и автоматически настраивает виртуальную машину. Или вы можете вручную создать виртуальную машину, которая позволит вам установить любой дистрибутив Linux.
Чтобы использовать функцию «Быстрое создание» в Hyper-V для настройки виртуальной машины Linux, выполните следующие действия:
- Откройте Пуск.
- Найдите Hyper-V и выберите верхний результат, чтобы открыть приложение.
- Нажмите «Действия» в верхней части навигации и выберите параметр «Быстрое создание».
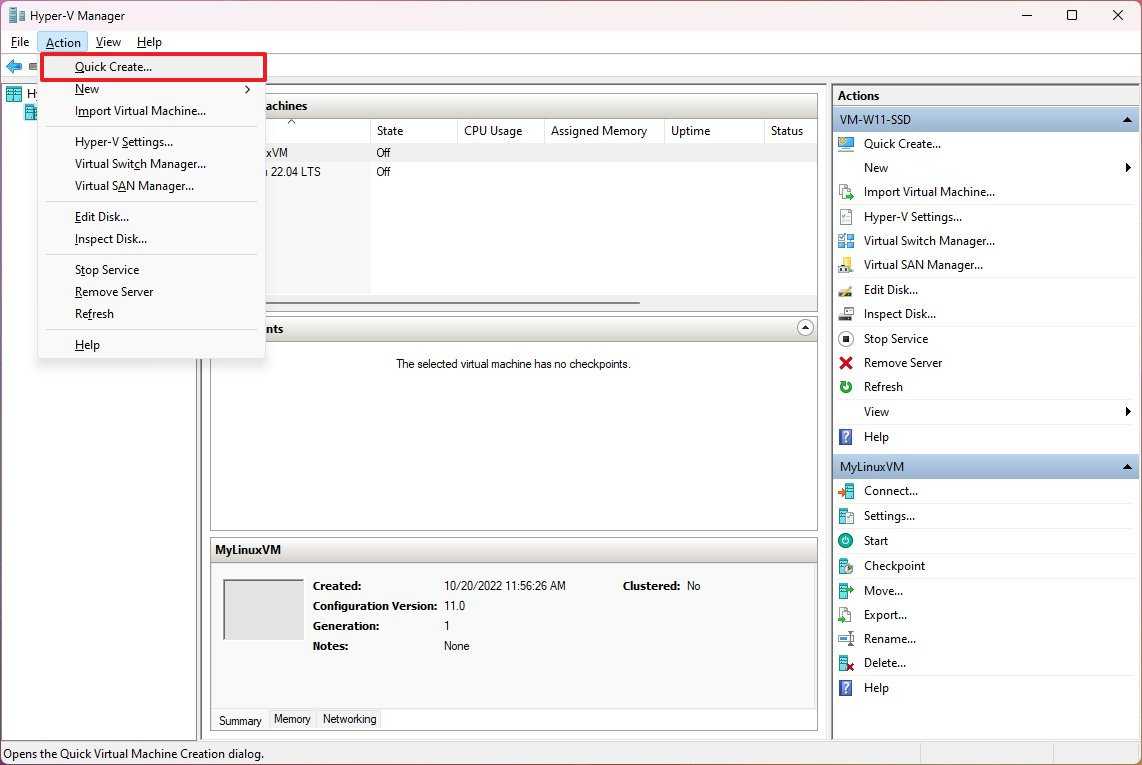
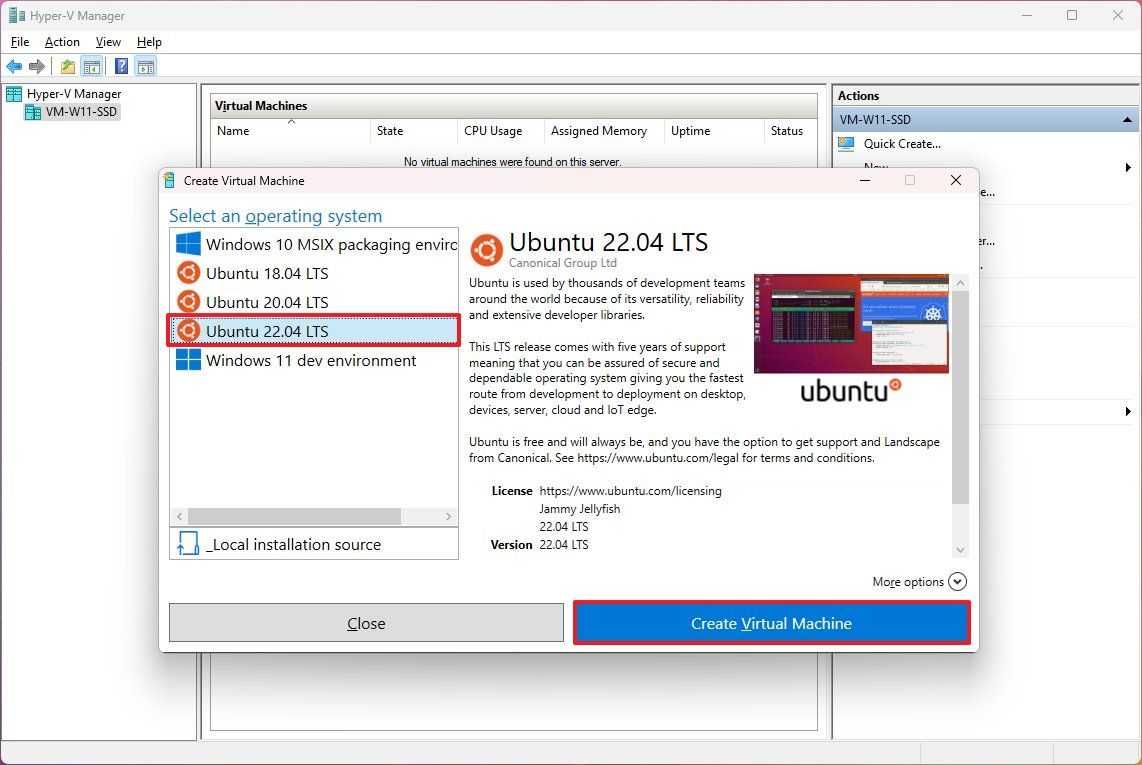
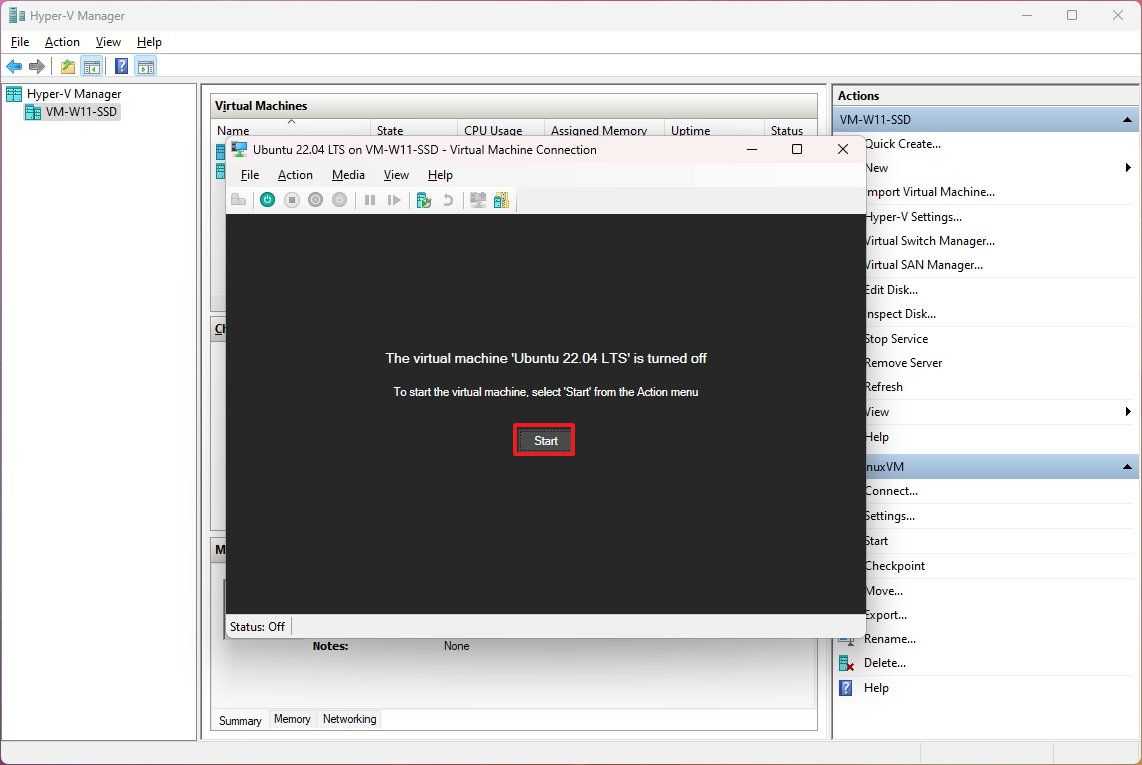
- Выберите версию Ubuntu для установки в Windows 11.
- Нажмите кнопку «Создать виртуальную машину».
- Нажмите кнопку Подключить.
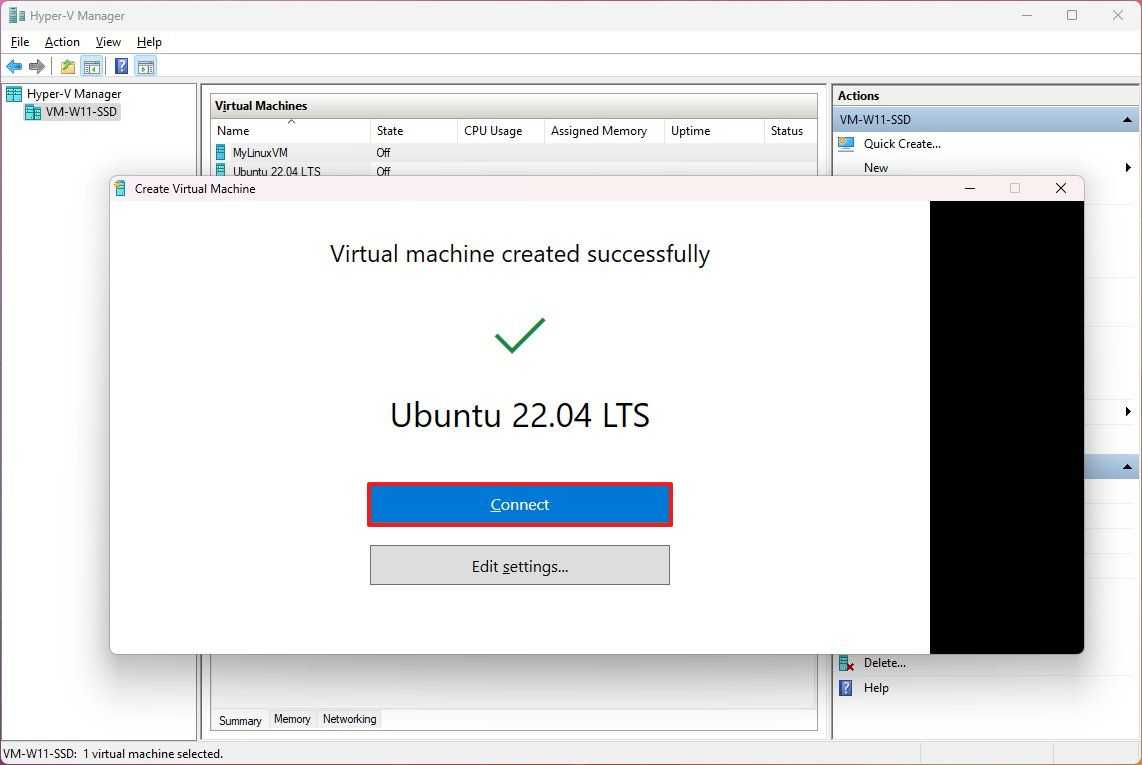
- Нажмите кнопку «Пуск».
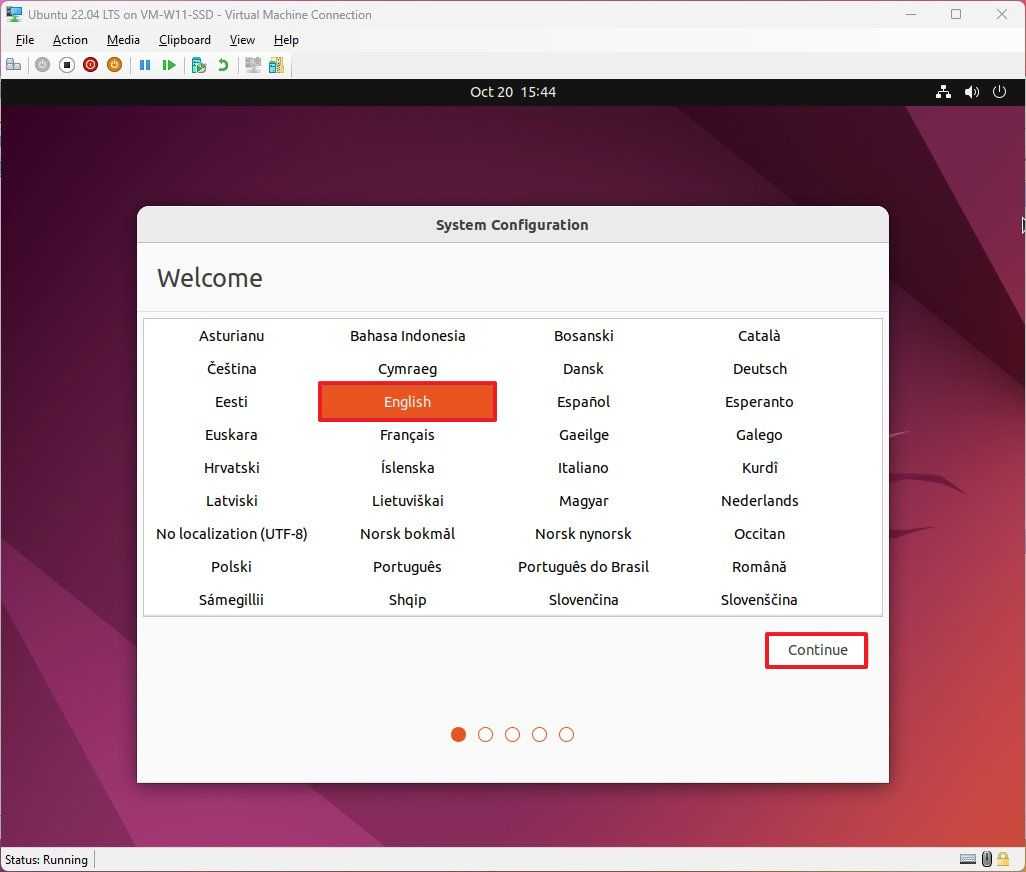
- Выберите свой язык.
- Нажмите кнопку «Продолжить».
- Выберите раскладку клавиатуры.
- Нажмите кнопку «Продолжить».

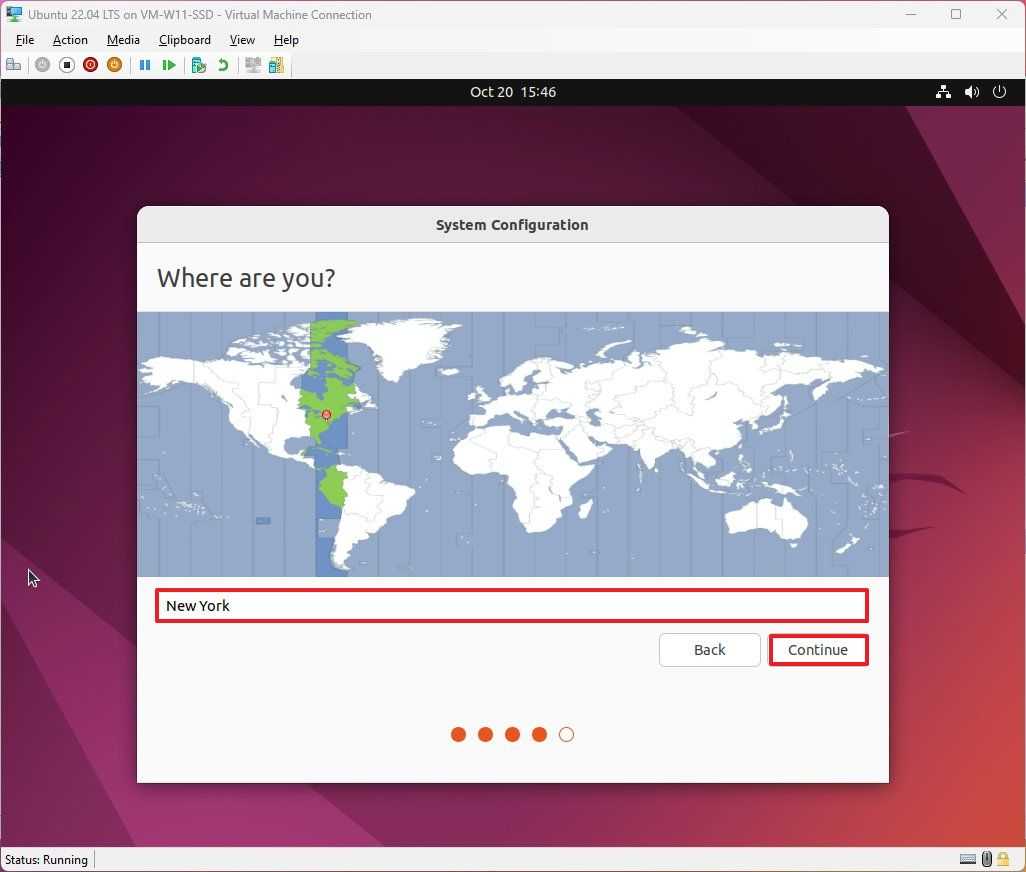
- Выберите ваше местоположение.
- Нажмите кнопку «Продолжить».
- Создайте учетную запись пользователя и пароль.
- Нажмите кнопку «Продолжить».
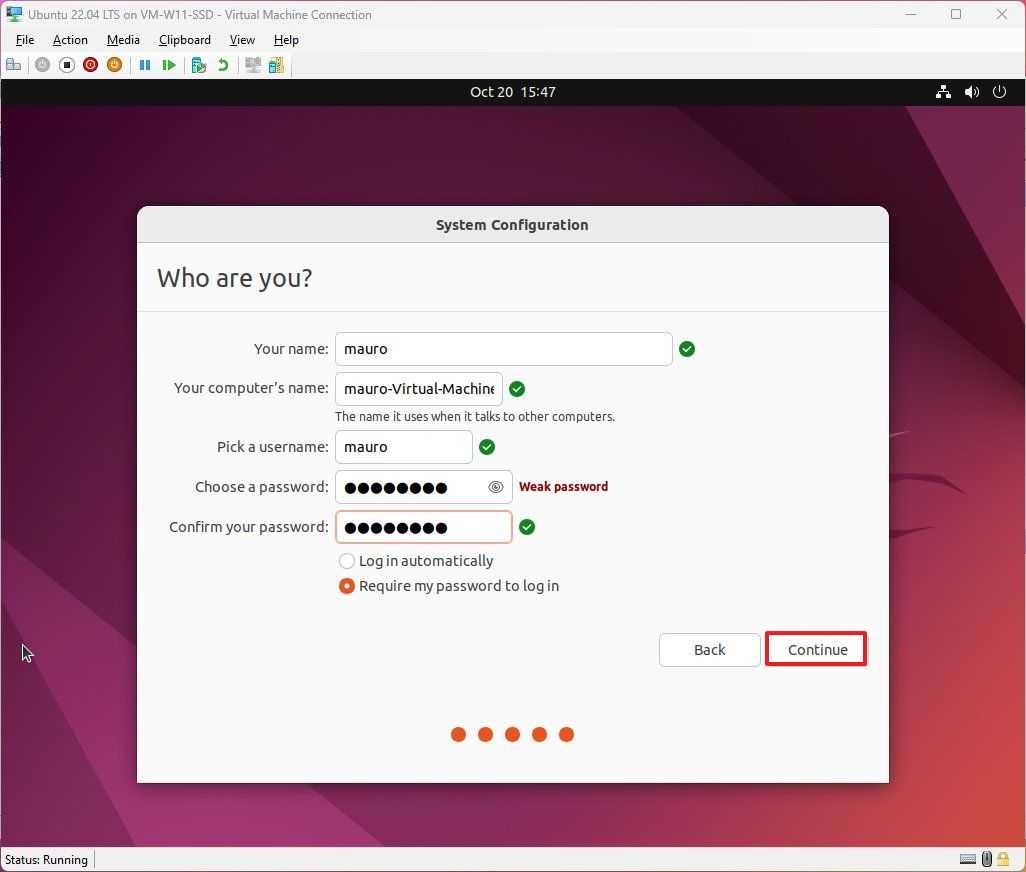
После выполнения этих шагов вы можете начать использовать Ubuntu Linux вместе с Windows 11 с графическим интерфейсом рабочего стола.
Создать виртуальную машину Linux (вручную)
Кроме того, вы можете создать виртуальную машину вручную, используя файл ISO вашего любимого дистрибутива Linux.
Чтобы создать виртуальную машину Linux Hyper-V в Windows 11, выполните следующие действия:
- Откройте Пуск.
- Найдите Hyper-V и выберите верхний результат, чтобы открыть приложение.
- Нажмите «Действия» в верхней части навигации, выберите «Создать» и выберите параметр «Виртуальная машина».

- Подтвердите имя машины.
- (Необязательно) Установите флажок «Сохранить виртуальную машину в другом месте» и укажите место для хранения машины Linux.
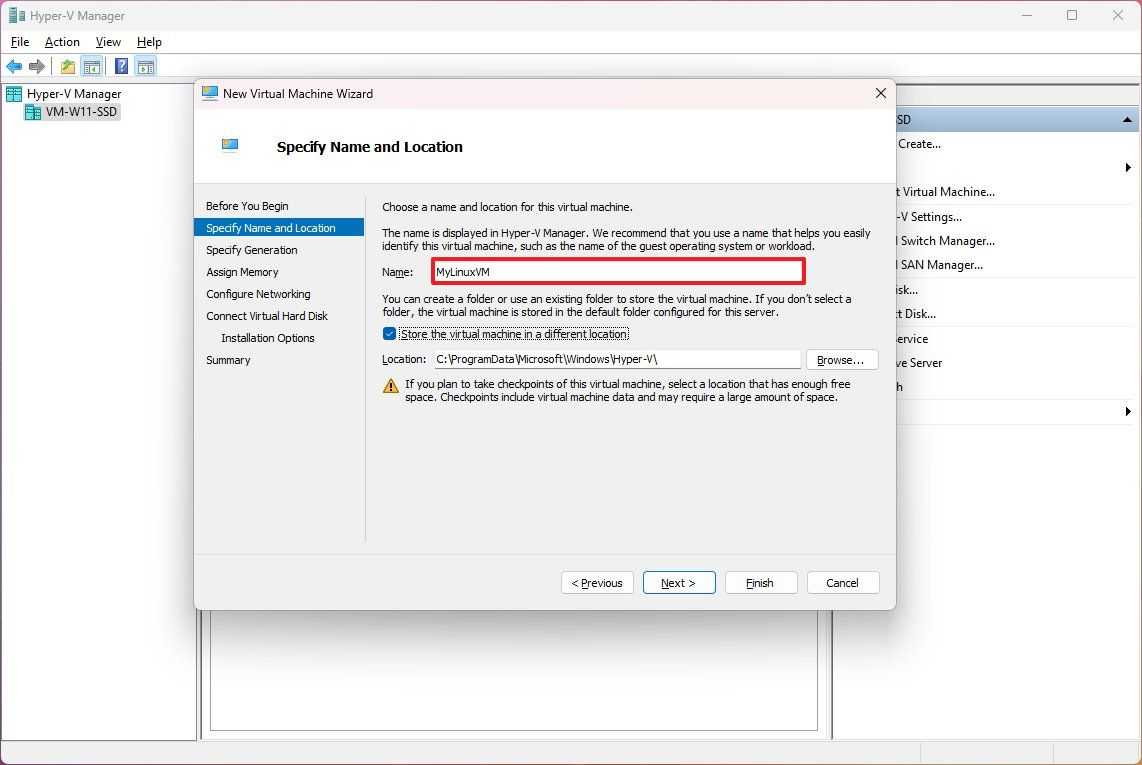
- Нажмите кнопку «Далее».
- Выберите вариант «Поколение 1».
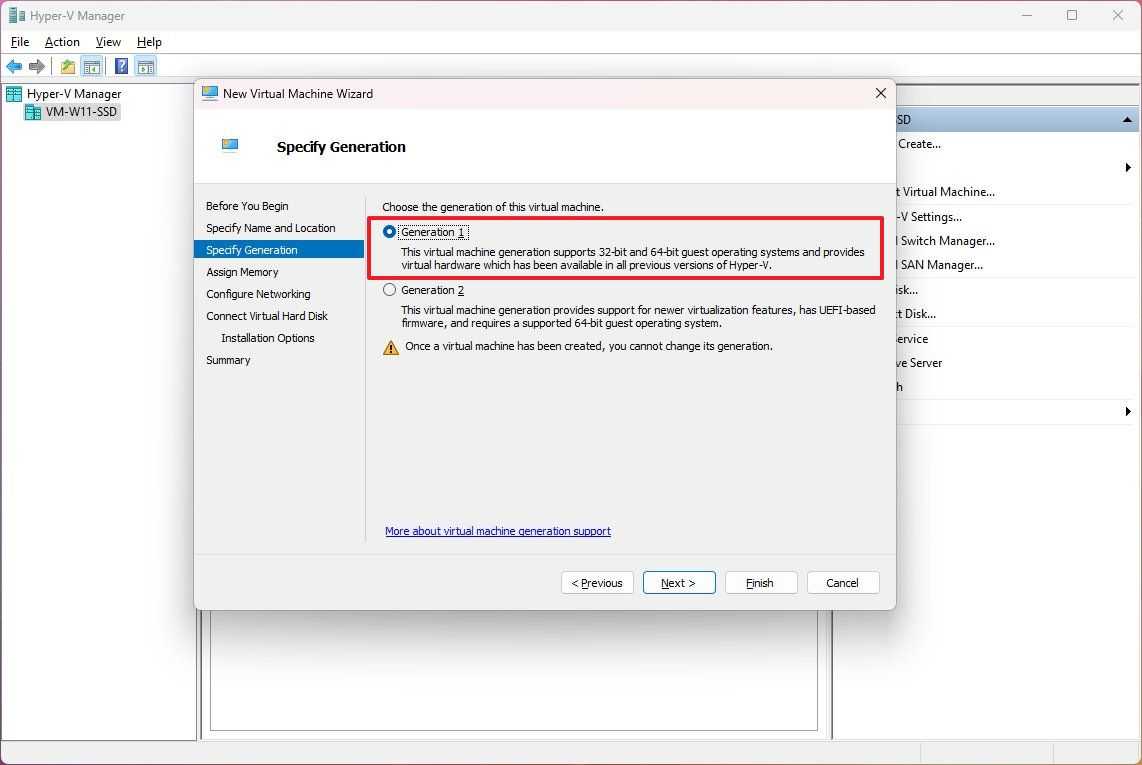
Краткое примечание: этот параметр будет зависеть от операционной системы, которую вы хотите установить. Вы можете проверить это Сайт документации Майкрософт (откроется в новой вкладке), чтобы помочь вам сделать выбор. Обычно вариант «Поколение 1» будет лучшим вариантом при использовании Linux.
- Нажмите кнопку «Далее».
- Укажите объем памяти, который необходимо зарезервировать для виртуальной машины.
- Установите флажок «Использовать динамическую память для этой виртуальной машины».
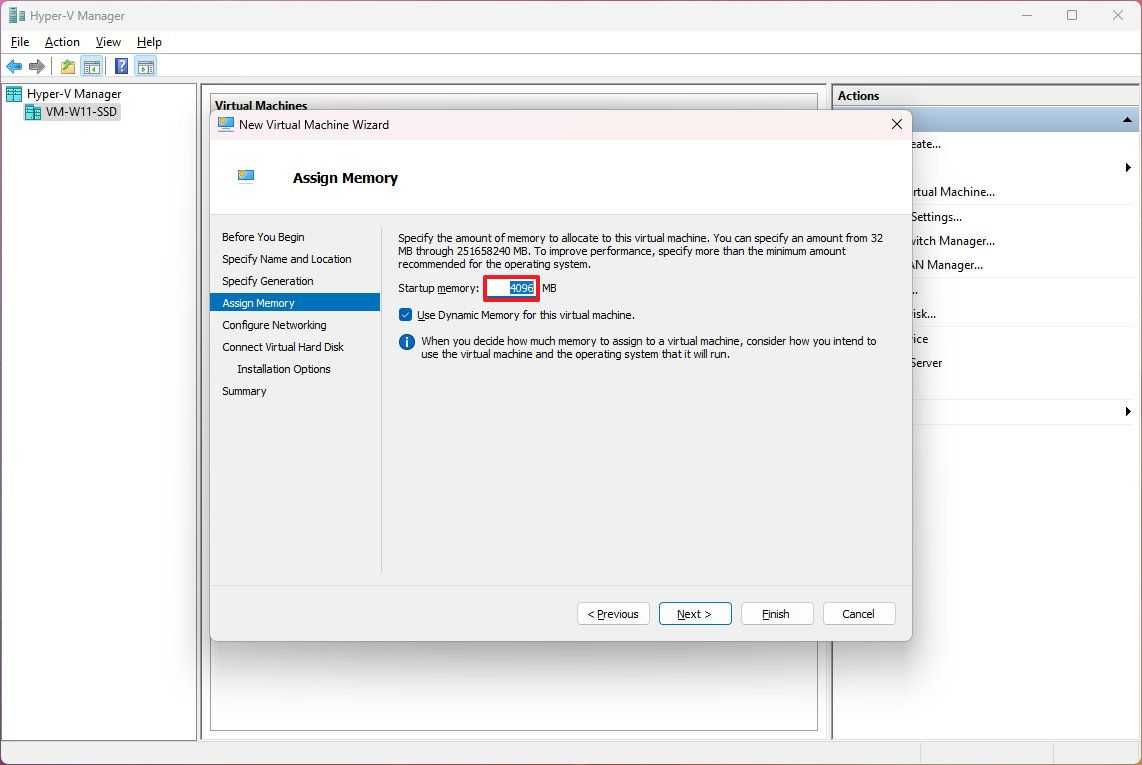
- Нажмите кнопку «Далее».
- Выберите переключатель по умолчанию для настройки «Соединение».
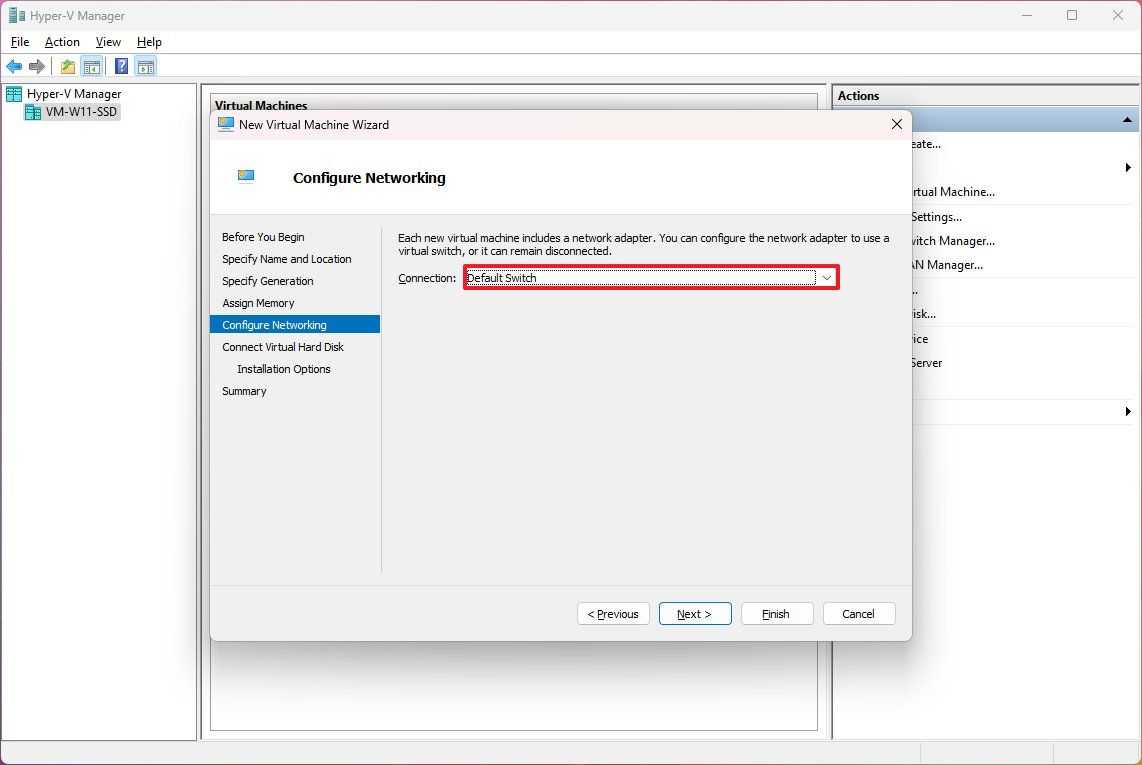
- Нажмите кнопку «Далее».
- Выберите опцию «Создать виртуальный жесткий диск».
- Укажите имя виртуального диска.
- Укажите размер виртуального диска для установки дистрибутива Linux.
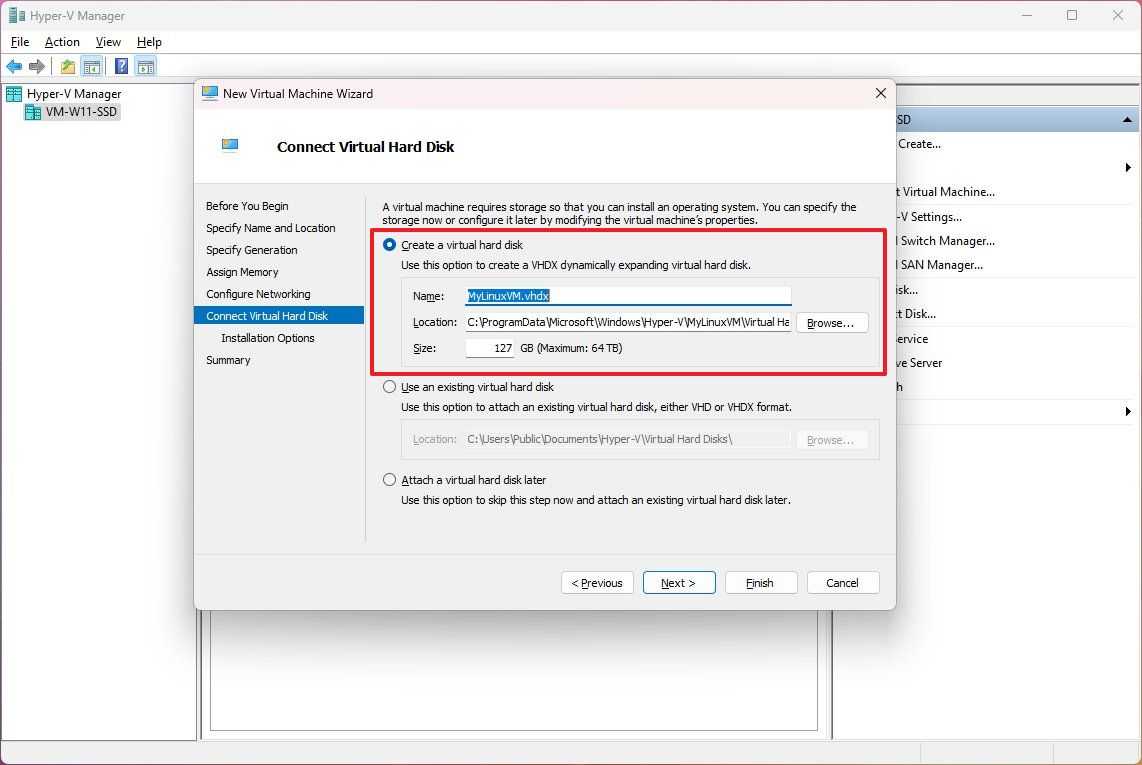
- Нажмите кнопку «Далее».
- Выберите опцию «Установить операционную систему из файла загрузочного образа».
- Нажмите кнопку Обзор.
- Выберите ISO-файл дистрибутива Linux.
- Нажмите кнопку Открыть.

- Нажмите кнопку «Далее».
- Нажмите кнопку Готово.
- Выберите виртуальную машину в диспетчере Hyper-V и нажмите кнопку «Пуск».
- Нажмите кнопку Подключить.
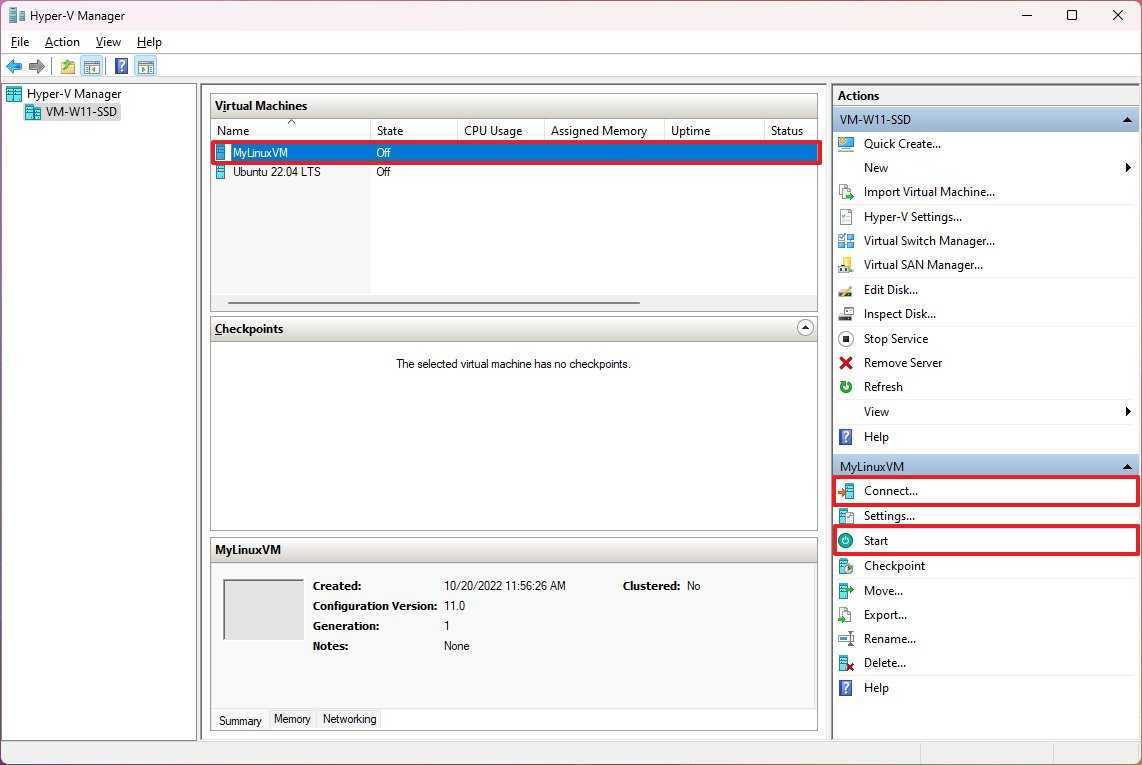
- Следуйте инструкциям на экране, чтобы установить дистрибутив Linux.
После того, как вы выполните эти шаги, дистрибутив Linux будет установлен на виртуальной машине с графическим или командным интерфейсом, в зависимости от установленного вами дистрибутива.
Независимо от того, решите ли вы использовать подсистему Windows для Linux или виртуальную машину Microsoft Hyper-V, вы можете установить и запустить столько дистрибутивов, сколько позволяет аппаратное обеспечение вашего компьютера.
How to Install Windows Subsystem for Linux on Windows 11?
There are some ways for you to install WSL in Windows 11 and you can choose one to have a try. Now, let’s go to see them.


Install Windows Subsystem for Linux in Windows 11 Command Prompt
In Windows 11, Microsoft simplifies the installation process of Windows Subsystem for Linux – only a single command is required to download and install all the necessary components.
Step 1: Type cmd to the search box and right-click this tool to run it as an administrator.
Step 2: Type this command – wsl –install and press Enter. Wait for WSL to be installed on your PC.
Step 3: A few minutes later, Windows will ask you to restart your PC to let changes effective. Do as the prompt says.
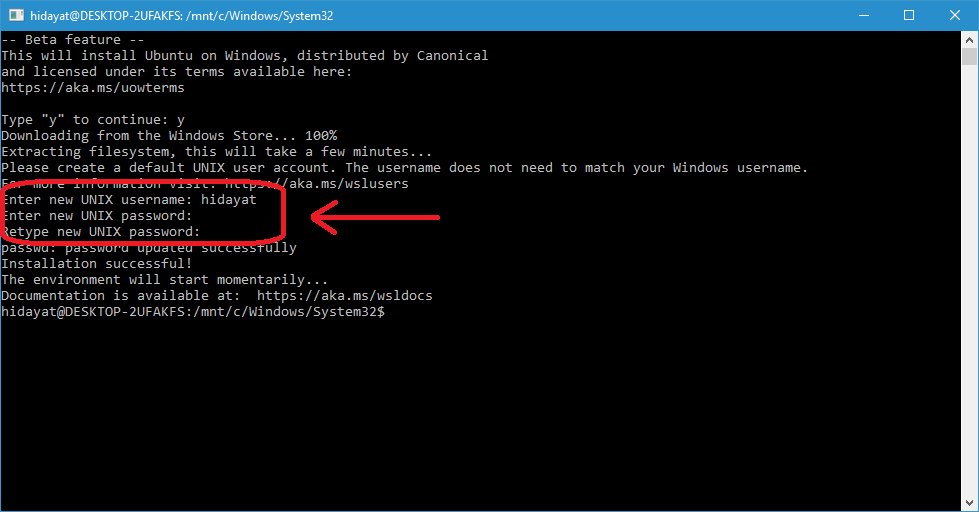
Step 4: When you log in to Windows after reboot, WSL will automatically resume a moment later to install the Linux distro like Ubuntu.
Step 5: After that, you need to enter a user name and password to create a user account for the Linux distro.
Install WSL with Specific Distro in Windows 11
In addition, you can install a specific distro with the WSL command, and here is what you can do.
Step 1: Also run Command Prompt with admin rights.
Step 2: Type wsl –list –online and press Enter. This command can list all the available WSL distros you can install on Windows 11.

Step 3: Run this command wsl –install -d DISTRO-NAME. Replace DISTRO-NAME with the distro that you want to install, for example, Debian.
Step 4: Restart the PC to finish the WSL installation.
Tip: To update the WSL kernel to the latest version, run this command – wsl –update.
Enable WSL and Install a Distro
This is another way to install Windows Subsystem for Linux on Windows 11. This is a slow way and is usually used in Windows 10. Of course, it also applies to Windows 11.
Tip: If you are running Windows 10, refer to this post to finish the installation of WSL – Guide to Install Windows Subsystem for Linux (WSL) in Win 10.
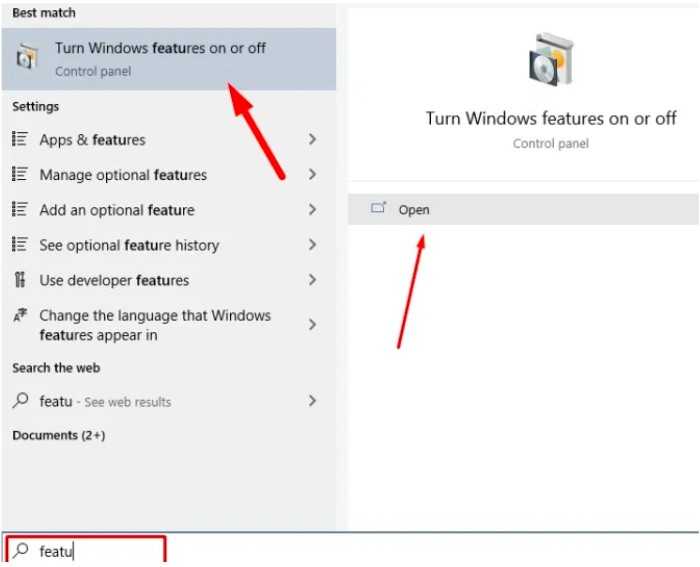
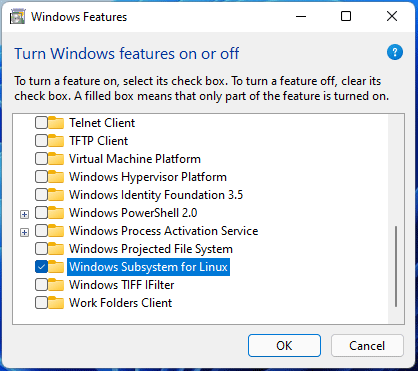
Step 1: Type windows features to the search box and click Turn Windows features on or off.
Step 2: Make sure the box of Windows Subsystem for Linux is checked.
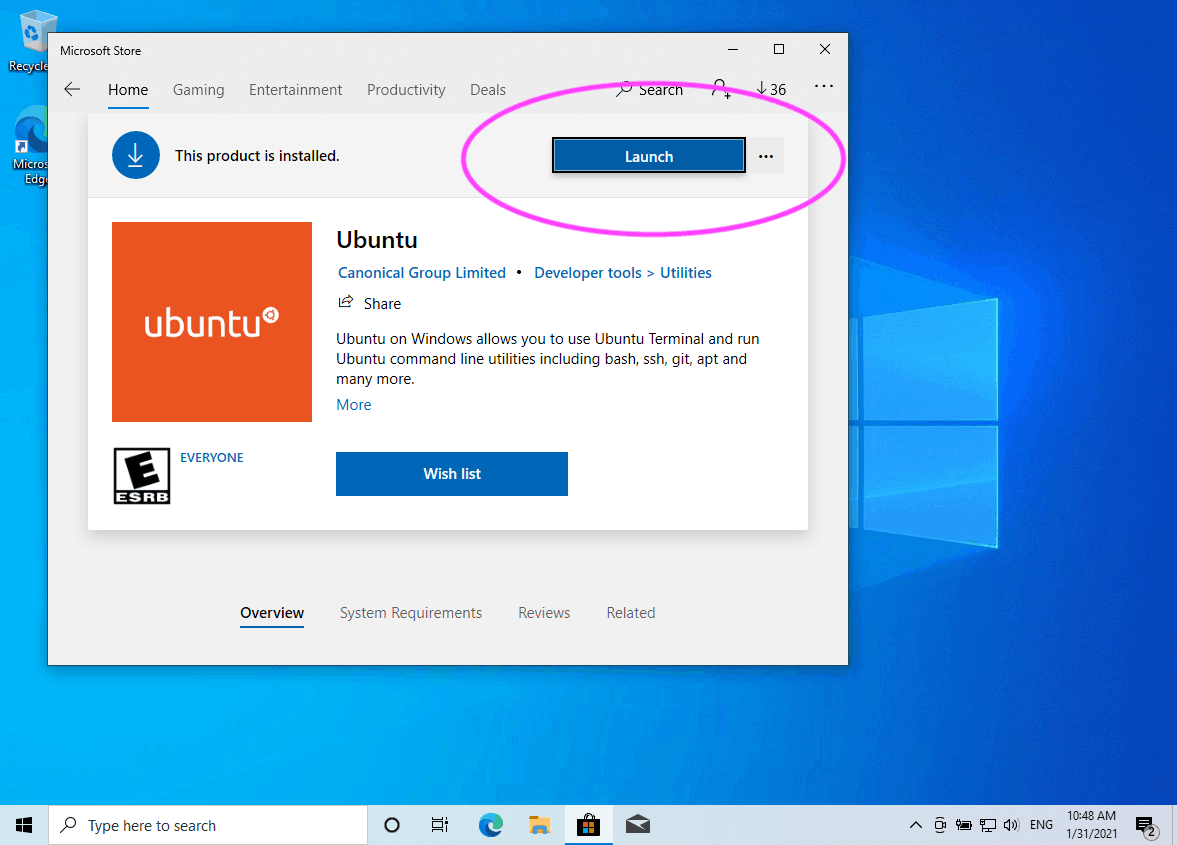
Step 3: Run Microsoft Store, search for the Linux distro you want to install like Ubuntu.
Step 4: Install this Linux distro to your computer and then you can use it.