

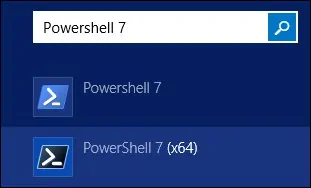
Как обновить повершелл
Добрый день! Уважаемые читатели и гости IT блога Pyatilistnik.org. В прошлый раз мы с вами научились определять версию PowerShell, которая установлена в вашей операционной системе. У вас она могла быть устаревшей, и я вам обещал, это исправить. В сегодняшней заметке, я вам покажу быстрый процесс, как обновить PowerShell версию в любой из операционных систем ,семейства Windows. Данные методы займут у вас не более нескольких минут. Как сказал Гагарин, поехали.
Что дает обновление версии PowerShell ?
Компания Microsoft вкладывает огромные силы для развития и поддержки своего продукта по управлению всем, что только можно в мире Windows. Поэтому, чтобы иметь возможность делать работу по автоматизации быстрее, лучше и профессиональнее, необходимо всегда следить за последними версиями командлетов и их ключами, так как от этого зависит их функционал. Каждый новый релиз PowerShell, это по сути как переход с одной операционной системы на другую, более продвинутую и лучшую. С каждой новой версией появляются десятки, а то и сотни новых командлетов для различных сценариев.
Алгоритм обновления версии PowerShell
Хочу отметить, что алгоритм обновления будет одинаков для всех версий Windows начиная с 7 SP1, если у вас ниже, то установите сервисный пакет Service Pack 1 на семерку и двигайтесь дальше.
- Определяете свою версию PowerShell
- Проверяете наличие у вас пакета Microsoft .NET Framework 4.7, если нет, то устанавливаете его
- Скачиваете пакет PowerShell 5.1
- Устанавливаете пакет PowerShell 5.1
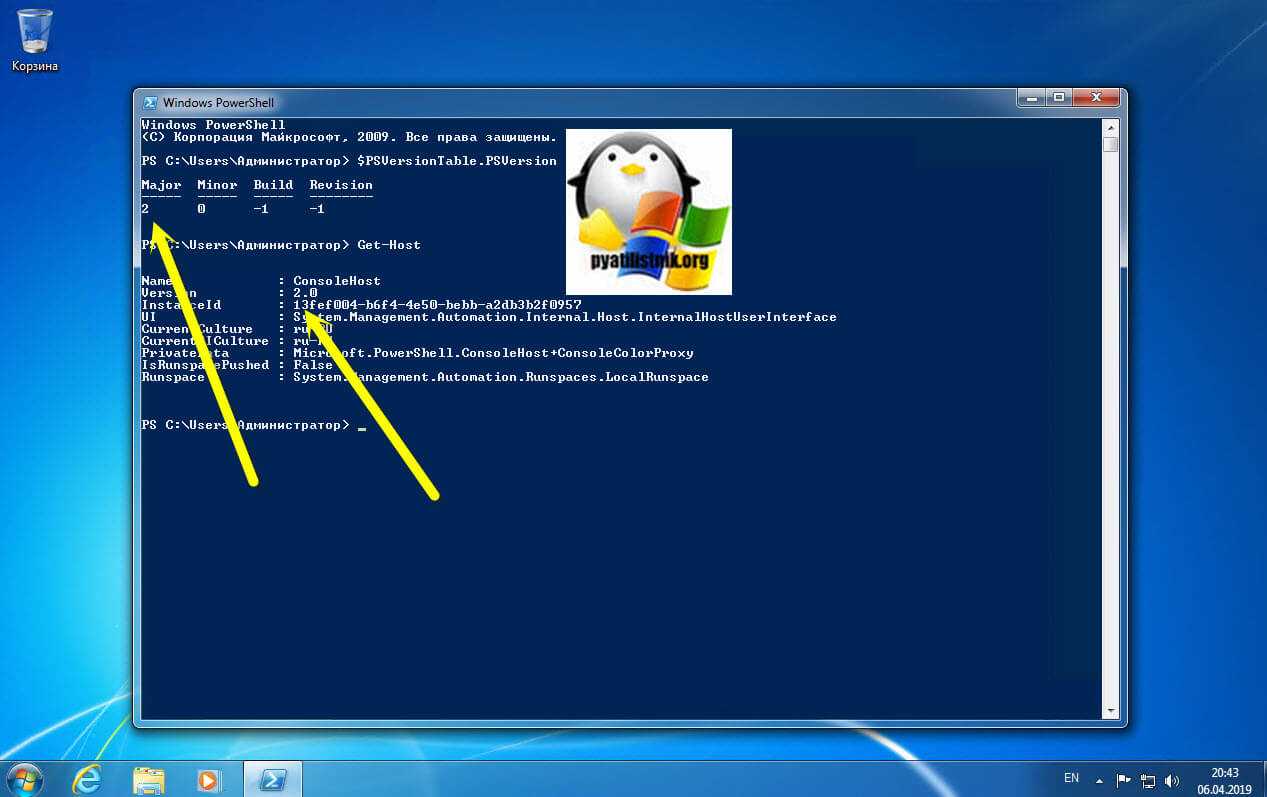
В моем примере я буду обновлять PowerShell в Windows 7 SP1. Моя текущая версия 2.0.
Данный пакет подойдет:
- Windows 7 с пакетом обновления 1 (SP1) (x86 и x64) (x86 и x64)
- Юбилейное обновление Windows 10 (x86 и x64)
- Windows Server 2008 R2 с пакетом обновления 1 (SP1) (x64)
- Windows Server 2012 (x64) (x64)
- Windows Server 2016 (x64)

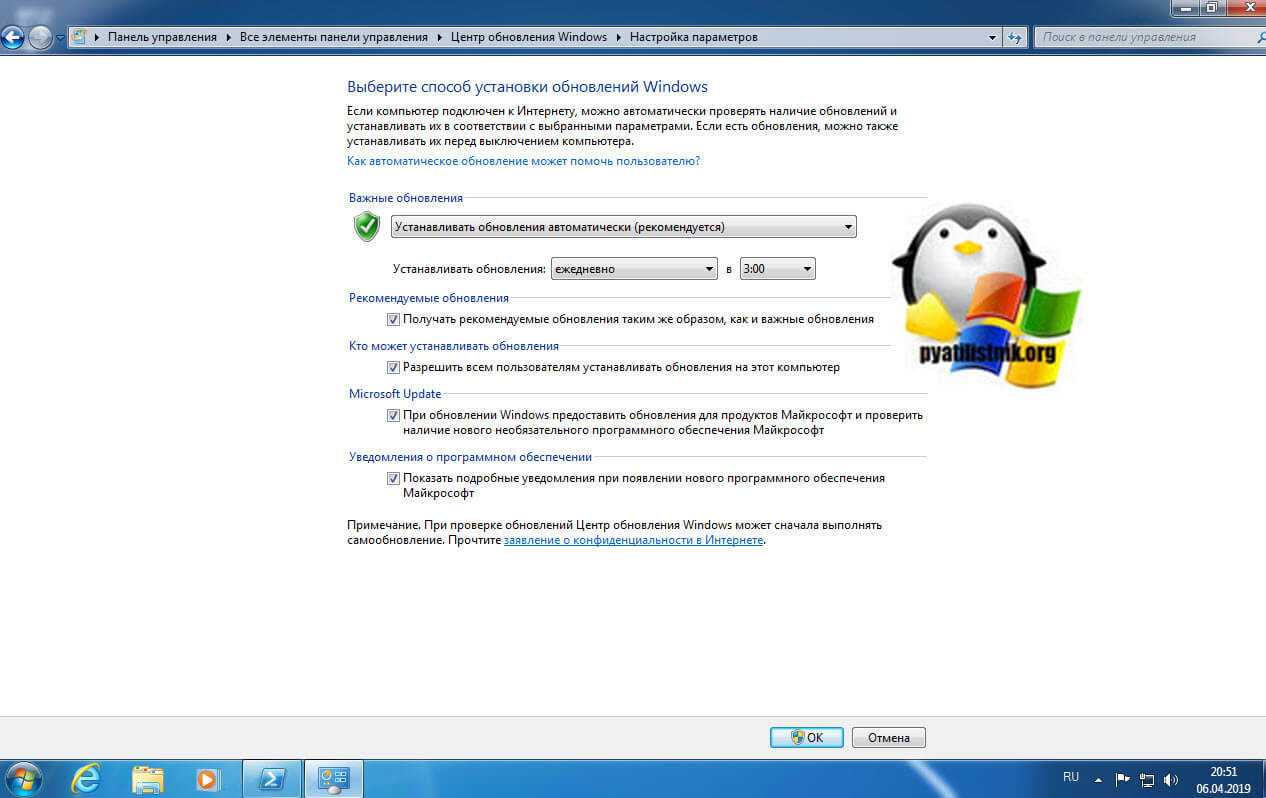
Так же советую вам произвести установку всех доступных обновлений, которые есть у вас в операционной системе, а так же убедиться, что вы получаете и дополнительные обновления. Для этого в перейдите по пути «Панель управления\Все элементы панели управления\Центр обновления Windows\Настройка параметров». Убедитесь, что у вас установлены галки:
- Получать рекомендуемые обновления таким же образом, как и важные обновления
- При обновлении Windows предоставлять обновления для других продуктов Майкрософт и проверить наличие нового необязательного программного обеспечения Майкрософт. Сюда и попадут Microsoft .NET Framework 4.7.
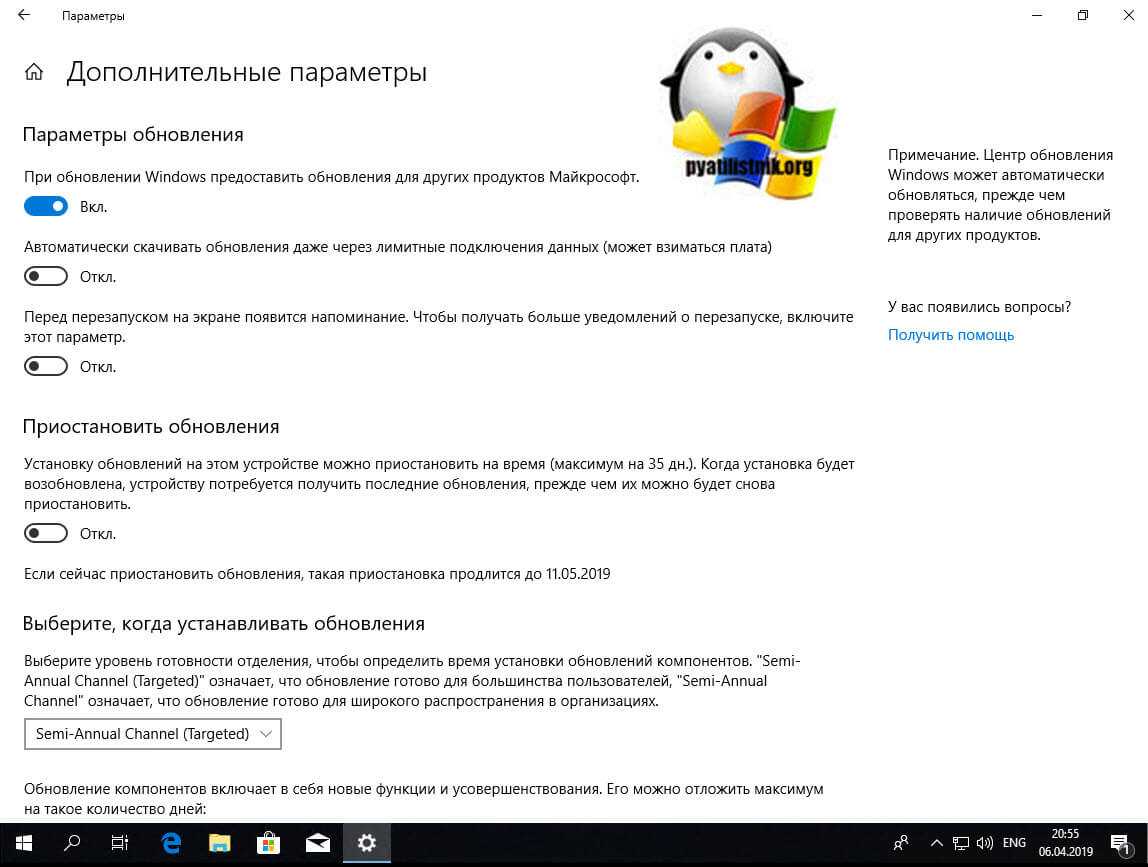
В Windows 10, данный пункт можно найти по пути «Параметры Windows — Обновление и безопасность — Центр обновления Windows — Дополнительные параметры»
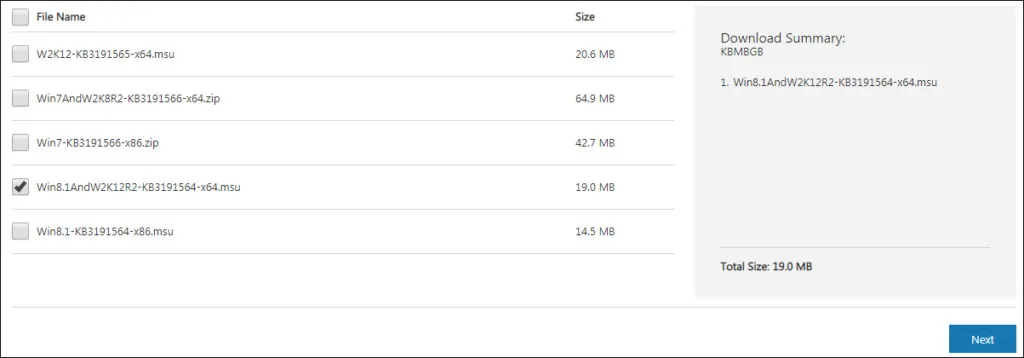
Нажимаем кнопку «Download».
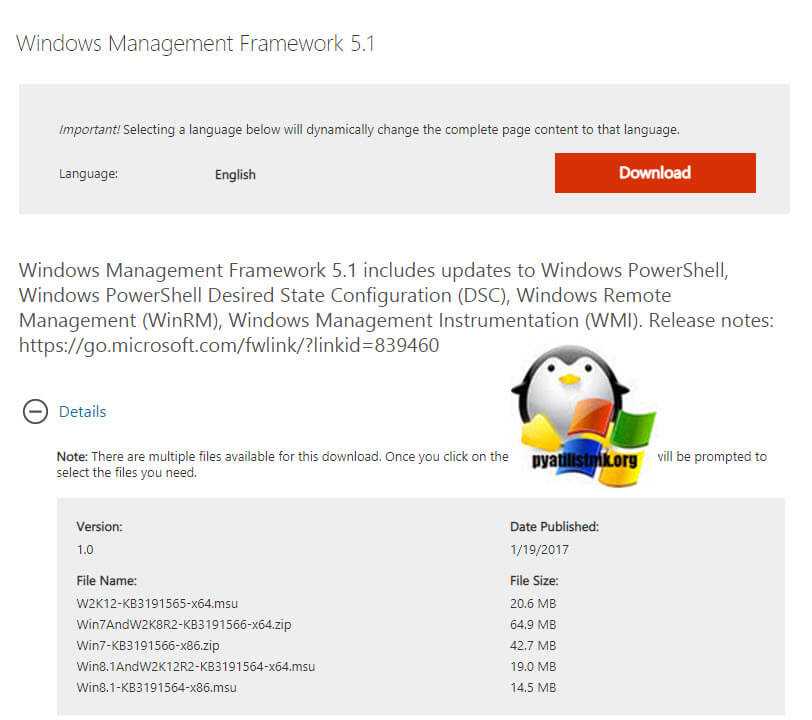
У вас появится всплывающее окно, где вас попросят выбрать для какой операционной системы вы хотите скачать пакет, по первому названию цифр понятно, для какой версии пакет, так же обратите внимание на разрядность x86 и x64. В моем случае Windows 7 64-х битная
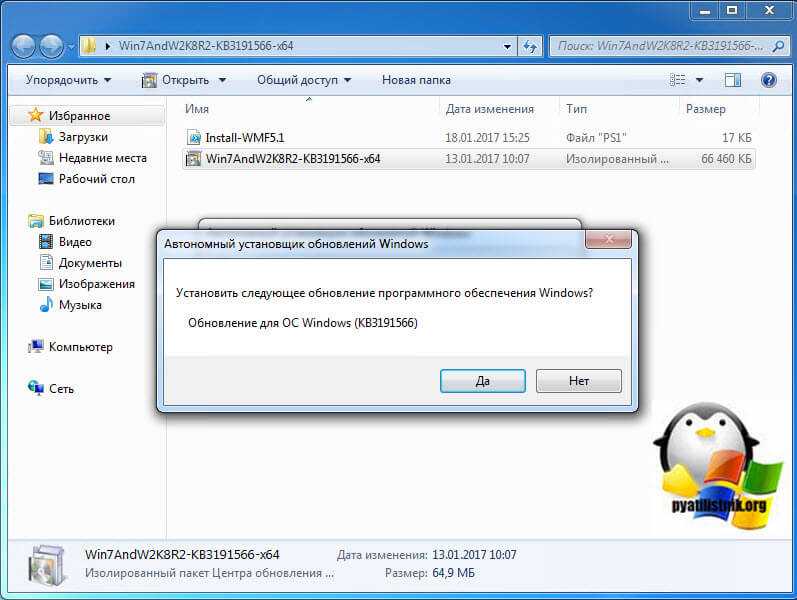
Для обновления версии PowerShell запускаем соответствующий автономный пакет обновления Windows. У меня это Win7AndW2K8R2-KB3191566-x64.zip, единственное вам нужно его распаковать. Запустив пакет, он проверит нет ли уже данного обновления или более свежего.

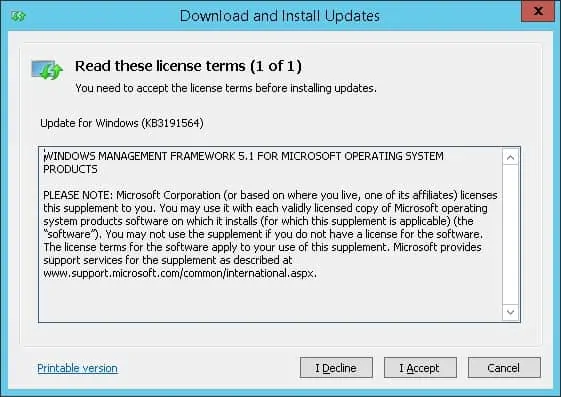
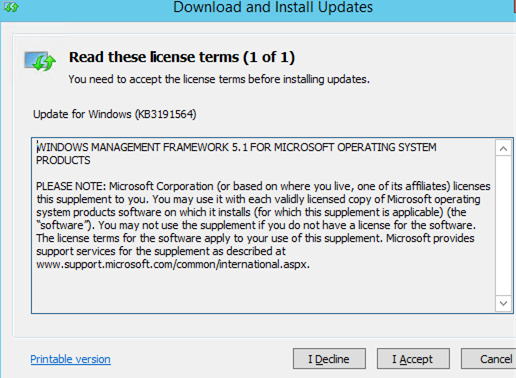
Так как пакета в Windows 7 не оказалось, то вам предлагают установить KB3191566, соглашаемся.
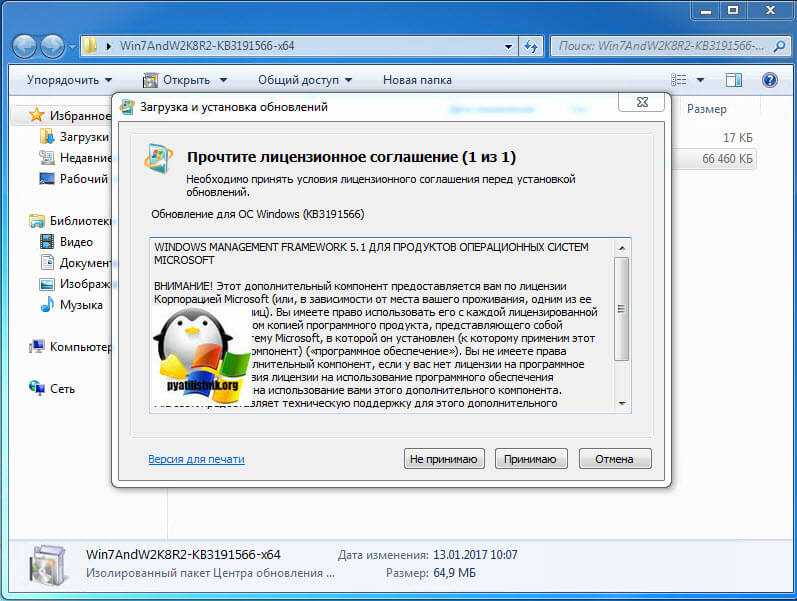
Принимаем лицензионное соглашение.
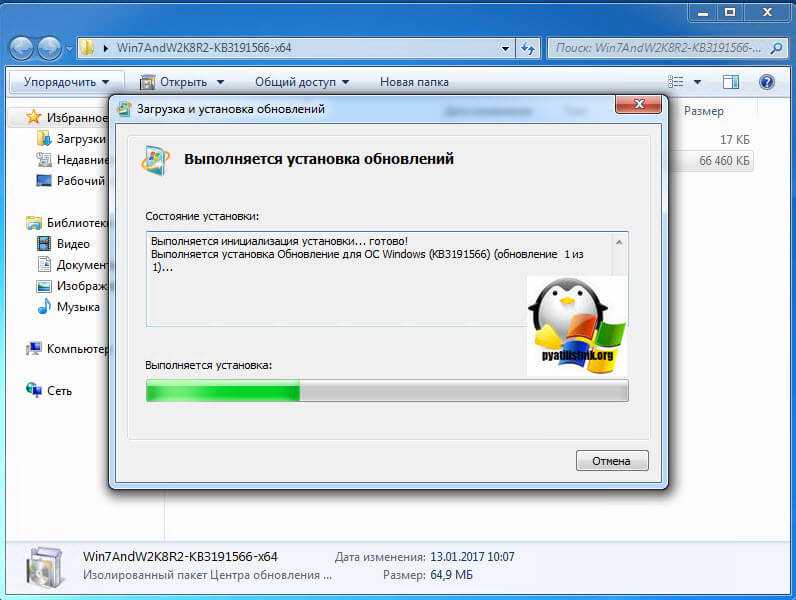
Установка пакета с PowerShell 5.1 занимает пару минут.
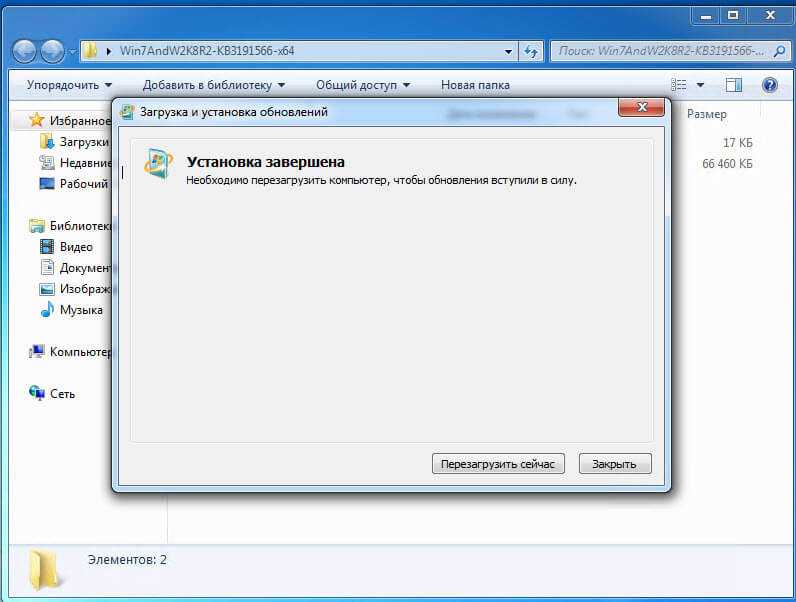
После чего потребуется обязательная перезагрузка вашей системы.
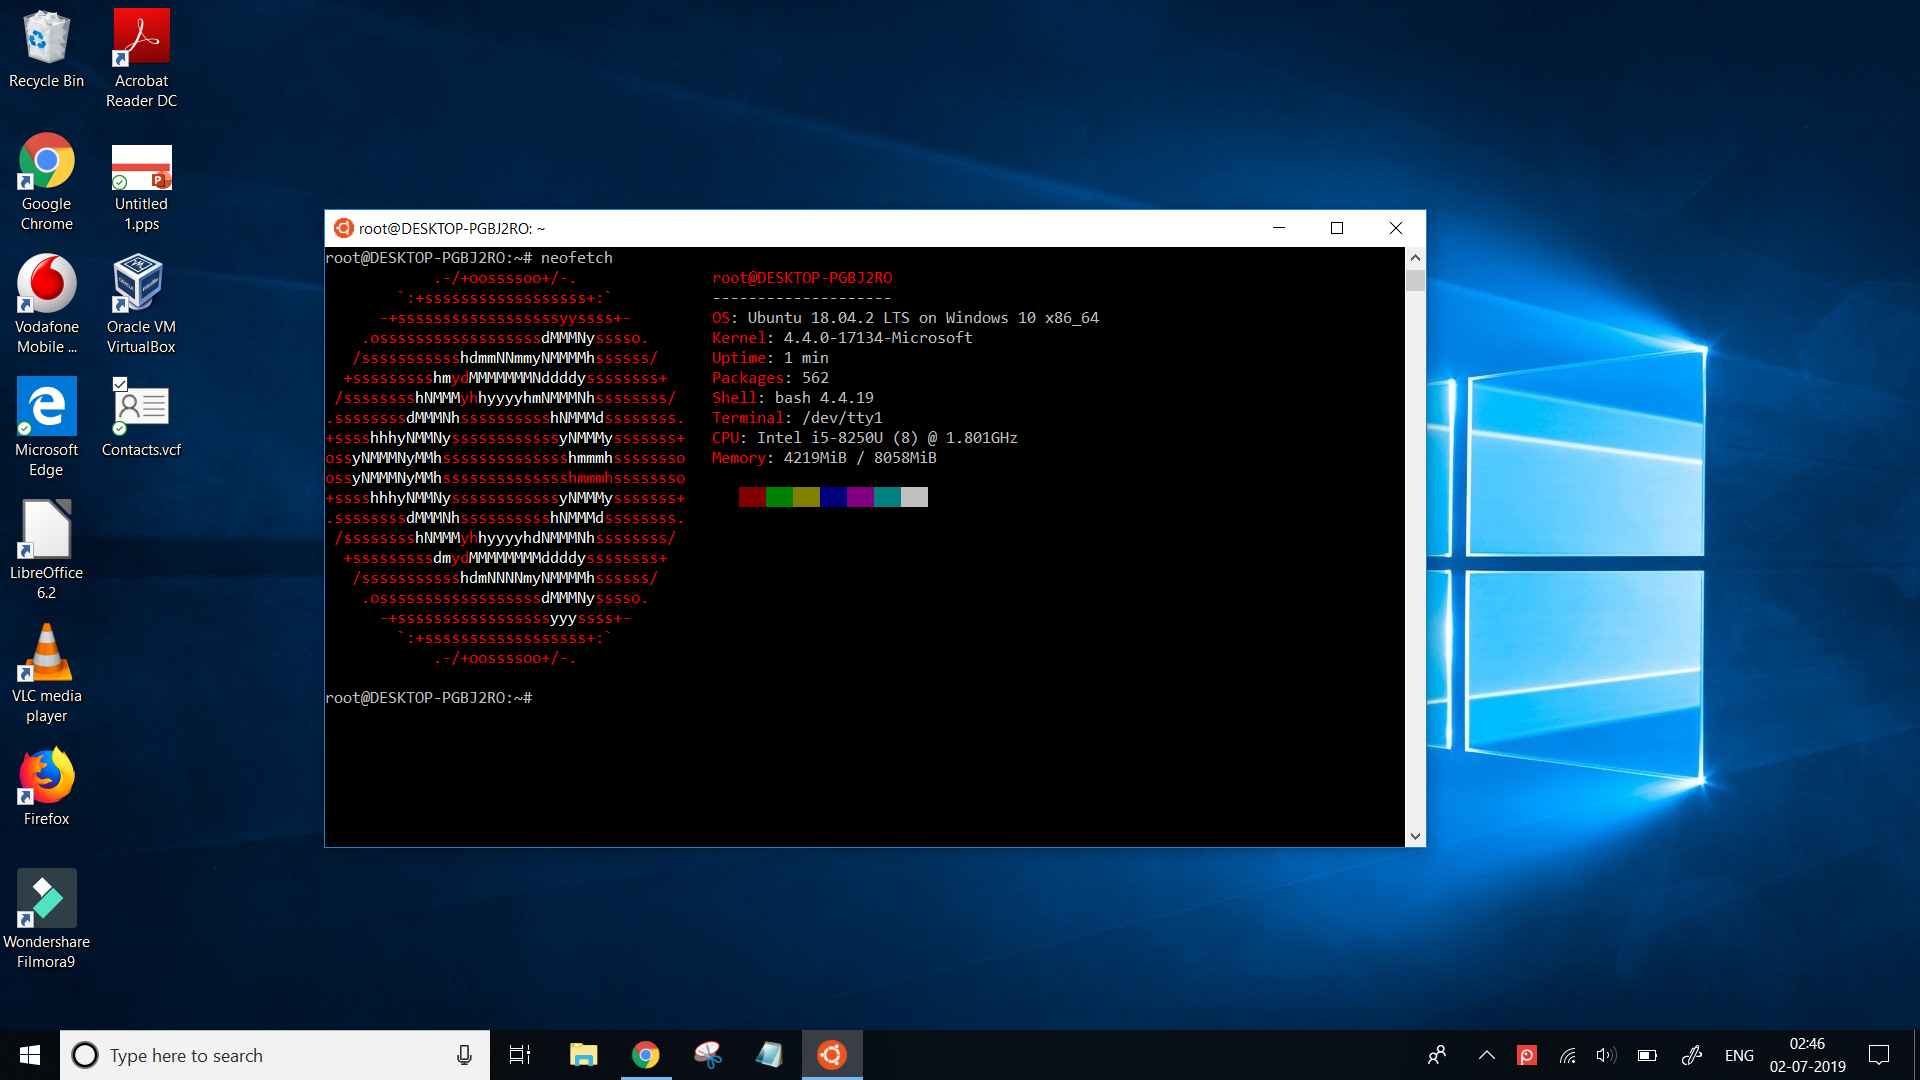
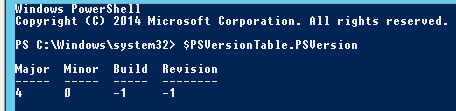
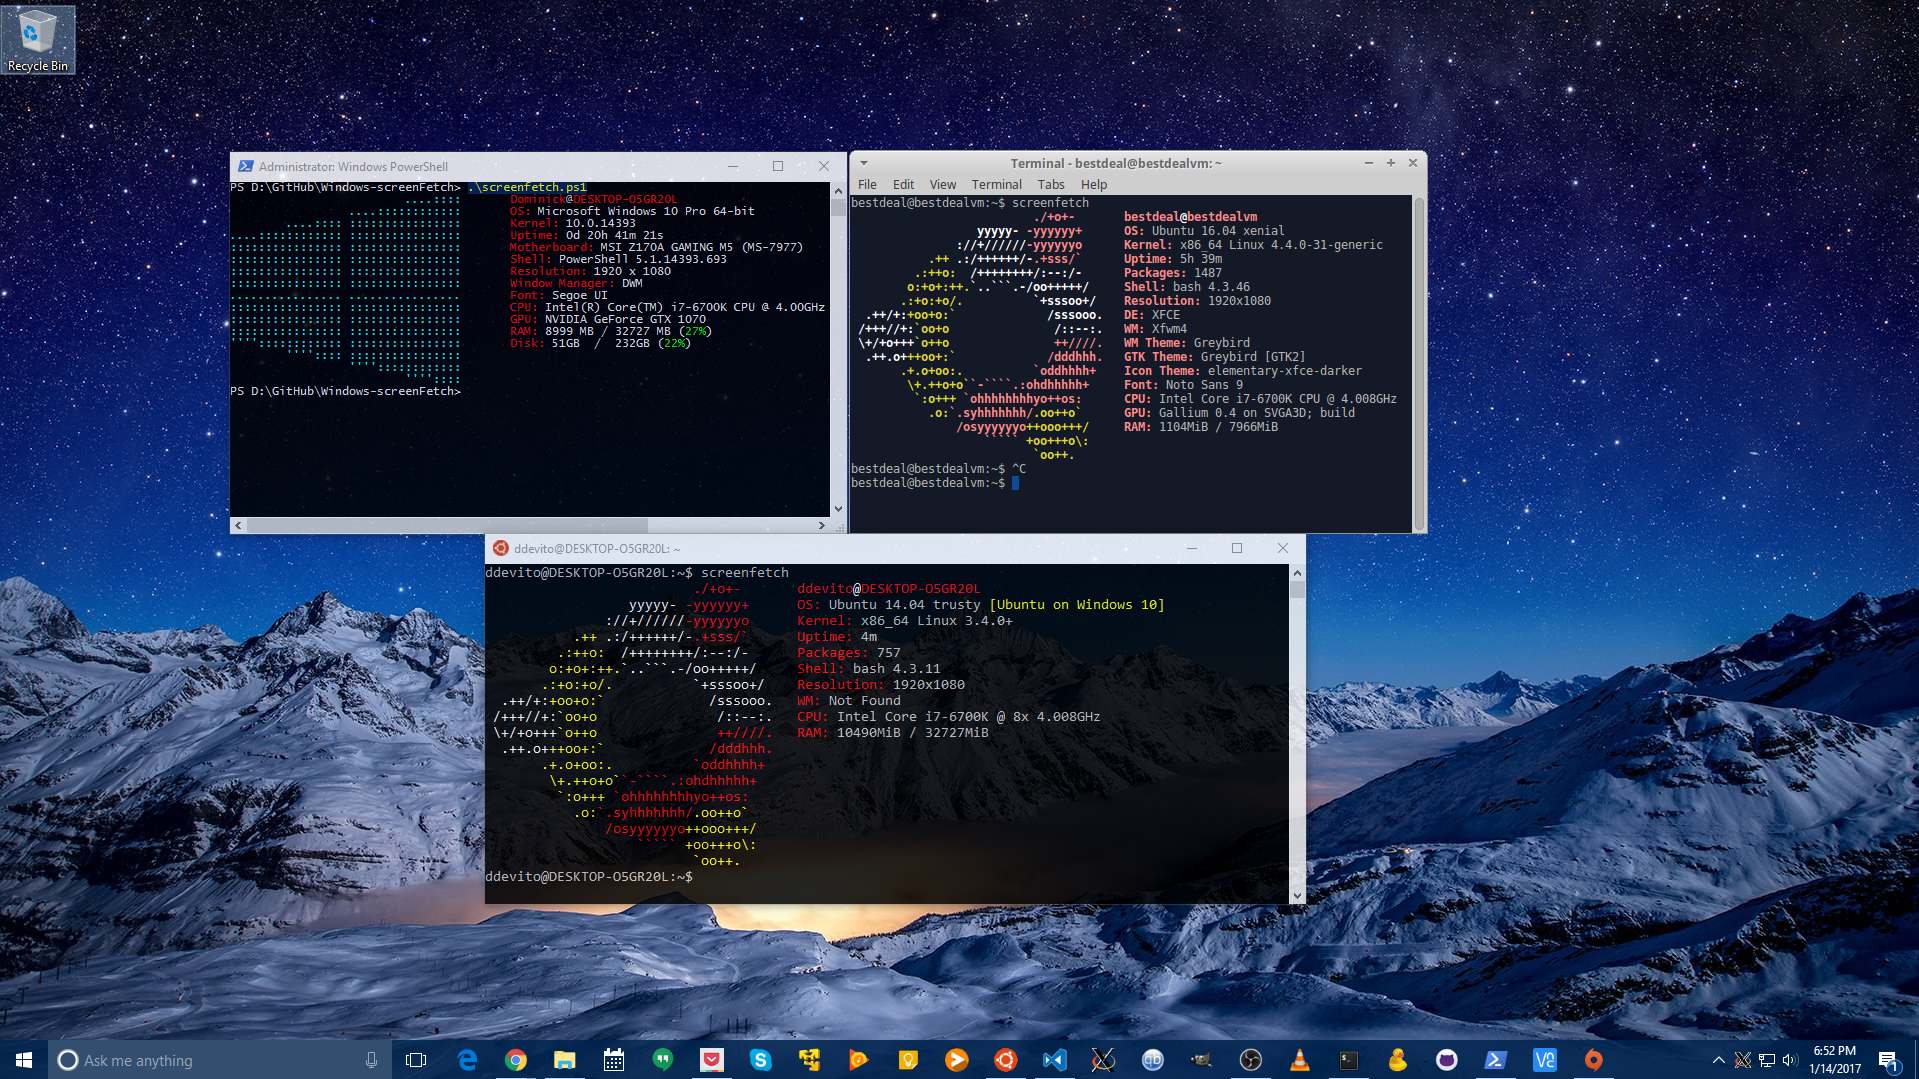
После перезагрузки, открыв оболочку PowerShell и выполнив команду Get-Host вы видите, что версия PowerShell 2 превратилась в 5.1.14409.1005

Так же может выскочить уведомление, что запрещено изменять раздел реестра, это из-за того, что оболочка PowerShell запущена не из под админана. Запустите ее в режиме администратора.
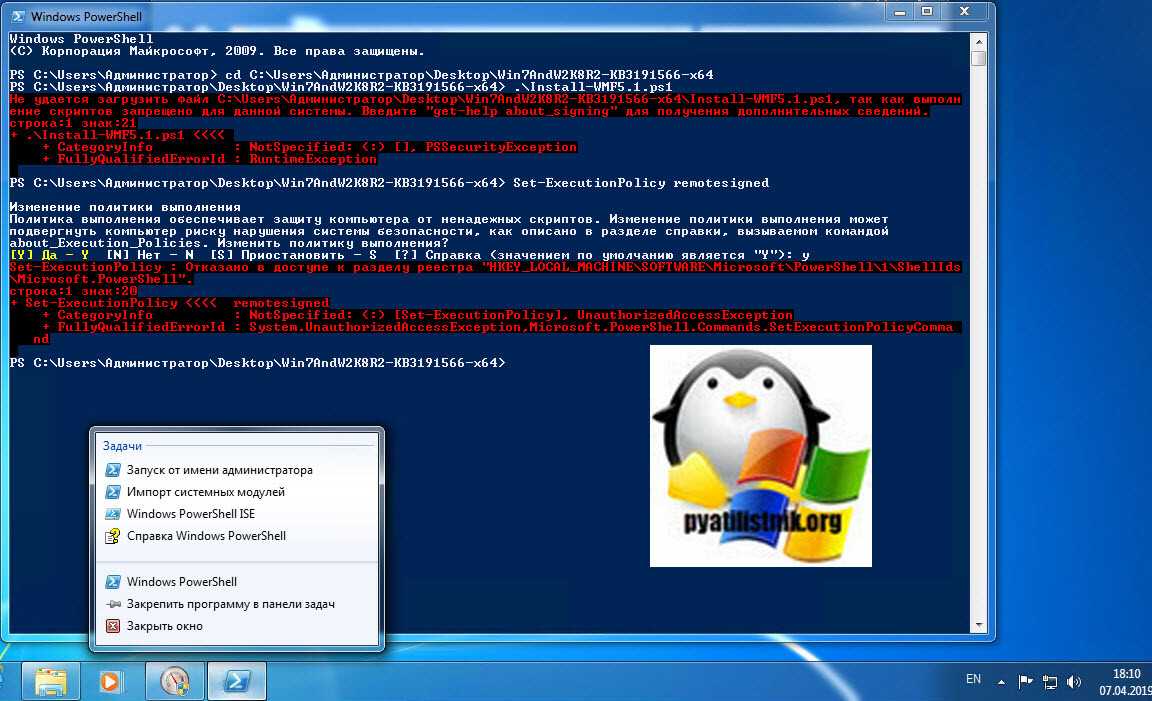
После чего скрипт у вас успешно отработает.

Conclusion
PowerShell makes up for the missing command-line interface with strong scripting ability in Microsoft and from then on, it gradually becomes one of the most widely used automation code tools for Windows, Linux, and Mac users.
Data can be corrupted or lost, however, due to all sorts of accidents like malware, or downtime. Consider Vinch Backup & Recovery, a compatible backup solution for 10+ virtualizations (VMware, XenServer, XCP-ng, Oracle OLVM, oVirt, etc.), NAS, Linux & Windows, and 6 databases.
Download the 60-day free trial to support your data protection now.
Download Free TrialFor Multi HypervisorsSecure Download
It automates the backup process under self-defined schedules and cuts down data size to half to save storage. While recovering crashed VM in a breeze from the backup repository in 15s for the minimal RTO. If you want to move data from one virtualization to another for better performance, you can also use it to perform smooth V2V migration without extra tools.
How to Install PowerShell 7.3.4 or 7.2.11 LTS
Here is how you can install Windows PowerShell on Windows 11, , 8.1, and Windows 7:
-
Download and execute the respective MSI file from the links above.
The installation wizard will now run.
-
Click Next.
Proceed
-
Select the destination folder for the installation and click Next.
Select installation directory
Select the optional features you want to install and click Next.
Select optional features to install
Select the optional features to install, such as adding PowerShell to environment variables, enabling PowerShell remoting, adding PowerShell to the context menu, etc.
Click Next.
Leave default settings
Leave default settings and proceed with the installation
Click Install to begin the installation.
Begin installation
Once installed, click Finish.
PS 7.3.2 installed
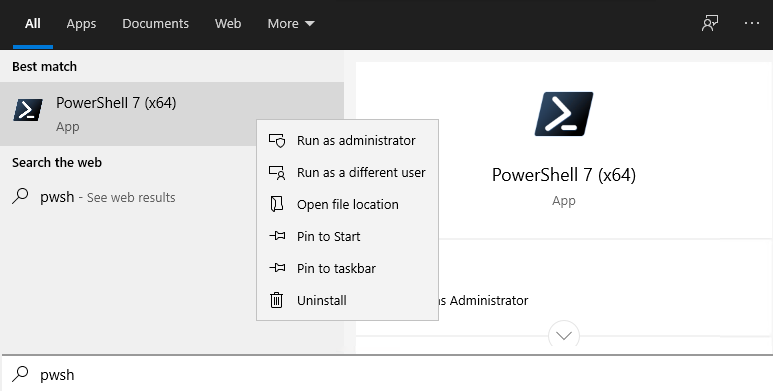
Now type in “pwsh” in the Run Command box to confirm the installation.
Confirm PowerShell has been updated
Learn more about PowerShell and PowerShell Core. You can also .
Установите PowerShell в Linux
В Linux Microsoft предоставила пользователям Linux множество различных способов использования PowerShell. Отныне есть Пакет DEB для Ubuntu и Debian, RPM для Fedora, SUSE, CentOS (и других операционных систем RedHat), неофициальный пакет AUR и даже Snap, доступный для установки.
Чтобы запустить PowerShell на вашем ПК с Linux, откройте окно терминала, нажав Ctrl + Alt + T ou Ctrl + Shift + T на клавиатуре. Затем следуйте инструкциям для используемого в настоящее время дистрибутива Linux.
Ubuntu
Это правда, что, поскольку Ubuntu по умолчанию поставляется с Snap, пользователям, вероятно, следует установить версию Snap, а не беспокоиться о DEB-версии PowerShell. Однако не все пользователи Ubuntu любят использовать Snaps, поэтому приятно видеть, что есть другой способ установки программного обеспечения.
Чтобы получить пакет Debian PowerShell для вашего ПК с Ubuntu, используйте скачать инструмент Wget .
18.04 LTS
16.04 LTS
После завершения загрузки файла пакета пора установить его в Ubuntu. Для этого используйте порядок Dpkg .
После установки пакета PowerShell DEB в Ubuntu в командной строке могут появиться ошибки. Не волнуйся; Эти ошибки, вероятно, связаны с зависимостью. Чтобы исправить их, используйте порядок apt install ниже.
Если предположить удачная установка работает успешно, вы сможете получить доступ к PowerShell в Ubuntu!
Debian
Microsoft поддерживает пользователей Debian с помощью пакета PowerShell DEB, однако официально выпустила только один для Debian 9 Stable. Хорошо, поскольку Большинству пользователей еще нет 10 лет , но если вы используете 10, игнорируйте эти инструкции в пользу метода Snap.
Чтобы заставить PowerShell работать в Debian 9, запустите окно терминала. Оттуда запустите команда загрузки Wget Следующий чтобы получить последнюю DEB-версию приложения.
После того, как пакет DEB загружен на ваш компьютер Debian, пора начать установку. Для этого запустите Dpkg .
После выполнения порядок Dpkg , Debian может испытывать проблемы с зависимостями. Чтобы решить эту проблему, вы можете запустить apt-get install .
Как только ваши проблемы с зависимостями (если таковые имеются) будут решены, PowerShell будет готов к работе.
Arch Linux
Microsoft PowerShell находится на Arch Linux AUR, поэтому, если вы хотите установить его на свой компьютер Arch, вам повезло. Чтобы начать установку, откройте терминал и используйте пакет Pacman для загрузки Git и Base-devel в систему.
После Git и Base-devel клонируйте последний снимок Trizen AUR для упрощения установки PowerShell.
Установите Trizen в систему, используя makepkg .
Наконец, установите последнюю версию Microsoft PowerShell в Arch Linux.
войлок
Microsoft выпустила пакет RPM для RedHat Enterprise Linux 7 и Fedora, который можно использовать для установки PowerShell. Чтобы получить этот файл пакета RPM, используйте Wget скачать его. Затем установите с помощью Dnf .
OpenSUSE
Есть RPM-пакет PowerShell, готовый к установке на OpenSUSE Leap 42.3, так что тем, кто использует SUSE, повезло
Однако, если вы используете 15.0 или Tumbleweed, обратите внимание на инструкции Snap
Чтобы установить PowerShell в SUSE 42.3, начните с использования инструмент Wget чтобы загрузить последний файл RPM.
После завершения загрузки используйте Zypper для установки пакета.
перерыв
Помимо создания нескольких пакетов для различных дистрибутивов Linux, Microsoft также решила загрузить PowerShell из магазина пакетов Snap. Так что, если вы используете дистрибутив Linux, поддерживающий Snap, вам повезло!
Чтобы установить Snap-версию PowerShell, следуйте этому руководству чтобы узнать, как настроить Snapd в вашей системе. Затем установите последнюю версию Microsoft PowerShell с порядок мгновенная установка ниже.
Доступ к PowerShell
Чтобы получить доступ к Microsoft PowerShell в Linux, запустите предпочитаемое терминальное приложение Linux. Когда приложение откроется, выполните следующую команду.
> pwsh > Чтобы получить помощь по PowerShell, запустите:
>
Обновление версии PowerShell на Windows
Хотите узнать, как установить новую версию Powershell? В этом уроке мы покажем вам, как обновить версию Powershell, установленную на компьютере под управлением Windows.
• Windows 7
• Windows 10
• Windows 2012
• Windows 2016
Список оборудования
В следующем разделе представлен список оборудования, используемого для создания этого учебника.
Как Amazon Associate, я зарабатываю от квалификационных покупок.
На этой странице мы предлагаем быстрый доступ к списку учебников, связанных с PowerShell.
Учебник — Модернизация установки PowerShell
Microsoft .NET Framework 4.5 или выше является требованием к установке WMF.
Скачать и установить последнюю версию Microsoft .NET Framework.
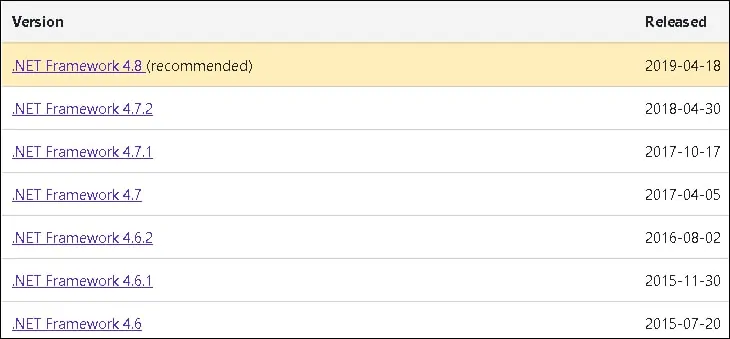
В нашем примере мы установили версию Microsoft .NET Framework 4.8.
Скачать и установить последнюю версию рамочной системы управления Windows.

В нашем примере мы скачали версию 5.1 Windows Management Framework для Windows 2012 R2.
Начните установку рамочной системы управления Windows.
Перезапустите компьютер для завершения установки.
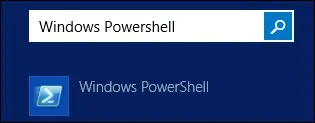
В меню «Пуск» ищите приложение под названием: Windows PowerShell.
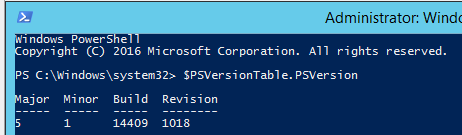
Проверьте используемую версию PowerShell.
Copy to Clipboard
Syntax Highlighter$PSVersionTable.PSVersion
Вот вывод команды:
Copy to Clipboard
Syntax HighlighterMajor Minor Build Revision
—— —— —— ———
5 1 14409 1005
Поздравляю! Вы закончили обновление Windows Powershell.
Учебник — Установка PowerShell 7 на Windows
Со временем программное обеспечение Powershell, доступное на операционной системе Windows, приобрело большую популярность и стало независимым проектом.
Программное обеспечение Powershell, доступное на операционной системе Windows, и новый проект Powershell могут сосуществовать.
Мы научим вас, как установить автономный проект Powershell.
Доступ к веб-сайту проекта Powershell, доступному на Github.
Загрузите последнюю версию, доступную для вашей операционной системы.
В нашем примере мы скачали файл Powershell под названием: PowerShell-7.0.0-win-x64.msi
Запустите установку Powershell 7.

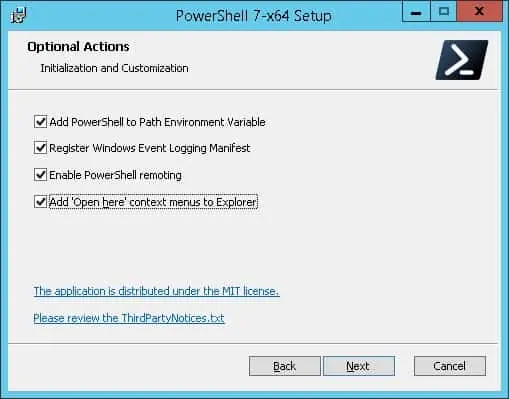
На этом экране выберите следующие варианты:
Включить Powershell remoting.
Добавляйте контекстные меню «Открыть здесь» в Explorer
Нажмите на кнопку «Следующая» до завершения установки.
В меню «Пуск» ищите приложение под названием PowerShell 7.
Проверьте используемую версию PowerShell.
Copy to Clipboard
Syntax Highlighter$PSVersionTable.PSVersion
Вот вывод команды:
Copy to Clipboard
Syntax HighlighterMajor Minor Patch PreReleaseLabel BuildLabel
—— —— —— ————— ———-
7 0 0
Поздравляю! Вы закончили установку версии Powershell 7.
2021-02-28T18:51:44-03:00
Upgrading to Windows PowerShell 5.1
PowerShell 4.0 is installed by default on Windows Server 2012 R2 (Windows 8.1). Let’s try to update the Windows PowerShell version to 5.1 on Windows Server 2012 R2.
First of all, check the current PowerShell version (the screenshot shows PowerShell 4.0 is installed):
To upgrade your PowerShell version to 5.1, install the Windows Management Framework 5.1, which requires the .NET Framework 4.5.2 (or newer). Make sure that .NET 4.5.2 or higher is installed using this command:


![]()
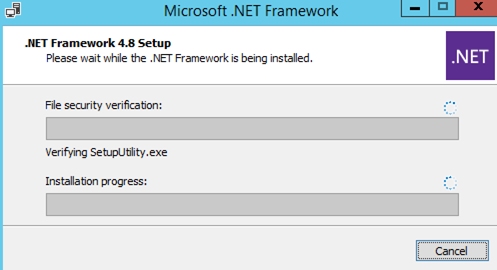
In my case, the release version means that .NET Framework version 4.5.1 is installed. So, I have to download and install the latest .NET Framework 4.8 (here is the link to the offline installer: https://go.microsoft.com/fwlink/?linkid=2088631 — ).
Install the .NET 4.8 (you will have to reboot your computer):
If you install WMF 5.1 without .NET 4.5.2, some PowerShell features will not be available.
Download WMF 5.1 for Windows Server 2012 R2 — (https://go.microsoft.com/fwlink/?linkid=839516).
Install the Windows Management Framework 5.1 MSU file.
After the server restart, open the PS console and make sure that the PowerShell version has been updated to 5.1.
If you have unsupported Windows 7 or Windows Server 2008 R2, you can upgrade the PowerShell version from 2.0 to 5.1 in the same way. First, install .Net Framework 4.5.2 (or newer), then WMF 5.1 (the download links will be different from those for Windows Server 2012 R2).
Installing/Updating PowerShell Core on Remote Computers
Consider two scenarios for installing or updating the PowerShell Core on multiple remote computers.
Deploying PowerShell Core with Group Policy
You can use Group Policy to centrally deploy and update PowerShell Core in an Active Directory domain. Use the features of the GPO to deploy MSI packages to domain computers.
- Download the PowerShell MSI installation file and copy it to the SYSVOL directory on the domain controller;
- Open the Domain Group Policy Management Console (), create a new GPO and link it to the OU with computers and servers;
- Go to the GPO section Computer Configuration -> Software Settings, create a new package, and specify the path to the PowerShell MSI installation file in the SYSVOL folder in the domain (use the UNC path); To more accurately target your policy to domain devices, you can use the GPO WMI filters.
- To update the Group Policy settings for the software installation, you must restart the computers. The new version of PowerShell will be installed on all computers at startup.
How to Update PowerShell on a Remote Computer from the Command Prompt?
You can use the command line prompt to update PowerShell on a remote computer.
The first method uses an MSI installer in a shared network folder to remotely update PowerShell on a computer:Invoke-Command -ComputerName mun-srv01 -ScriptBlock {Start-Process msiexec.exe -ArgumentList ‘/package «\\mun-fs01\install\PowerShell-7.3.3-win-x64.msi» /quiet ADD_EXPLORER_CONTEXT_MENU_OPENPOWERSHELL=1 ENABLE_PSREMOTING=1 REGISTER_MANIFEST=1’ -Wait}
The following script selects all enabled computers running Windows 10 from the Active Directory domain and starts downloading and installing PowerShell Core on each of them:$ADComputers = Get-ADComputer -Filter ‘operatingsystem -like «*Windows 10*» -and enabled -eq «true»‘ ForEach ($computer in $ADcomputers) { Invoke-Command -ComputerName $computer {iex «& { $(irm https://aka.ms/install-powershell.ps1) } -UseMSI -Quiet»} } You must have the Active Directory PowerShell module installed on the computer to use the GetADComputer cmdlet.
Take care when using PowerShell Remoting commands when connecting to remote computers (with the and cmdlets). If you need to connect to a PowerShell 7 endpoint, you must use the command:
Otherwise, you will connect to the PowerShell Remoting 5.1 endpoint.
The most common way to update the PowerShell Core on Linux distros is to use the native package manager.
Как сделать так, чтобы в Terminal по умолчанию использовался PowerShell 7
Командной строкой по умолчанию в Windows 11 стал Terminal.
Связанная статья: Доступен новый Windows Terminal — он потрясающий
Terminal — это красивая и функциональная программа, но даже после установки PowerShell 7, по умолчанию она использует PowerShell 5. Это можно легко изменить.
Для этого нажмите Win+x и выберите «Windows Terminal»:
Нажмите на кнопку в виде стрелочки вниз, которая находится правее имён окон и выберите в меню «Settings»:
В выпадающем меню «Default profile» выберите «PowerShell», затем нажмите «Save»:
Теперь Terminal будет использовать по умолчанию самую последнюю установленную версию Terminal.
Если вы хотите переключиться на PowerShell 5, то введите в командной строке:
powershell
Либо выберите соответствующую опцию при открытии новой вкладки:
How to Install or Update to PowerShell Core 7?
Note that the latest Windows PowerShell version installed in Windows 10 and Windows Server 2019 is PowerShell 5.1. Microsoft started to develop a cross-platform PowerShell Core version instead. Currently, PowerShell Core 6.0, 6.1, 6.2, 7.0 and 7.1 are available. PowerShell Core is essentially a new platform that is installed on the computer along with Windows PowerShell. It means that you cannot upgrade PowerShell 5.1 to PowerShell Core 7.1. PowerShell 7 is installed on a computer separately from Windows PowerShell 5.1.
In PowerShell 7.1, the developers added maximum compatibility with Windows PowerShell. So, you can easily run your old PS1 scripts and cmdlets in PowerShell Core.
If you have PowerShell Core 6.0 installed, you can update the PowerShell version on your computer to the latest PowerShell 7.1 Core (or you can install PowerShell Core 7.1 together with Windows PowerShell 5.1). In this example, we will try to update PowerShell Core in Windows 10 20H2. There are two ways to upgrade:
- You can download the PowerShell Core MSI installer manually from GitHub;
- You can download and install (update) it directly from the PowerShell console.
The latest releases of PowerShell Core can be installed on all versions of Windows starting with Windows 7 SP1, Server 2008 R2, and newer.
If you want to install PowerShell Core using the MSI package, go to the project page https://github.com/PowerShell/PowerShell, find the latest stable release. At the time of this writing, this is the March 4, 2021 release of PowerShell v7.1.3. The higher preview Release of PowerShell v7.2.0 is also available, but you’d better wait for a more stable version. Expand the Assets list and find a package for your Windows version (PowerShell-7.1.3-win-x64.msi or PowerShell-7.1.3-win-x86.msi).
Download the MSI file and install it.

To install PowerShell Core from an MSI package using SCCM/MDT/scripts in quiet mode, you can use a command with the following parameters:
You can update the PowerShell right from the PS cli.
Let’s update (install) the latest PowerShell Core version using the command:
This command downloads the PowerShell 7.1 MSI distribution file from GitHub and then starts the installation via the MSI installer.
You can also use other installation parameters:
- -Destination – change the default PowerShell Core installation folder
- -Preview – install the latest Preview PowerShell version
- -Quiet – a quiet installation mode
- -AddToPath – adds a path to the PowerShell Core installation directory to the environment variables
![]()
After the installation is finished, the PowerShell Core (pwsh.exe) window appears. Check the PowerShell version here to make sure it is PoSh 7.1.3.
If you have the WinGet package manager installed, you can install or update your PowerShell version to the latest command:
Or, you can install a specific version of PowerShell Core:
If you have Chocolatey package manager installed, use the commands:
or for PowerShell 7.x:
Pay attention to the directories of different PowerShell versions:
- Windows PowerShell 5.1:
- PowerShell Core 6.x:
- PowerShell Core 7.x:
If PowerShell 6.x was installed on your computer, the directory is automatically removed when you install PowerShell 7.1.
Note that the name of the PowerShell executable has changed. In PowerShell Core it is c:Program FilesPowerShell7pwsh.exe. It has its own icon in the Start menu.
- To run .NET Framework-based Windows PowerShell, the command is used
- To run .NET Core-based PowerShell Core, use the
This means that you have both Windows PowerShell 5.1 and PowerShell Core 7.1 installed on your computer.
In order to find out the version and build of PowerShell installed on your device, you can check the version of the pwsh.exe file:

This is how you can check the version of a file on a remote computer:
Windows PowerShell provides a special backward compatibility mode that allows you to run an older version of PowerShell even if you have newer versions installed. You can start PowerShell of a specific version (for example 4.0) with the following command:
Upgrading to Windows PowerShell 5.1
PowerShell 4.0 is installed by default on Windows Server 2012 R2 (Windows 8.1). Let’s try to update the Windows PowerShell version to 5.1 on Windows Server 2012 R2.
First of all, check the current PowerShell version (the screenshot shows PowerShell 4.0 is installed):
To upgrade your PowerShell version to 5.1, install the Windows Management Framework 5.1, which requires the .NET Framework 4.5.2 (or newer). Make sure that .NET 4.5.2 or higher is installed using this command:


![]()
In my case, the release version means that .NET Framework version 4.5.1 is installed. So, I have to download and install the latest .NET Framework 4.8 (here is the link to the offline installer: https://go.microsoft.com/fwlink/?linkid=2088631 — ).
Install the .NET 4.8 (you will have to reboot your computer):
If you install WMF 5.1 without .NET 4.5.2, some PowerShell features will not be available.
Download WMF 5.1 for Windows Server 2012 R2 — (https://go.microsoft.com/fwlink/?linkid=839516).
Install the Windows Management Framework 5.1 MSU file.
After the server restart, open the PS console and make sure that the PowerShell version has been updated to 5.1.
If you have unsupported Windows 7 or Windows Server 2008 R2, you can upgrade the PowerShell version from 2.0 to 5.1 in the same way. First, install .Net Framework 4.5.2 (or newer), then WMF 5.1 (the download links will be different from those for Windows Server 2012 R2).
Установка Windows PowerShell
Windows PowerShell установлен по умолчанию в каждой ОС Windows, начиная с Windows 7 с пакетом обновления 1 (SP1) и Windows Server 2008 R2 с пакетом обновления 1 (SP1).
Если вас интересует PowerShell 7 или более поздних версий, вам нужно установить PowerShell вместо Windows PowerShell. Дополнительные сведения см. в статье Установка PowerShell в Windows.
Поиск PowerShell в Windows 11, 10, 8.1, 8.0 и 7
Иногда найти консоль или ISE (интегрированную среду сценариев) PowerShell в Windows бывает непросто, так как их расположение в разных версиях Windows отличается.
Следующие таблицы помогут найти PowerShell в вашей версии Windows. Все указанные версии являются оригинальными, сразу после выпуска и без обновлений.
Консоль
| Версия | Location |
|---|---|
| Windows 10, 11 | Щелкните значок Windows (левый нижний угол в Windows 10, посередине снизу в Windows 11) и начните вводить «PowerShell». |
| Windows 8.1, 8.0 | На начальном экране начните вводить PowerShell.Если вы находитесь на рабочем столе, щелкните значок Windows в левом нижнем углу и начните вводить PowerShell. |
| Windows 7 с пакетом обновления 1 (SP1) | Щелкните значок Windows в левом нижнем углу и в поле поиска начните вводить PowerShell. |
| Версия | Location |
|---|---|
| Windows 10, 11 | Щелкните значок Windows (левый нижний угол в Windows 10, посередине снизу в Windows 11) и начните вводить «ISE». |
| Windows 8.1, 8.0 | На начальном экране введите PowerShell ISE.Если вы находитесь на рабочем столе, щелкните значок Windows в левом нижнем углу и введите PowerShell ISE. |
| Windows 7 с пакетом обновления 1 (SP1) | Щелкните значок Windows в левом нижнем углу и в поле поиска начните вводить PowerShell. |
Поиск PowerShell в версиях Windows Server
Начиная с Windows Server 2008 R2, операционную систему Windows можно установить без графического пользовательского интерфейса (GUI). Выпуски Windows Server без GUI называются выпусками Core, а выпуски с GUI — Desktop.
Выпуски Windows Server Core
Во всех выпусках Core при входе на сервер открывается окно командной строки Windows.
Введите powershell и нажмите клавишу ВВОД , чтобы запустить PowerShell в сеансе командной строки. Введите exit , чтобы закрыть сеанс PowerShell и вернуться к командной строке.
Выпуски Windows Server Desktop
Во всех выпусках Desktop нужно щелкнуть значок Windows в левом нижнем углу и начать вводить PowerShell. Появятся параметры консоли и ISE.
Единственное исключение из этого правила — ISE в Windows Server 2008 R2 с пакетом обновления 1 (SP1). В этом случае щелкните значок Windows в левом нижнем углу и введите PowerShell ISE.
Проверка версии PowerShell
Чтобы узнать, какая версия PowerShell установлена, запустите консоль PowerShell (или ISE), введите $PSVersionTable и нажмите клавишу ВВОД . Найдите значение PSVersion .
Обновление существующей версии Windows PowerShell
В пакет установки для PowerShell входит установщик WMF. Версия установщика WMF совпадает с версией PowerShell. Для Windows PowerShell нет отдельного установщика.
Если вам нужно обновить существующую версию PowerShell, в Windows используйте следующую таблицу, чтобы найти установщик для нужной версии PowerShell.
| Windows | PS 3.0 | PS 4.0 | PS 5.0 | PS 5.1 |
|---|---|---|---|---|
| Windows 11Windows Server 2022 | — | — | — | установлено |
| Windows 10 (см. примечание 1)Windows Server 2016 | — | — | — | установлено |
| Windows 8.1Windows Server 2012 R2 | — | установлено | WMF 5.0 | WMF 5.1 |
| Windows 8Windows Server 2012 | установлено | WMF 4.0 | WMF 5.0 | WMF 5.1 |
| Windows 7 с пакетом обновления 1 (SP1)Windows Server 2008 R2 с пакетом обновления 1 (SP1) | WMF 3.0 | WMF 4.0 | WMF 5.0 | WMF 5.1 |
Если в начальном выпуске Windows 10 включены автоматические обновления, PowerShell обновляется с версии 5.0 до 5.1. Если оригинальная версия Windows 10 не обновлена в Центре обновления Windows, версия PowerShell будет 5.0.
Если вы ищете Azure PowerShell, можно начать с раздела Общие сведения об Azure PowerShell.
Updating PowerShell via Windows Update or WSUS
Prior to PowerShell Core 7.2, pwsh.exe was not automatically updated. There was only a notification in the console after the release of a new version:
A new PowerShell stable release is available. Upgrade now, or check out the release page at: https://aka.ms/PowerShell-Release?tag=v7.1.3

Starting with version 7.2, PowerShell Core supports automatic updates through Windows Update (Microsoft Update, Windows Update for Business, internal WSUS server, or SCCM). To do this, you must enable the appropriate options during the installation of the MSI package.
- The first allows PowerShell to update automatically using any available channel (enables the registry parameter UseMU =1 in the key)
- The second checkbox will allow you to receive updates for all of Microsoft’s software, not just Windows. If this option is disabled, you will not receive PowerShell updates from Microsoft Update, but you can receive them from your WSUS/SCCM (the registry parameter registeredwithAU=1 under )
Check that the Receive updates for other Microsoft products when you update Windows option is now enabled under Settings -> Update and Security -> Windows Update -> Advanced options.

An administrator can configure update installation options through Group Policy settings.
Now, when you click the Check for Updates button or run an update scan through the PSWindowsUpdate module, you will also receive updates for PowerShell Core.
Немного о PowerShell для Windows 10
Консоль PowerShell представляет собой средство для оптимизации работы операционной системы, обработки скриптов и выполнения команд. На данный момент среда отладки использует в качестве основного движка Net.Core, что обеспечивает быстрый доступ пользователей к удаленным системам.
PowerShell — главная среда по обработке команд
Возможности PowerShell:
- удаленный доступ к другим системам. Администратор может запустить выполнение сценариев в PowerShell с помощью команд на удаленной машине. При этом утилита предоставит пользователю подробный отчет о выполнении сценария и состоянии системы;
- работа в фоновом режиме. В PowerShell Windows 10 реализована функция последовательного вызова команд. Выполнение скриптов в фоновом режиме можно запустить на удаленной системе без дополнительных разрешений;
- группы последовательных транзакций. Разработчики программного обеспечения могут совершать последовательные команды с базой данных;
- конвейер. Пользователи могут последовательно вызвать несколько командлетов «BeginProcessing», «ProcessRecord» и «EndProcessing»;
- открытые модули. Администратор может выполнять сценарии в PowerShell и помещать исполняемый код в самостоятельный модуль. Код будет выполняться исключительно автономно, не влияя на окружение. Самостоятельный модуль может содержать в себе скрытие и открытые переменные;
- отладка скриптов. Пользователи могут при выполнении самостоятельного сценария поставить точки прерывания. Точку прерывания можно поставить при выполнении команд, когда идет запись переменных;
- новая среда выполнения скриптов. Встроенный модуль отладчика теперь имеет графический интерфейс для отображения команд. Новая среда поможет владельцам персональных компьютеров запустить несколько консолей отладки и с полной поддержкой юникода.
Запуск и отладка скриптов в Повер Шелл