
Solution 4
Please check the following link:
https://stackoverflow.com/a/38111013/15374795
This answer belongs to — credit Tj Kellie please do not add like for me.
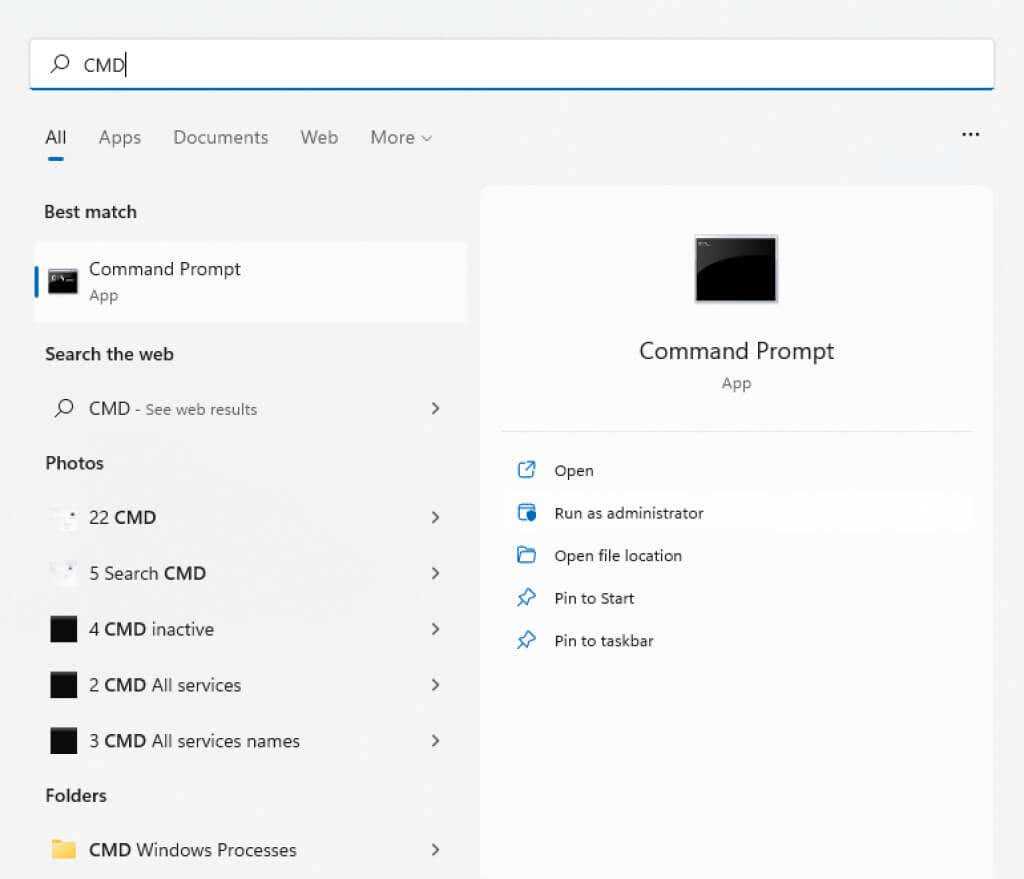
Note: open Command Prompt by right click on that and click on «Run as administration».
To turn Hypervisor off, run this from Command Prompt (Admin) (Windows+X):
and reboot your computer. To turn it back on again, run:
If you receive «The integer data is not valid as specified», try:
Important note: after turning off the Hypervisor and restarting the system it is mandatory to turn on the Hypervisor because with out Hypervisor you can not use the git repository on your windows.
Running bcdedit /set hypervisorlaunchtype off in Command Prompt
The specific command needed is “bcdedit /set hypervisorlaunchtype off” and should be entered into an administrator Command Prompt window. After entering the command, users should restart their computers for it to take effect.
It’s important to use caution when using Command Line Prompt since incorrect commands could potentially cause further damage that could render a computer unusable. Before entering any commands, double-check spelling and syntax to ensure the accuracy of the entered command – incorrect commands can lead to irreparable system failure or data loss. To avoid unintended consequences it is also recommended that users back up important files before attempting any changes via Command Prompt as a precautionary measure before completing troubleshooting steps.
It is also possible that this solution may not work for all users and additional troubleshooting might be necessary such as disabling Core Isolation from Windows Security if Hyper-V does not show under Device Manager or reinstalling or updating virtualization software such as Virtualbox etc. However, running this initial command can help resolve errors associated with VT-x on Virtual Box quickly without having to enter any complex settings which makes this an ideal first step.
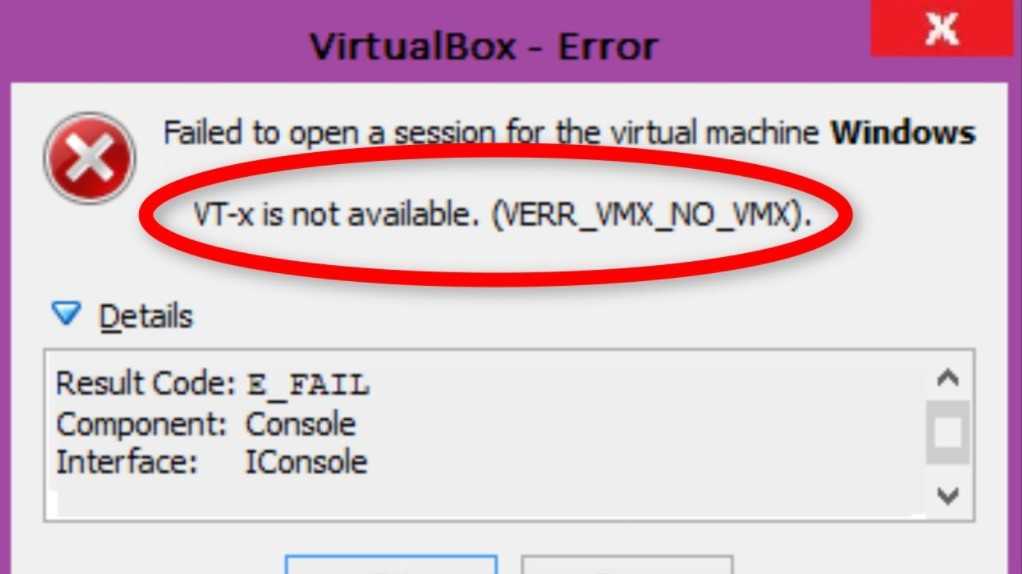
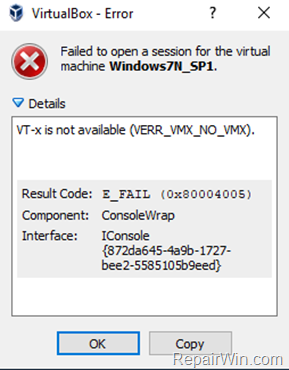
Causes Of The “VirtualBox Error VT-x Is Not Available (VERR_VMX_NO_VMX)”
The error can be caused by several factors, such as incorrect BIOS settings, incompatible CPU, and software or hardware conflicts.
BIOS Issues
BIOS (Basic Input / Output System) is a set of instructions found in the nonvolatile memory of a computer that acts as an interface between software and hardware.
It initializes all the components on your system, launching necessary programs when you turn it on and managing data flow between peripherals like keyboards or mice. To run virtual machines using VirtualBox, the VT-x option must be enabled from within BIOS settings to enable Intel’s Hardware-assisted virtualization feature.
Enabling this setting allows faster performance for running multiple operating systems simultaneously. This can also help with CPU-intensive tasks such as streaming media content online or gaming inside a VM without any interruption.
To access the BIOS settings, you need to restart your system and press “Del” or “F12/F10” continually while it boots up depending upon your computer’s motherboard model.
After entering into the bios menu, find options like “Virtual Technology” and then enable both VT-x/VT-d options from there.
CPU Compatibility
CPU compatibility is essential for virtualization and to correctly run the VT-x technology. If a compatible processor is not used, it can lead to errors.
The most commonly supported processors are Intel Core i3/i5/i7 as well as the AMD Ryzen series. When using other processors like Atom, Celeron, or Pentium you may experience conflicts between hardware resources and software limitations which will hinder your ability to use virtualization technologies optimally.
To prevent these issues from occurring ensure that your device contains a Modern processor that supports both VT-x and VT-d features when enabling virtualization support in BIOS settings.
Virtualization Software Settings
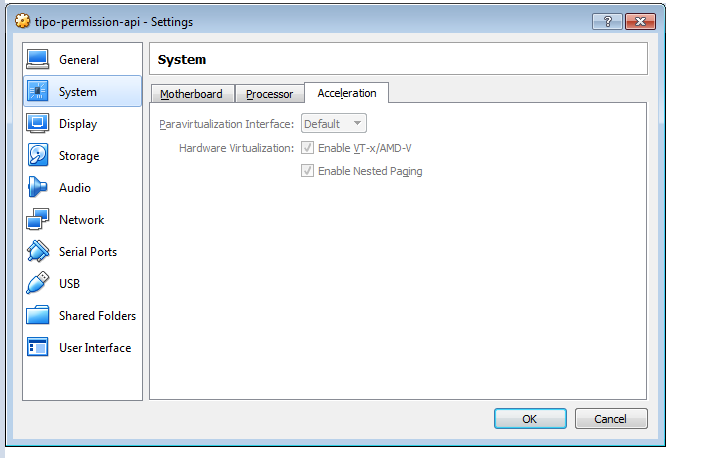
It is important to review the settings of your virtualization software to prevent the “VT-x not available” error from occurring. Popular products such as VirtualBox, VMWare, and Parallels Desktop are just a few of the diverse virtualization applications that may require setting modifications before utilizing them.
For instance, users need to ensure their version of VirtualBox is compatible with VT-x technology and enable Intel VT-X / AMD options for its technologies before operating Advanced Micro Devices (AMD) or Intel processors respectively within it.
Additionally, other third-party antivirus software may have conflicting features which could result in blocking certain requirements needed for proper virtualization; therefore you should check that no security modules are enabled or otherwise preventing full utilization of hardware virtualization technology approved by your processor manufacturer.
The Cause (for all scenarios)
You can eliminate this cause if you have not manually disabled VT-x in the BIOS in recent times. There is no reason why someone will disable the virtualization technology in the BIOS if you are using Windows 11 or 10 operating systems. In case you changed this setting for some reason, enable the VT-x as shown in our guide.
The CPU doesn’t have VT-x support
I doubt this is applicable when you have a working Windows 10/11 64Bit computer. If you are using Windows 11 64Bit, surely your computer processor supports VT-x technology. Except you are using a very old computer that came decades ago, most of the CPUs support VT-x.
Hyper-V virtualization is active in Windows 10/11.
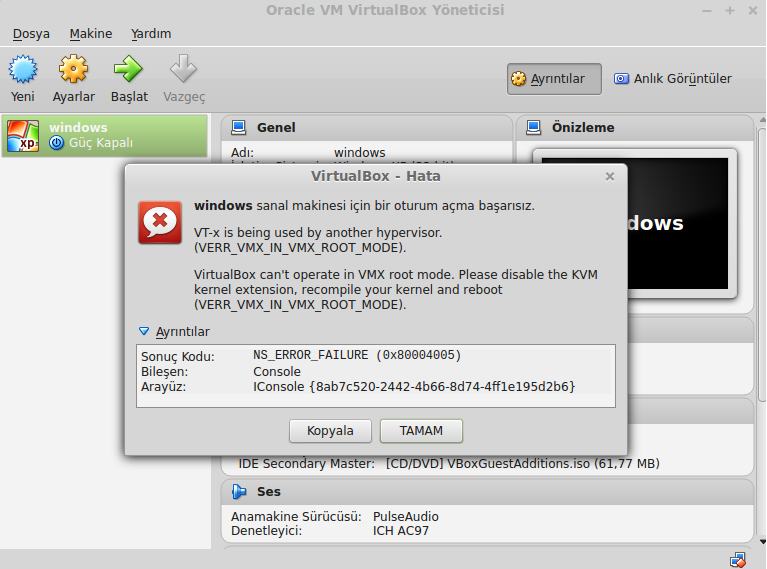
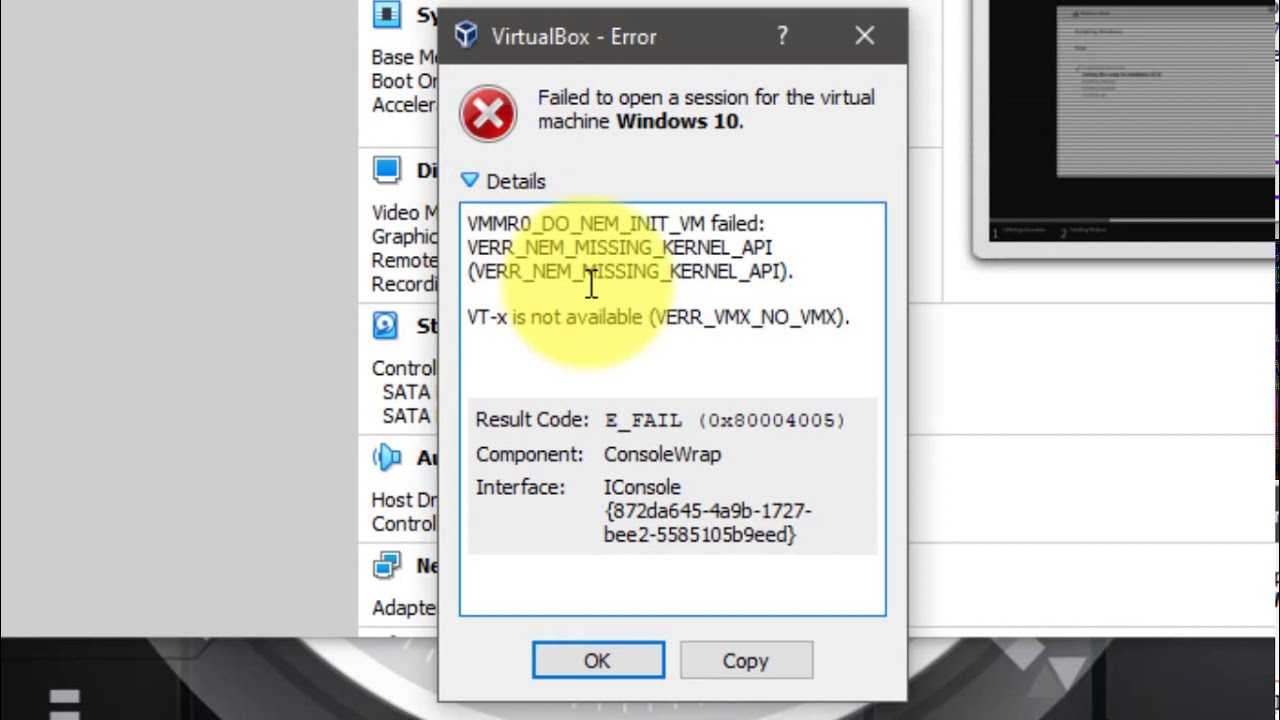
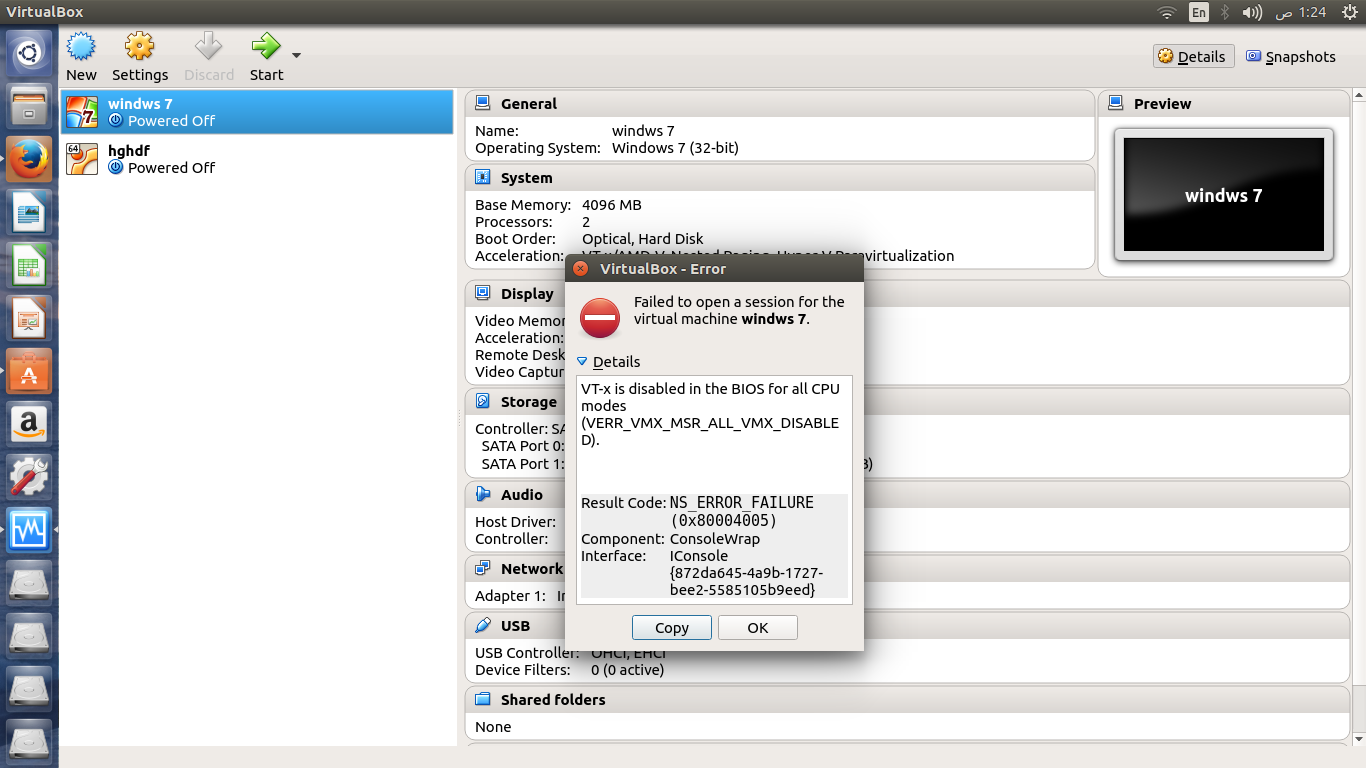
This is the reason in my case, could be yours too. I enabled the Hyper-V feature on my Windows 10 computer to install virtual machines for testing purposes. Hyper-V and its VMs worked well, but now VirtualBox is not opening virtual machines.
Testing the CPU technologies by the Intel tool said that the Vt-x is off as below (though it is enabled in the BIOS).
Also if you installed Microsoft Docker which uses Hyper-V virtualization technology, you may face the “vt-x is not available (verr_vmx_no_vmx)” issue with Oracle VirtualBox. In this case, Microsoft recommends using the DockerToolbox which uses the VirtualBox technology instead of Hyper-V.
Check the Antivirus or Recently installed software
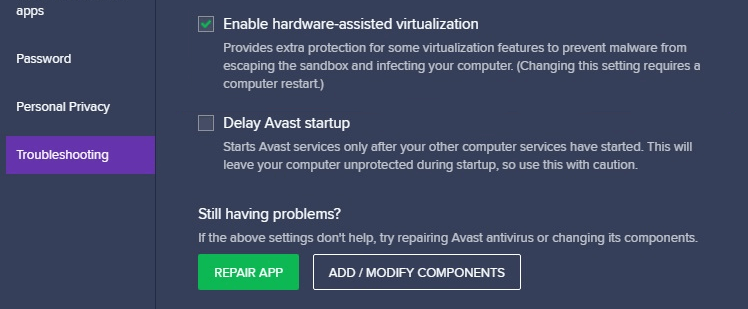
Some Antivirus (like Avast) or other programs might use the virtualization technology and access it directly on the host computer. If they do, you should disable them in the particular program settings. That should bring back the working virtual machines in Windows 10.


Как исправить недоступность VT-x (VERR_VMX_NO_VMX)?
В этом разделе мы расскажем, как исправить ошибку, заключающуюся в том, что verr_vmx_no_vmx vt x недоступен.
Способ 1. Отключить виртуализацию Hyper-V
Чтобы исправить ошибку, заключающуюся в том, что vt-x недоступен (verr_vmx_no_vmx), вы можете отключить виртуализацию Hyper-V.
А вот и руководство.
- Тип Командная строка в поле поиска Windows и выберите наиболее подходящий.
- Затем щелкните его правой кнопкой мыши, чтобы выбрать Запустить от имени администратора .
- Во всплывающем окне введите команду exe / Online / Отключить функцию: Microsoft-Hyper-V и ударил Войти продолжать.
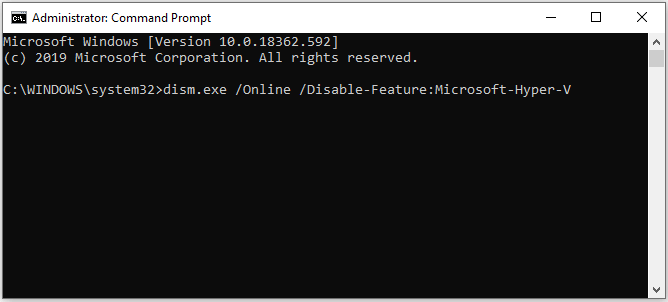
Когда процесс будет завершен, закройте окно командной строки и перезагрузите компьютер. Затем снова откройте виртуальную машину, чтобы проверить, устранена ли ошибка, заключающаяся в том, что vt-x недоступен (verr_vmx_no_vmx).
Если это решение неэффективно, попробуйте другие решения.
Способ 2. Отключить изоляцию ядра от Защитника Windows
Чтобы исправить ошибку, заключающуюся в том, что verr_vmx_no vmx vt x недоступен, вы также можете отключить изоляцию ядра из Защитник Windows .
А вот и руководство.
- Нажмите Windows ключ и я ключ вместе, чтобы открыть Настройки .
- Во всплывающем окне выберите Обновление и безопасность продолжать.
- Тогда выбирай Откройте Безопасность Windows продолжать.
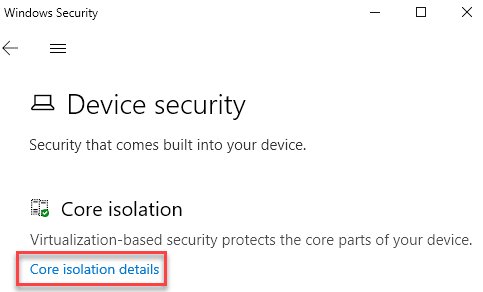
- На правой панели выберите Безопасность устройства продолжать.
- Во всплывающем окне нажмите Детали изоляции ядра .
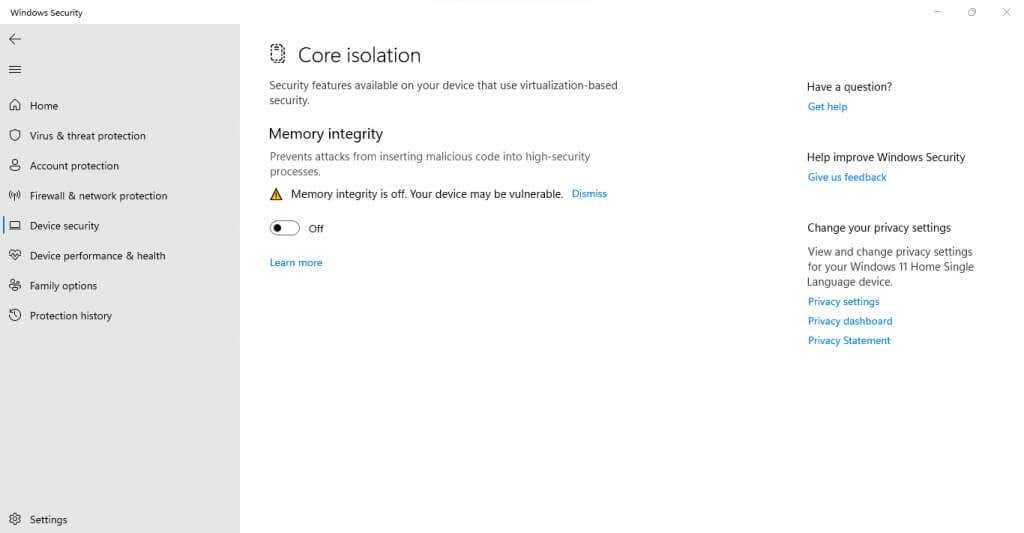
- Затем измените переключатель под Целостность памяти к Выключено .
После этого перезагрузите компьютер и проверьте, что ошибка, связанная с недоступностью vt-x, устранена.
Способ 3. Включите VT-X в настройках BIOS
Если технология виртуализации отключена в настройках BIOS, вы также можете получить сообщение об ошибке, что vt-x недоступен (verr_vmx_no_vmx). Таким образом, вы можете включить vt-x в настройках BIOS.
А вот и руководство.
- Загрузите свой компьютер. Когда появится логотип Windows, нажимайте кнопку настройки, чтобы войти в BIOS .
- После входа в BIOS перейдите к Безопасность вкладка и прокрутите вниз до Системная безопасность .
- Затем проверьте, есть ли Технология виртуализации или же VTx / VTd здесь указан и включен ли он.
- Если нет, измените его статус на включенный.
После завершения всех шагов перезагрузите компьютер, чтобы проверить, устранена ли ошибка, связанная с недоступностью vt-x (verr_vmx_no_vmx).
Fix 3: Disable Memory Integrity
Windows Security includes a virtualization-based protection feature that can detect low-level code injection and protect your PC from even the most dangerous malware. But just like Hyper-V, this creates a conflict with VirtualBox.
Most users don’t need the advanced security provided by Core isolation. Modern laptops have it disabled by default, as it conflicts with built-in software used to optimize hardware performance.
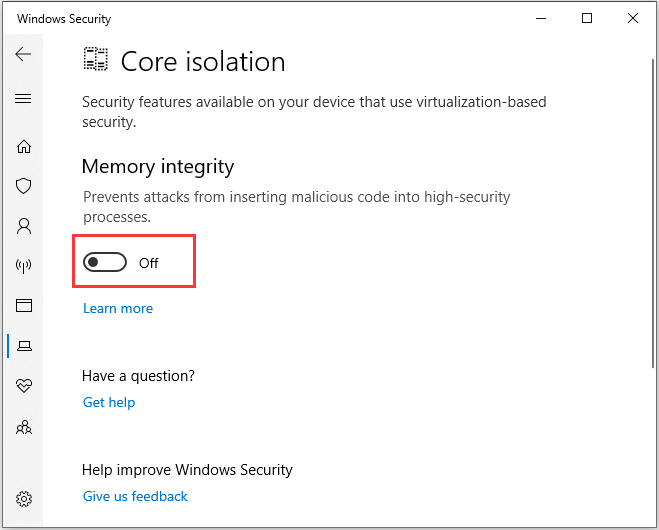
- To disable Memory integrity on your computer, open Windows Security. You can search for it in the Start Menu.

- Switch to the Device Security tab.
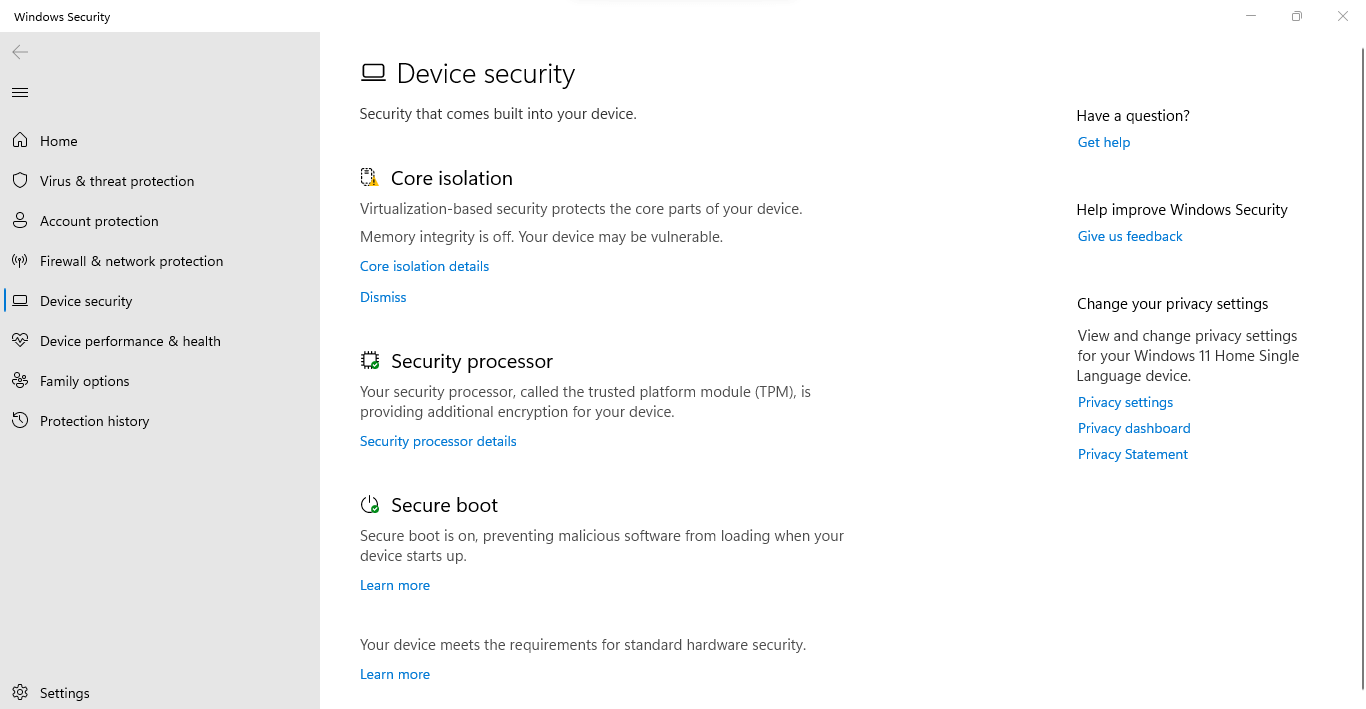
- You can view whether Memory integrity is running by checking the Core isolation header. Selecting Core isolation details brings you to the option itself.
- Turn off Memory integrity by flipping the toggle to the Off position.
- Restart the computer.
Enabling Nested Virtualization
Nested virtualization is a powerful feature of modern processor architectures that allows users to run multiple guest operating systems from within a single host computer. This technology is an important factor in improving the performance and scalability of virtualized environments, as it permits features such as running additional VMs inside existing VMs or supporting Hyper-V on Windows guests (that may need to be installed for certain types of software).
When enabled, nested virtualization allows users to gain access to hardware resources not available when using traditional non-virtualized configurations. That means developers and enthusiasts will find more freedom in setting up their computing environment without compromising overall control or stability. However, enabling this advanced feature requires certain steps depending on the type of processor and version of virtualization software being used.
Supported Virtualization Software:
Nested Virtualization is currently supported by a variety of major hypervisor platforms including VMware Workstation/ESXi, XenServer 7+, KVM on Linux/QEMU 2+5 series versions, Hyper-V 2019 Series 19H1 & later with Nested Assessment Toolkit (NAT) setup with compatible processors having VTx support enabled through BIOS settings., Microsoft Azure ARM 2012+4 Series & Compute Engine OpenStack Liberty+.
Important Considerations:
When enabling nested virtualization there are two primary considerations; proper CPU compatibility and appropriate BIOS settings. All CPUs must have Intel’s Xeon E3 v2 family instruction set architecture (ISA), which adds support for Advanced Vector Extensions (AVX). Additionally, many motherboards require special tweaks such as forcing VC pu events default mode from Enabled option so nesting can take full effect once activated via BIOS based upon related motherboard models along its user guide specifications.
Как исправить ошибку?
Для эффективной борьбы с ошибкой данного рода нужно выполнить не так много процедур. Во-первых, следует убедиться в том, что Hyper-V не активен и не был включен после обновления. Во-вторых, стоит попробовать отключить переменные DeviceGuard или CredentialGuard. Напоследок уже можно переходить к проверке других настроек.
Что нужно сделать в первую очередь:
Отключаем службы Hyper-V. Это можно сделать и вручную через «Панель управления», но более быстрый способ – через командную строку. Предварительно следует использовать команду bcdedit и посмотреть состояние hypervisorlaunchtype. Если в консоли указано auto, значит проблема в этом. Вводим dism.exe /Online /Disable-Feature:Microsoft-Hyper-V и dism.exe /Online /Disable-Feature:Microsoft-Hyper-V.
Выключить компоненты DeviceGuard и CredentialGuard, которые используют Hyper-V, они также могут влиять на параметры запуска виртуальной среды. Для этого нужно запустить «Редактор групповой политики», а затем перейти в: «Политика локального компьютера»> «Конфигурация компьютера»> «Административные шаблоны»> «Система»> «Защита устройства»> «Включить безопасность на основе виртуализации». Устанавливаем параметр «Отключено». Далее используем следующую серию команд
Только важно проверить, что X – неиспользованная буква диска, иначе ее нужно изменить. После их выполнения нужно подтвердить отключение DeviceGuard и CredentialGuard
Дополнительные способы решения:
- Отключить быстрый запуск Windows. Это легко сделать в «Панели управления» — «Электропитание» — «Выбор действия кнопок питания» — «Параметры включения» и «Отключить быстрый запуск».
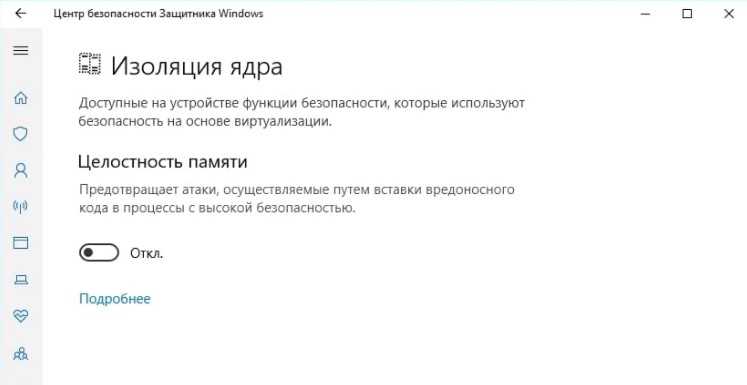
- Деактивировать изоляцию ядра. Нужно в «Параметрах» в «Обновление и безопасность» нажать на кнопку «Центр безопасности Защитника Windows» в первой же вкладке. Далее следует развернуть меню, кликнуть на «Безопасность устройства» и щелкнуть по элементу «Сведения об изоляции ядра». В блоке «Целостность памяти» перемещаем ползунок в неактивное положение.
Проверить активность виртуализации в BIOS. Обычно находится во вкладке «Безопасность BIOS». Нужно активировать Intel VTT, Intel VT-d или AMD Thinkpad V.


How do I fix error VT-x is not available (VERR_VMX_NO_VMX)?
Before we move to the slightly complex solutions, here are a few quick ones to try:
- Restart the computer to terminate all non-critical background processes.
- Install any available Windows updates in case the problem is a known bug and a patch is available for it.
- Revert any recent changes to the PC. For instance, if you got the VT-x is not available (VERR_VMX_NO_VMX) error after downloading software, uninstall the program to get things running.
If none work, move to the fixes listed next.
1. Enable VT-x in BIOS
- Power off the computer, then turn it on and repeatedly hit the Esc, F10, F12, or Delete key, depending on the device manufacturer, to access the BIOS. You can find the exact key on the OEM’s website or the in manual that came along with the PC.
- Once in the BIOS, head to the Security or System Security section.
- Now, enable the Virtualization Technology (VT-x) feature.
- Save the changes, exit the BIOS, and boot Windows.
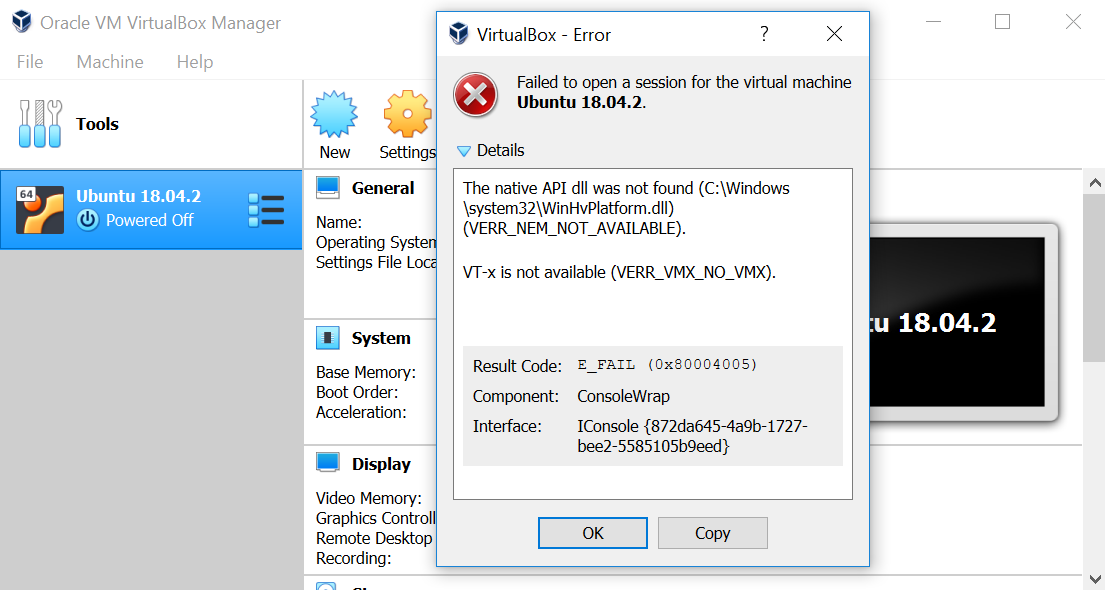
When faced with the VT-x is not available (VERR_VMX_NO_VMX) Ubuntu error, your primary approach should be to ensure that VT-x is indeed enabled. Also, if you find it already activated, re-enable the setting.
2. Disable Hyper-V
- Press Windows + R to open Run, type cmd, and hit Ctrl + Shift + Enter.
- Click Yes in the UAC prompt.
- Now, paste the following commands one at a time and hit Enter after each:
- Once done, restart the computer and run the Virtual Machine to verify whether the problem persists.
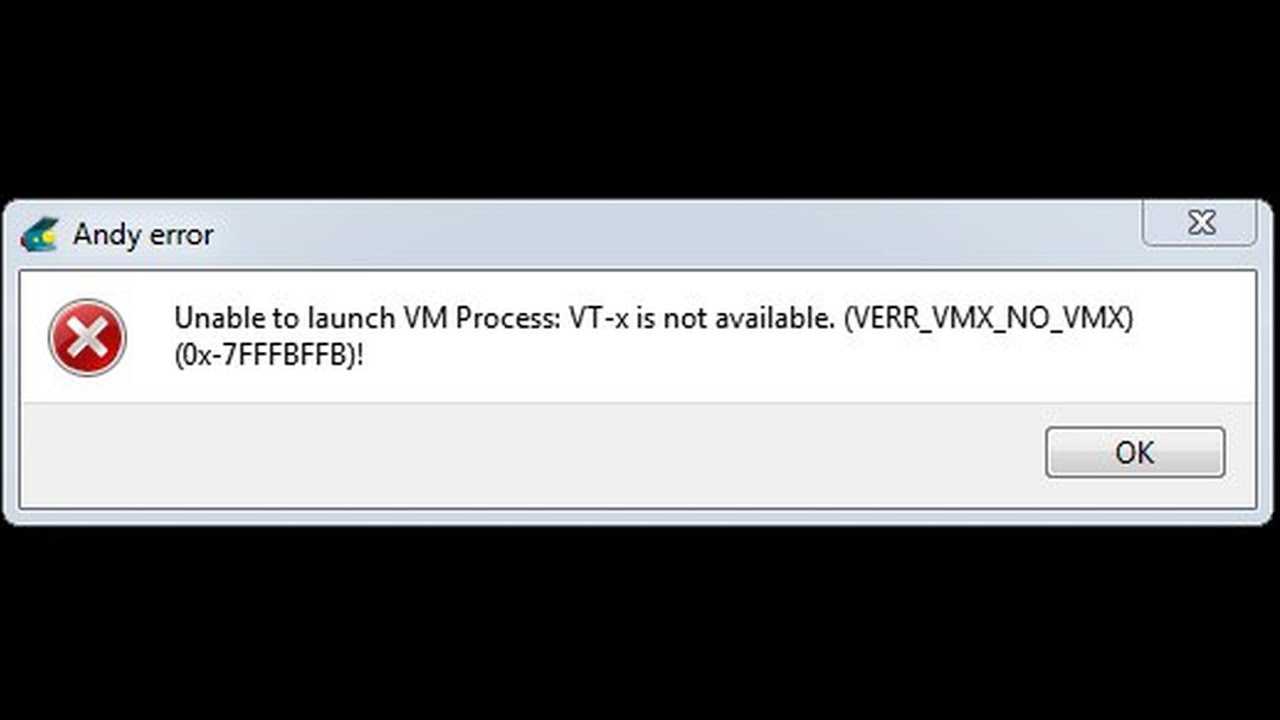
While this is not the case by default, an update led to Hyper-V conflicting with VT-x when enabled, which triggered the VT-x is not available (VERR_VMX_NO_VMX) Windows 7 error. And disabling the former, in this case, should get things up and running.
3. Turn off Memory Integrity
- Press Windows + S to open Search, type Windows Security in the text field, and click on the relevant search result.
- Now, click on Device security.
- Click on Core isolation details.
- Now, disable the toggle for Memory integrity.
- Once done, restart the computer, and run the Virtual Machine.
Expert tip:
SPONSORED
Some PC issues are hard to tackle, especially when it comes to missing or corrupted system files and repositories of your Windows. Be sure to use a dedicated tool, such as Fortect, which will scan and replace your broken files with their fresh versions from its repository.
Another feature often found to conflict with the Virtual Machine is Core isolation or Memory integrity, which triggers the VT-x is not available (VERR_VMX_NO_VMX) Windows Server 2019 error.
The purpose of Memory integrity is to prevent unauthorized code from running on the PC. Besides this, it may also conflict with performance-boosting software. So, you should try disabling these and verify whether the error is fixed.
4. Uninstall your antivirus
- Press Windows + R to open Run, type appwiz.cpl in the text field, and hit Enter.
- Select the installed third-party antivirus from the list, and click Uninstall.
- Follow the on-screen instructions to complete the process.
In case the previous solutions didn’t work, it could the antivirus to blame for the VT-x is not available (VERR_VMX_NO_VMX) Oracle VirtualBox error.
Make sure to remove any cache or revert changes made by the program. A quick solution to ensure this is to use a dedicated uninstaller software, which clears the Registry entries created by the antivirus, thus reverting any changes made to the PC.
5. Downgrade the VM software
When nothing works, it’s mostly like non-compatibility with the recent version of the VM software to blame for the VT-x is not available (VERR_VMX_NO_VMX) Windows 10 error. And for this, the only viable solution is to downgrade the software.
Check which version you have, uninstall the software, and then download an older version from the official website. Here are the direct links to download pages for the various VM software:
- VirtualBox
- VMWare (Choose an older version from the dropdown menu)
That’s it! And after you have fixed the error, do not forget to find out how to enable Windows 11 on a Virtual Machine and test out the latest iteration before making the final upgrade.
For any queries or to share what worked for you, drop a comment below.
Still experiencing issues?
SPONSORED
If the above suggestions have not solved your problem, your computer may experience more severe Windows troubles. We suggest choosing an all-in-one solution like Fortect to fix problems efficiently. After installation, just click the View&Fix button and then press Start Repair.
Was this page helpful?
MyWOT
Trustpilot
Thank you!
Not enough details
Hard to understand
Other
x
Contact an Expert
Start a conversation
Why is VMware not compatible with Hyper-V?
Whenever the Hyper-V role is enabled, the virtualization extensions are not exposed to type 2 hypervisors installed on a Windows machine, hence the incompatibility issue. However, other factors responsible for this error are:
- Outdated or low-bit processor: VMware workstation and Hyper-V may not be compatible if you use an outdated processor for Windows Server 2012. Regardless of the Hyper-V feature you wish to use, a 64-bit processor of second-level address translation (SLAT) is a requirement for newer hardware.
- Insufficient Memory: To run multiple Virtual Machines simultaneously, you’ll need enough memory of at least 4 GB of RAM or more for the host and other Virtual Machines.
- Hyper-V is a Virtual Machine creator: Hyper-V is also a Virtual Machine creator and cannot run with another VM due to competition for resources. You may have to disable Hyper-V in Windows 11 in such cases.
What Are the Causes Of This VT-X is Not Available Error?
If not enabled in BIOS settings, it will cause this error on your computer when opening VirtualBox.
Your computer’s processor does not support VT-X :
Although this happens very rarely, there are still cases where this error has occurred because the system was not equipped with the necessary processor to support this technology.
Hyper-V virtualization technology is enabled on your computer :
This is the other most common reason that can cause this error on your computer. Microsoft’s Hyper-V technology is known to conflict with this technology.
Therefore, if Hyper-V virtualization is enabled on the system, then your operating system will disable it.
Avast’s June 2017 update disabled it :
The update released by Avast in June 2017 was found to be the reason for the deactivation.
Core isolation is enabled :
Kernel isolation is a security option in Windows Defender that conflicts with VT-X if VT-X is enabled on the PC.
VT-x недоступен (VERR_VMX_NO_VMX)
Чтобы исправить ошибку VT-x is not available (VERR_VMX_NO_VMX), выполните следующие действия:
Программы для Windows, мобильные приложения, игры — ВСЁ БЕСПЛАТНО, в нашем закрытом телеграмм канале — Подписывайтесь:)
- Включить VT-x и VT-d
- Отключить Hyper-V
- Отключите виртуализацию Hyper-V с помощью командной строки
- Отключить целостность памяти
Чтобы узнать больше об этих шагах, продолжайте читать.
1]Включить VT-x и VT-d
При использовании VirtualBox VT-x и VT-d – две самые важные вещи, которые необходимо включить на вашем компьютере. Если ваш компьютер не поддерживает эти функции, вы не можете использовать VirtualBox и в конечном итоге получите указанную выше ошибку. Если вы включили его ранее, но отключили по ошибке, вы можете получить ту же ошибку. Поэтому рекомендуется включать настройки VT-x и VT-d из BIOS.


![Решено - vt-x недоступен (verr_vmx_no_vmx) [новости minitool]](https://nephros-crimea.ru/wp-content/uploads/a/4/a/a4a7e263f1a5e7ba776b592cb524e153.png)


Для этого вам нужно открыть BIOS и найти две настройки: Intel Virtualization Technology (также известная как VT-x) и VT-d. После этого вам необходимо проверить, включены ли они. Если нет, включите их.
2]Отключить Hyper-V
Когда вы используете VirtualBox, необходимо включить Hyper-V. В противном случае вы можете столкнуться с проблемами, упомянутыми выше. Поскольку Hyper-V является еще одной функцией виртуализации, две функции виртуализации не могут работать одновременно. Поэтому выполните следующие действия, чтобы отключить Hyper-V на вашем ПК:
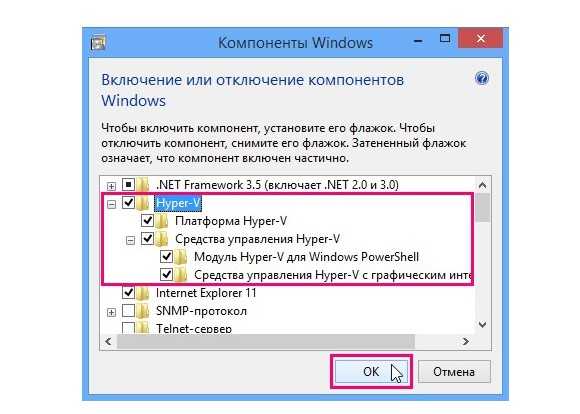
- Найдите функции Windows в поле поиска на панели задач.
- Щелкните индивидуальный результат поиска.
- Найдите Hyper-V в списке.
- Снимите соответствующий флажок с параметра Hyper-V.
- Щелкните кнопку ОК.
Наконец, вам может потребоваться перезагрузить компьютер, чтобы получить изменения. После этого вы сможете использовать VirtualBox без каких-либо ошибок.
3]Отключите виртуализацию Hyper-V с помощью командной строки.
Иногда отключения Hyper-V может быть недостаточно для решения вышеупомянутой проблемы. Если то же самое происходит с вами, вам необходимо отключить виртуализацию Hyper-V с помощью командной строки. Для этого сделайте следующее:
- Найдите cmd в поле поиска на панели задач.
- Нажмите на опцию Запуск от имени администратора.
- Щелкните кнопку Да.
- Введите эту команду: bcdedit / set hypervisorlaunchtype off
- Введите эту команду: DISM.exe / Online / Disable-Feature: Microsoft-Hyper-V
После этого вы сможете использовать VirtualBox с указанным выше сообщением об ошибке.
4]Отключить целостность памяти
Вы можете отключить функцию целостности памяти в Windows Security, чтобы проверить, решает ли это вашу проблему или нет. Для этого сделайте следующее:
- Найдите безопасность Windows в поле поиска на панели задач.
- Щелкните индивидуальный результат поиска.
- Перейдите на вкладку Безопасность устройства слева.
- Щелкните параметр Сведения об изоляции ядра.
- Переключите кнопку целостности памяти, чтобы выключить ее.
После этого перезагрузите компьютер и проверьте, сохраняется ли проблема.
Как исправить недоступность VT-x?
Чтобы исправить недоступность VT-x, вам необходимо включить технологию виртуализации Intel в BIOS. Для этого откройте настройки BIOS и найдите Технология виртуализации Intel вариант. Далее убедитесь, что он включен. Если нет, включите эту опцию.
Как включить VT-x на виртуальной машине?
Чтобы включить VT-x на виртуальной машине или виртуальной машине, вам необходимо включить технологию виртуализации Intel. Для этого откройте BIOS на своем компьютере и найдите Технология виртуализации Intel вариант. Затем вам нужно выбрать Включено вариант.
Программы для Windows, мобильные приложения, игры — ВСЁ БЕСПЛАТНО, в нашем закрытом телеграмм канале — Подписывайтесь:)