
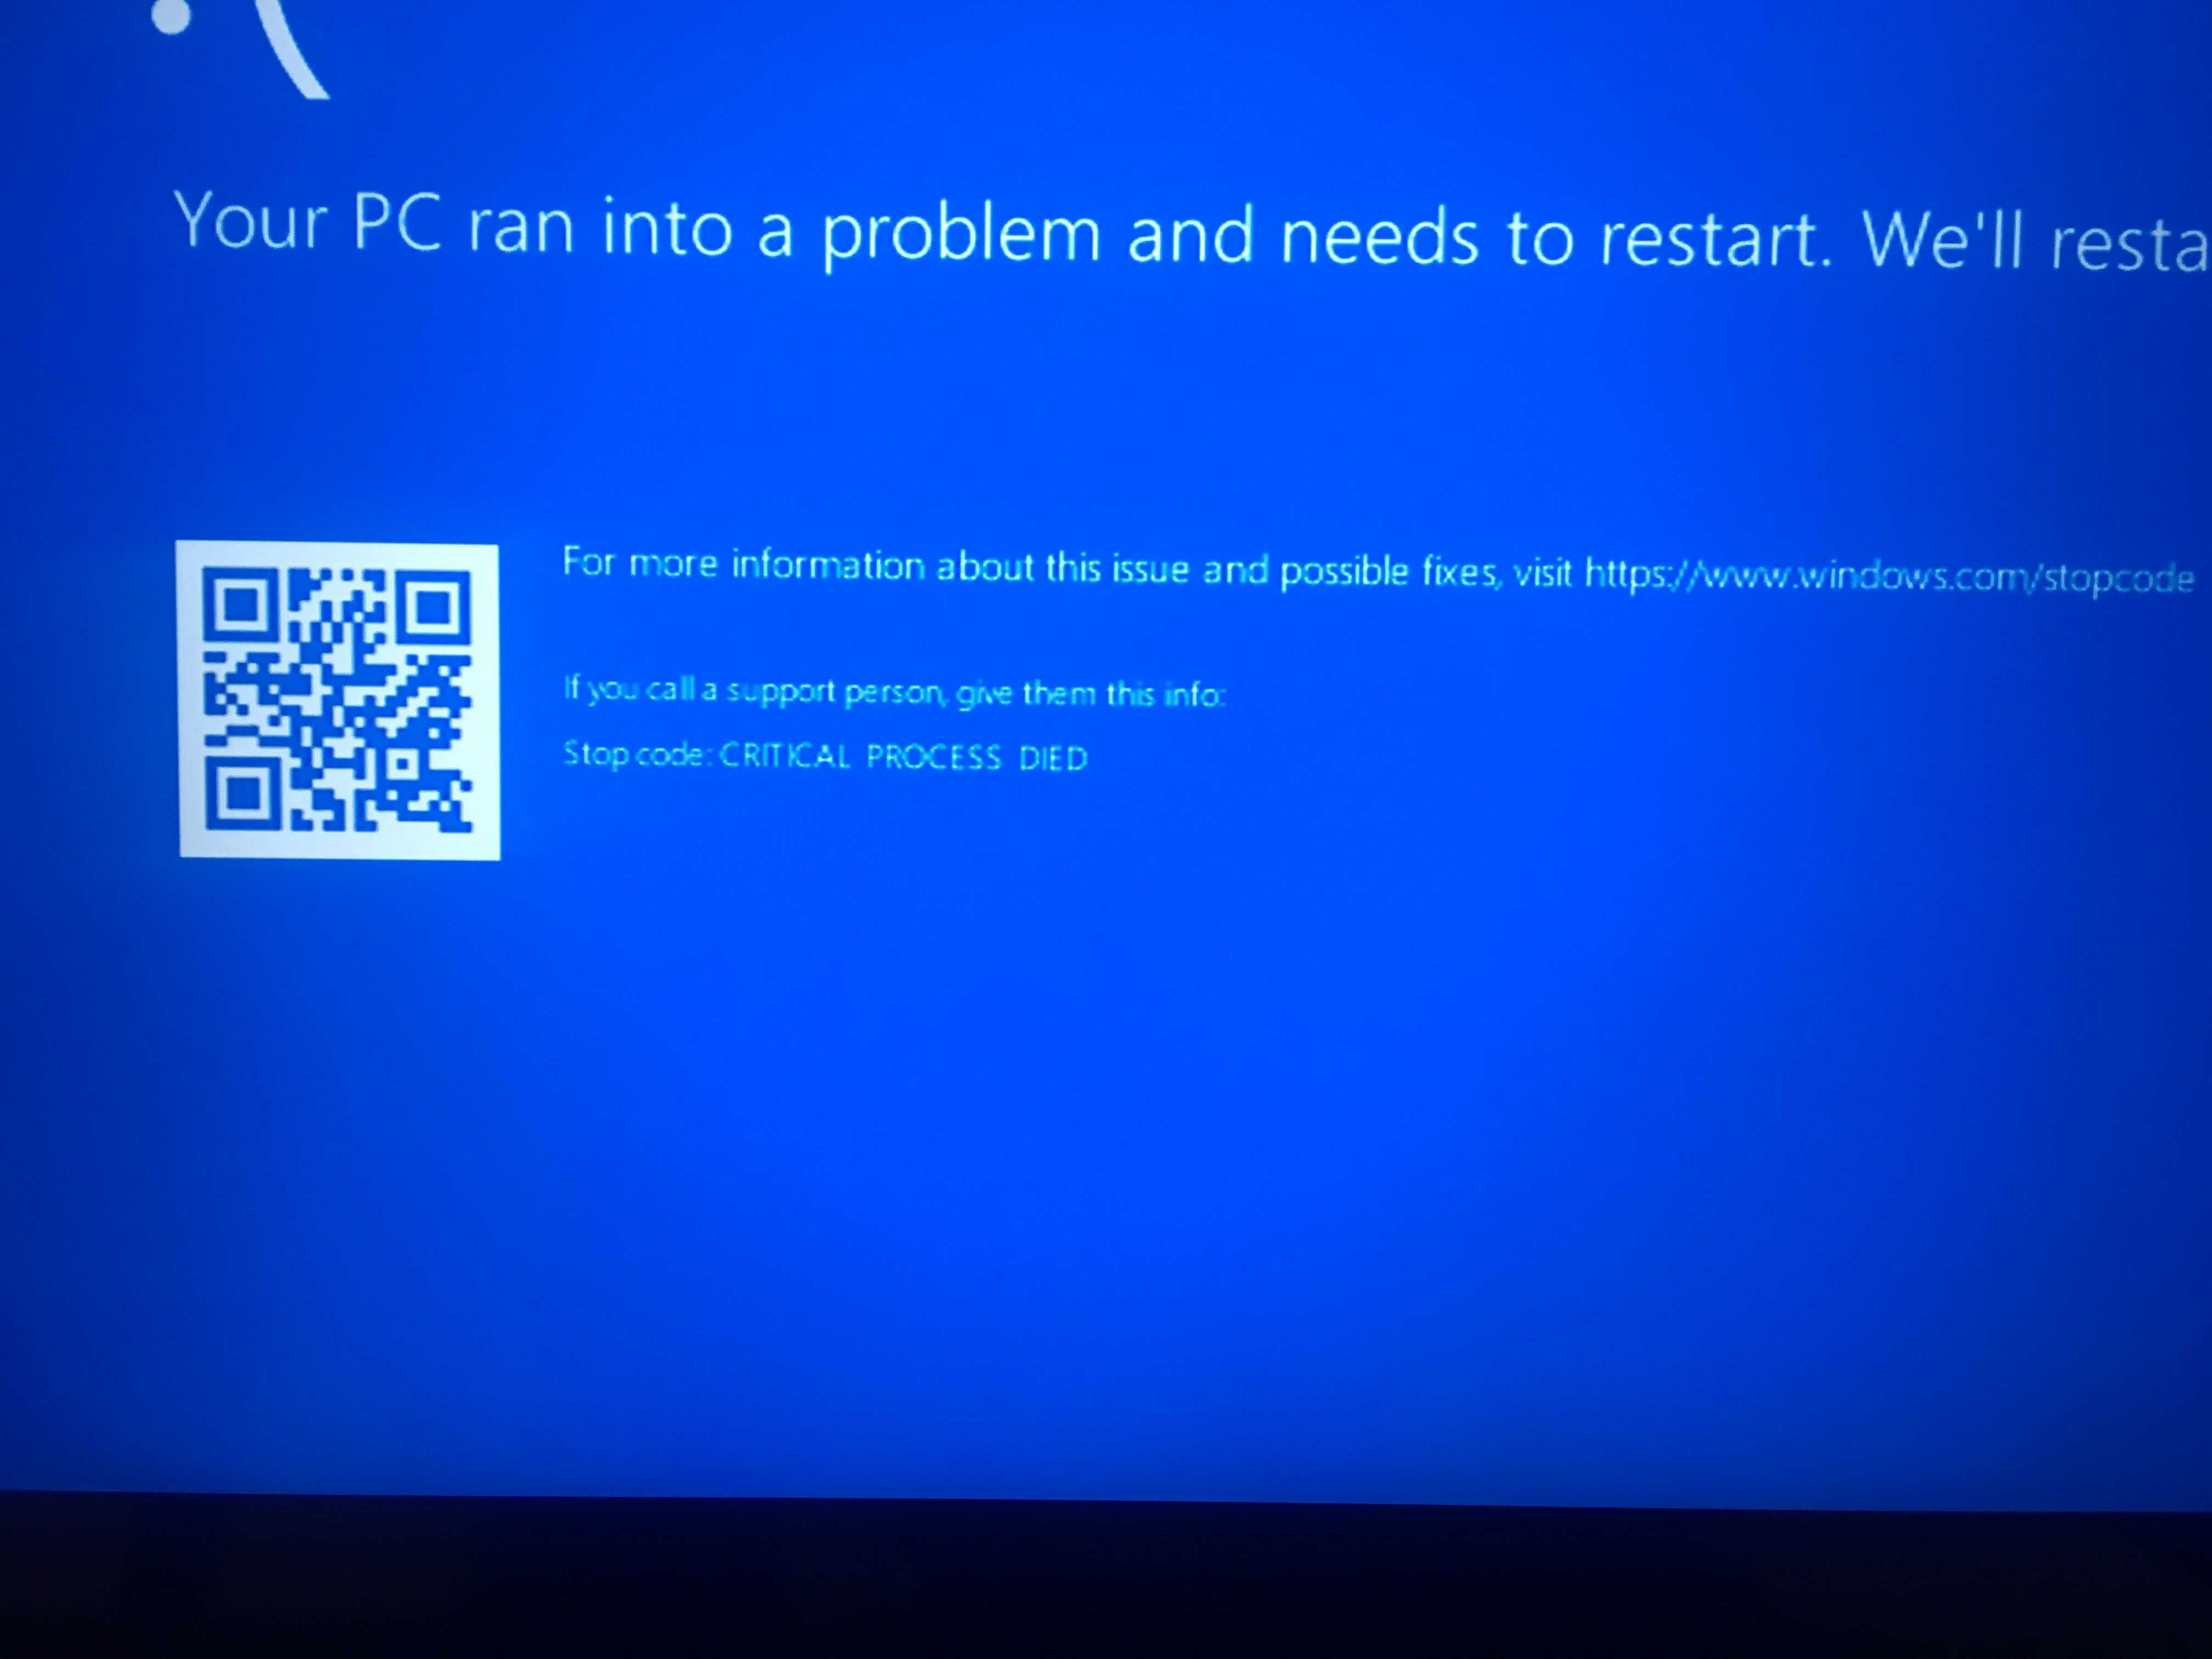
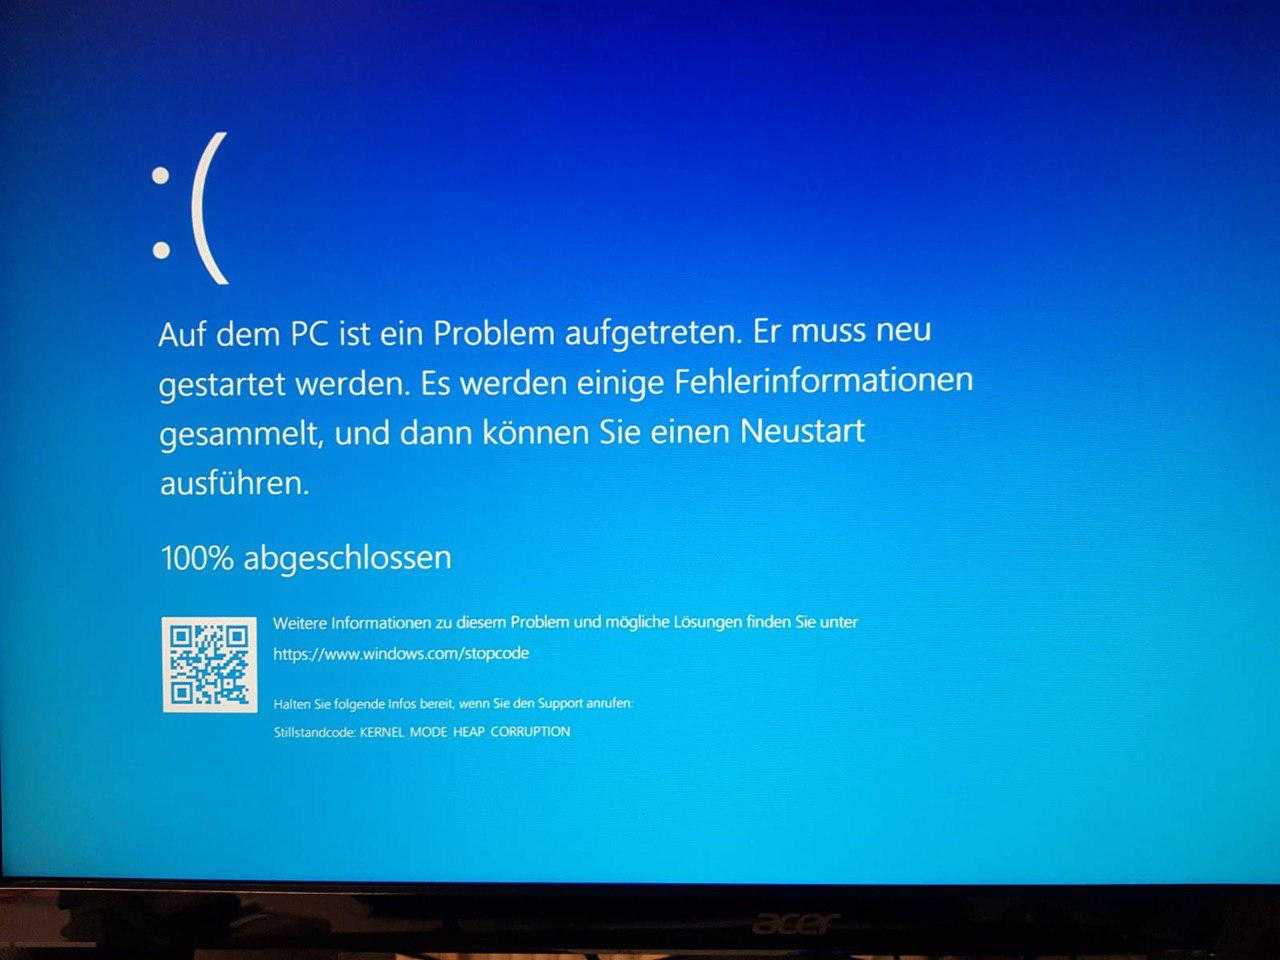
What Is the Windows 10/11 Blue Screen Kernel Mode Heap Corruption?

Kernel Mode Heap Corruption is one of the stop codes presented by Windows when you run into a ‘blue screen error of death’ BSOD error. As is the case with other codes, ‘Kernel Mode Heap Corruption’ is created uniquely to help users identify the problems triggering system crashes. Usually, the error is caused by driver issues (especially graphics card drivers) or software conflicts, but it may also be caused by hardware malfunction.
Expert Tip: For smoother PC performance, consider an optimization tool PC optimization tool. It handles junk files, incorrect settings, and harmful apps. Make sure it’s right for your system, and always check the EULA and Privacy Policy.
Free Scan for PC Issues
Compatible with:
Windows 10/11, Windows 7, Windows 8
Special offer. About Outbyte, uninstall instructions, EULA, Privacy Policy.
People have encountered the Kernel Mode Heap Corruption error in different situations. Some said the error happened on startup of Windows 10/11, while others the moment of launching specific programs such as a video game.
In the kernel mode operation of your computer, programs have unrestricted access to the foundational hardware components. When a kernel mode heap corruption occurs, it means a flaw in a running program’s code has modified the contents of a data heap. This also means that the allocator’s handle of the heap has been affected.
Some possible outcomes are critical memory faults within the allocator itself and memory leaks, where some parts of the memory become inaccessible in the future.
Kernel Mode Heap Corruption FAQ
️ How do you fix heap corruption?
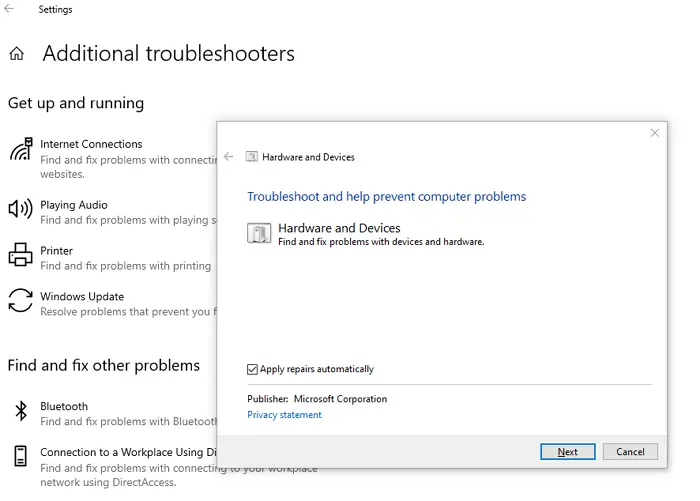
- Check Event Viewer.
- Update, Roll Back, or Reinstall the Graphics Card Driver.
- Run Driver Verifier Manager.
- Check for Incompatible Software.
- Check RAM.
- Run SFC or DISM.
- Check Slots of the Graphics Card and the Memory.
- Perform System Restore.
️ What is kernel mode heap corruption?
Kernel mode is one of operation modes computer, which allows the computer to have full access to all hardware and make the machine run its any instructions.
Heap corruption occurs when a program damages the allocator’s view of the heap. This error may cause a memory leak where some memory isn’t returned to the heap and is inaccessible to the program afterward, or it may cause a memory fault, usually within the allocator itself.
Повреждение кучи режима ядра NVidia
Игроки используют драйверы NVidia для многих игр, и неэффективный драйвер мешает им заниматься своими любимыми онлайн-активностями.
Но прежде чем обновлять драйвер, создайте точку восстановления, чтобы ПК мог справиться с любыми будущими программными сбоями.
Чтобы записать точку восстановления в Windows:
Перейдите на панель задач и введите «Создать точку восстановления». Когда параметр появится в результатах поиска, выберите его.
Войдите в «Свойства системы» и коснитесь раздела «Защита системы».
Выберите опцию «Создать».
Введите описание точки восстановления.
Нажмите «Создать» и нажмите кнопку «ОК».
После того, как вы настроили точку восстановления, вы можете переустановить драйвер:
Одновременно удерживайте клавиши «Windows» и «X», затем выберите «Диспетчер устройств» в контекстном окне.
Найдите раздел «Видеоадаптеры» и увеличьте его.
Наведите курсор на драйвер NVIDIA и щелкните правой кнопкой мыши.
Нажмите «Удалить».
Выберите опцию «Удалить программное обеспечение драйвера для этого устройства».
Чтобы установить новейшую версию драйвера, загрузите программное обеспечение с Официальная веб-страница NVidia.
Fix 5. Check RAM
Memory problem is another reason behind this stop error. To solve this issue, you should identify and fix RAM problems on your PC through Memory Diagnostic. Similarly, this method is only available when your computer can enter Windows or Safe Mode. Please follow the steps below to check RAM:
Step 1: Type «memory diagnostic» in the Windows search box. Then, double-click the best-matched icon for Windows Memory Diagnostic.
Step 2: Choose Restart now and check for problems.
Step 3: Your computer will restart and diagnose the memory. Once the diagnosis process is completed, the computer will boot up automatically. Then, you need to view the diagnosis report in Event Viewer through the following steps:
If the diagnosis is not passed, you should take measures according to the diagnosis result description.
This article explains what high memory usage is and how to check it. It also gives 11 methods to fix Windows 10 high memory usage caused by most common reasons.
Fix 5. Check RAM
Memory problem is another reason behind this stop error. To solve this issue, you should identify and fix RAM problems on your PC through Memory Diagnostic. Similarly, this method is only available when your computer can enter Windows or Safe Mode. Please follow the steps below to check RAM:
Step 1: Type «memory diagnostic» in the Windows search box. Then, double-click the best-matched icon for Windows Memory Diagnostic.
Step 2: Choose Restart now and check for problems.
Step 3: Your computer will restart and diagnose the memory. Once the diagnosis process is completed, the computer will boot up automatically. Then, you need to view the diagnosis report in Event Viewer through the following steps:
- Open Event Viewer.
- Navigate to Windows Logs > System.
- Click Filter Current Log in the right box.
- In the Event sources box, choose MemoryDiagnostics-Results and then click OK button to display all result logs of the memory test.
- Double-click the latest result log to see whether the diagnosis is passed.
If the diagnosis is not passed, you should take measures according to the diagnosis result description.
Как исправить ошибку повреждения кучи режима ядра
Пользователи видят сообщение об ошибке « Ошибка повреждения кучи режима ядра », Когда они обычно используют свои компьютеры или выполняют некоторые операции с интенсивным использованием ЦП. Этот синий экран смерти очень распространен и «обычно» не означает серьезных проблем с вашей операционной системой.
Ошибка повреждения кучи режима ядра
Однако недавно мы столкнулись с несколькими случаями, когда этот BSOD повторялся снова и снова, когда пользователи запускали или выполняли одно и то же действие, которое изначально вызывает ошибку. В этой статье мы рассмотрим все возможные причины появления этого сообщения об ошибке, а также способы обходного пути, которые можно предпринять для решения проблемы.
Fix KERNEL_MODE_HEAP_CORRUPTION Error in Windows 11/10
There are a few different ways that you can fix the KERNEL_MODE_HEAP_CORRUPTION error on your Windows 10 computer. We’ll walk you through each of them below:
1. Uninstall Programs or Drivers That Are Causing The Problem
If you suspect a program or driver is causing this error, you can try uninstalling it to see if that fixes the problem. To do this:
1. Press the Windows + X keys on your keyboard and select “Device Manager” from the menu that appears.
2. Expand the list of devices and find the one causing the problem.
3. Right-click on the device and select “Uninstall” from the context menu.
4. Restart your computer and check to see if the problem has been fixed.
2. Update Your Drivers
Another potential cause of this error is outdated or corrupt drivers. To combat this, you need to update your drivers.
1. Press Windows + X on your keyboard and select “Device Manager.”
2. Expand the list of devices and find the drivers that need to be updated.
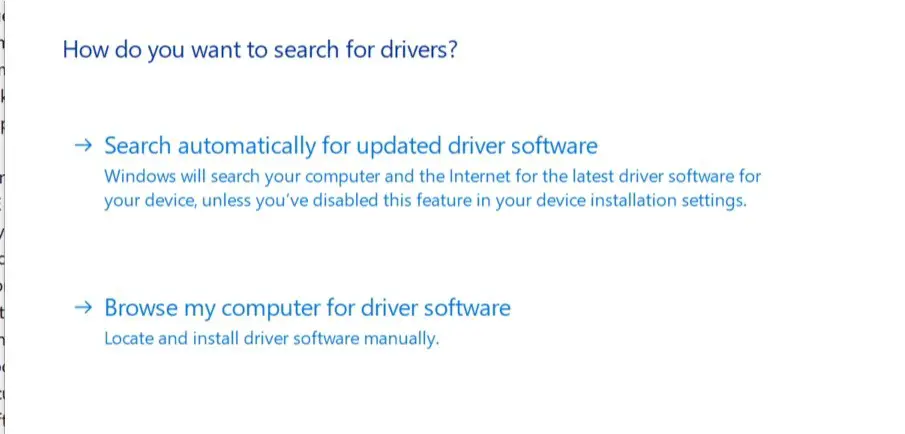
3. Once found, right-click on the driver and select “Update Driver.”
4. On the following screen, select “Search automatically for updated driver software.”
5. Do the same for other drivers as well.
6. Once done, restart your computer.
3. Roll back Corrupted Drivers
If you began encountering the KERNEL_MODE_HEAP_CORRUPTION error after a driver update, rolling it back should help.
1. Press Windows + X on your keyboard and select “Device Manager” from the menu.
2. Expand the list of devices and double-click the driver that could be causing the error.
3. On the properties screen, click “Roll Back Driver” under the “Driver” tab.
4. Click OK, and Windows will automatically install the previous driver version on your system.
![Kernel mode heap corruption on windows 10 [solved]](https://nephros-crimea.ru/wp-content/uploads/f/3/8/f38554397c889c23b6aef1e659a11ecd.jpeg)


![[solved] pc crashes with kernel mode heap corruption error - minitool partition wizard](https://nephros-crimea.ru/wp-content/uploads/e/3/8/e381cfc3453eb029d434b226166d0180.png)
5. Once done, restart your computer.
4. Run SFC/DISM Scan To Repair Corrupted Files
Corrupted files on your system can also trigger the KERNEL_MODE_HEAP_CORRUPTION error. To assist you with this, Windows provides two built-in utilities— SFC (System File Checker) and DISM (Deployment Image Servicing and Management). These utilities will scan your system files and repair any corrupted ones on their way.
RUN SFC Scan
1. Press Windows + X and select “Command Prompt (Admin)” to open an elevated command prompt.
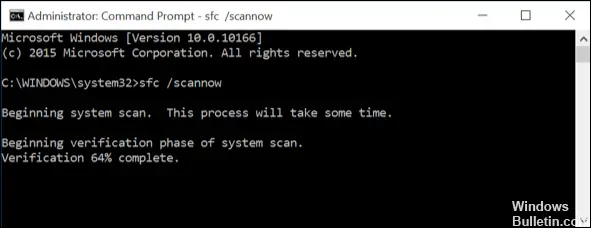
2. Next, type sfc/ scannow in the console and hit Enter.
3. The utility will scan and repair your corrupted system files. Once the process is done, restart your computer.
Run DISM Scan
1. Press Windows + X and select “Command Prompt (Admin)” to open an elevated command prompt.
2. Type Dism /Online /Cleanup-Image /RestoreHealth in the console and hit Enter.
3. Restart your computer once the scan is finished.
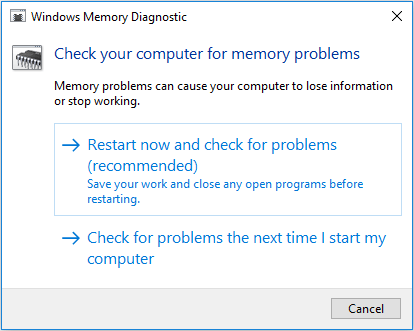
5. Run the Windows Memory Diagnostic Tool
The KERNEL_MODE_HEAP_CORRUPTION error may also occur if your computer has memory problems. You can use the Windows Memory Diagnostic Tool to test the memory on your computer and find any errors. This tool is built into Windows, and you can run it by following these steps:
1. Press Windows + R on your keyboard to open the Run dialogue box.
2. Type “mdsched.exe” into the Run dialogue box and press Enter.
3. Click the “Restart now and check for problems (recommended)” option.
4. Your computer will restart and run the memory diagnostic tool.
5. Once the test is complete, you will see the results. You can try reseating your memory modules or replacing them entirely if there are any errors.
6. Use Safe Mode
If you still can’t fix this error, try booting into Safe Mode. In Safe Mode, only essential programs and services are loaded, so if there is a problem with a program or driver, it should not load in Safe Mode, which can help you narrow down the source of the problem.
With Networking Support
1. Press Windows + R on your keyboard to open the Run dialogue box.
2. Type “msconfig” into the Run dialogue box and press Enter.
3. On the Boot tab of System Configuration, select “Safe Boot.”
4. Select “Network” from the menu.
5. Click “OK” and then restart your computer.
Without Networking Support
1. Follow steps 1-3 from above.
2. On the Boot tab of System Configuration, select “Safe Boot” and “Minimal” from the menu below it.
3. Click “OK” and then restart your computer.
Once in Safe Mode, try running whatever program or driver is causing this error again to see if it still causes problems.
7. Perform A System Restore
If you’ve recently installed a program or driver that is causing this error, you can use System Restore to undo the changes that were made. To do this, follow these steps:
1. Search for “Recovery” and open it.
2. Click on “Open System Restore.”
3. Click “Next” on the System Restore Wizard page that appears.
4. Choose a restore point from the list that appears and click “Next.”
5. On the next page, click “Finish,” and your computer will restart.
Как исправить проблему синего экрана
Существует несколько способов устранения проблемы синего экрана, выбор которых зависит от причин ее появления и способностей пользователя.
Через БИОС
Чаще всего люди отдают предпочтение реанимированию системы через старый добрый БИОС, так как это довольно быстрый и легкий способ. Некоторые ошибки не позволяют включить компьютер, система просто не пропускает пользователя дальше заставки включения.
Чтобы реанимировать ПК через BIOS, необходимо:
- Войти в БИОС при загрузке системы. Вход может отличаться в зависимости от модели компьютера. По этой причине перед его ремонтом следует ознакомиться с горячими клавишами в инструкции гаджета.
- Кликнуть на раздел Boot (на современных устройствах).
- Выбрать пункт Disabled в строке Вoot Booster.
- Сохранить изменения и перезагрузить компьютер. Действия сбросят гаджет до заводских настроек, что способствует решению большинства проблем, вызывающих BSOD. Но стоит понимать, что настраивать устройство «под себя» придется заново, а все сохранения будут удалены.
Разрешить неудобства с потерей данных поможет резервное копирование или отправка важных файлов в облако.
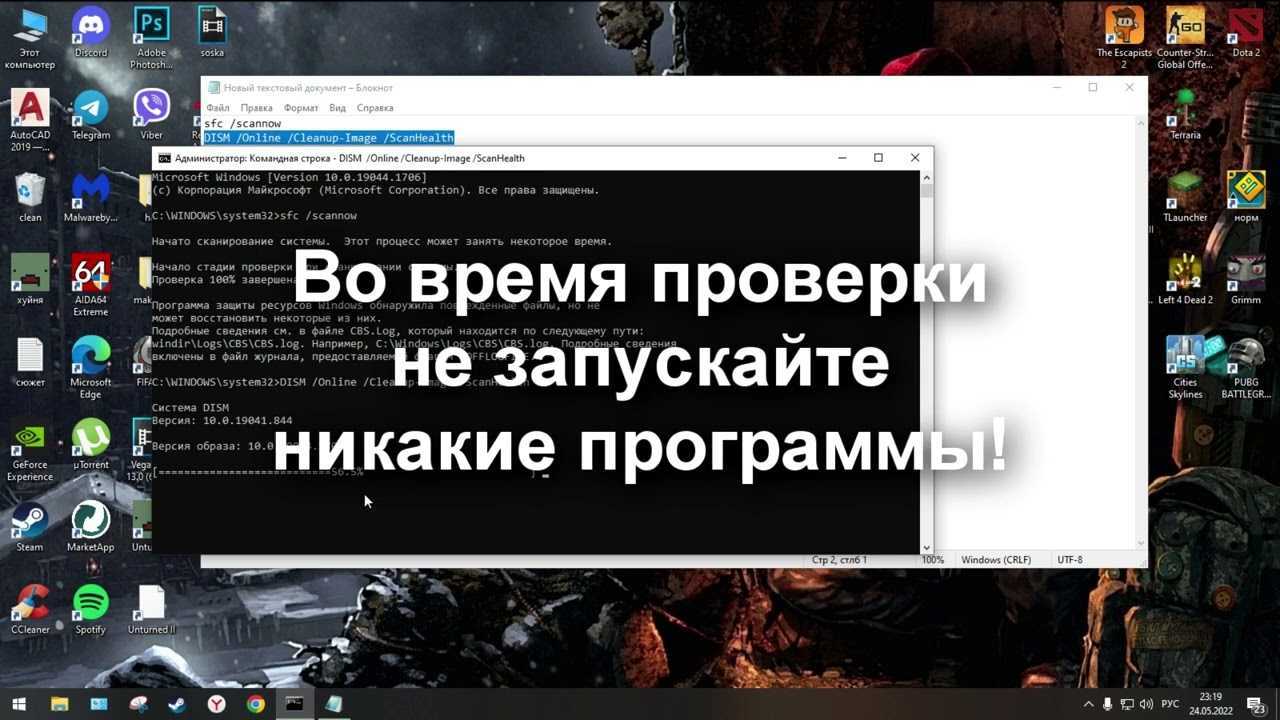
С помощью командной строки
Нередко к проблеме приводят повреждения системных файлов или ошибки в них. Особенно часто с такой причиной сталкиваются люди, скачивающие ПО через сторонние ресурсы. В таком случае в качестве мер реанимации можно использовать командную строку SFC, которая находит и устраняет ошибки, возникшие в системных файлах.
Для устранения бага стоит придерживаться следующей инструкции:
- Запустите командную строку от имени администратора. Ее можно найти через поисковую систему на компьютере, расположенную в меню «Пуск».
- Подтвердите свое намерение, нажав на клавишу «Да/Yes».
- Введите в появившемся окне: sfc/scannow.
- Нажмите на кнопку “Enter” в качестве подтверждения.
- После завершения сканирования, перезагрузите компьютер.
Если причина проблемы была в файлах системы, то после sfc-сканирования гаджет начнет работать в прежнем режиме.
Через безопасный режим
Узнать причину неполадки можно также с помощью включения компьютера в так называемом безопасном режиме. Под ним подразумевается ограниченная версия системы, в которую входят только основные функции и системные драйверы. То есть, любые сторонние драйверы и программы включены не будут, а значит и не смогут помешать работе устройства.
Чтобы запустить безопасный режим на последней версии ОС, необходимо:
- Зажать клавишу Shift и кликнуть на раздел перезагрузки.
- Оказавшись в разделе «Выбор действия», нажать на пункт «Диагностика» (Поиск и устранение неисправностей).
- После следует выбрать «Дополнительные параметры» и «Перезагрузить».
- Последним этапом станет нажатие на клавишу F4.
Если при включении ПК ошибка не появится, значит причиной ее возникновения стали сторонние драйверы, программы или вирусы.
В таком случае останется только проанализировать последние дни пользования устройством и вспомнить, устанавливалось на него что-то или нет. Ответ «да» подразумевает удаление всех сторонних программ и драйверов, установленных в последнее время.
Выйти из режима можно просто с помощью перезагрузки устройства. Безопасный режим – отличный способ понять причину поломки устройства без ряда дополнительных манипуляций.
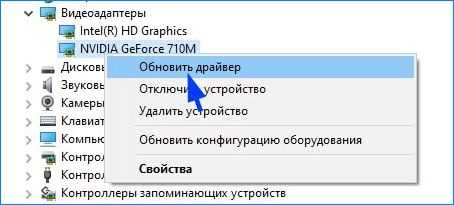
Обновление драйверов
Если какие-то драйвера оказались неисправными в ходе проверки предыдущим решением, обновите их вручную до последней версии.
Первое, что нужно сделать, загрузить требуемые драйвера с официального сайта в указанную папку на диске и запустить их установку.
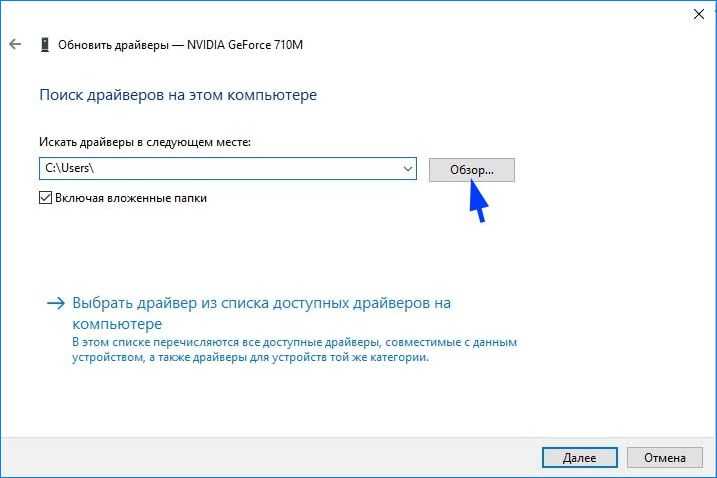
Откройте окно «Выполнить» (Win + R), впишите команду devmgmt.msc для входа в «Диспетчер устройств». В случае повреждения драйверов видеокарты, разверните вкладку «Видеоадаптеры», кликните правой кнопкой мыши на ней и выберите «Обновить».
Выберите второй вариант обновления вручную.
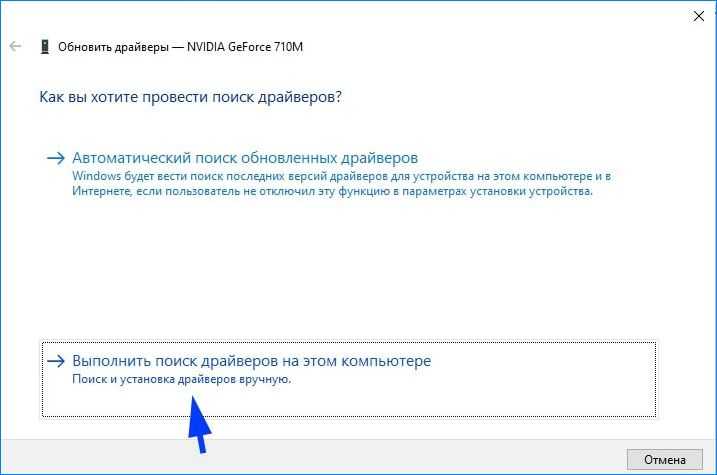
Затем нажмите на кнопку «Обзор», перейдите в папку с загруженными драйверами. Следуйте инструкциям до завершения установки.
![6 simple [solved] fixes for the kernel mode heap corruption error on windows 10 - the infobits](https://nephros-crimea.ru/wp-content/uploads/c/0/6/c06ca2b9522ec8846bdc61a88675af54.png)

![Fix bsod kernel mode heap corruption error on windows 10 [full guide]](https://nephros-crimea.ru/wp-content/uploads/b/f/d/bfdde26cb1838a1880948f3b0a0b7795.jpeg)
![[solved] kernel_mode_heap_corruption bsod error 0x0000013a](https://nephros-crimea.ru/wp-content/uploads/5/c/4/5c43878ee3ab2a5d236776714b6290ba.png)
![8 ways to fix kernel mode heap corruption bsod error in 2023 [solved] - easeus](https://nephros-crimea.ru/wp-content/uploads/1/2/3/12307273d2c3c4e16fac2c7578b4ca62.jpeg)
![[solved] kernel mode heap corruption error - driver easy](https://nephros-crimea.ru/wp-content/uploads/4/8/f/48f69c92c70e6224c8029de362f6ddf4.jpeg)

Обновите все устройства, драйверы которых были повреждены и перезагрузите компьютер. Если продолжаете сталкиваться с ошибкой Kernel_Mode_Heap_Corruption перейдите к следующему способу.
Обновление драйверов
Если какие-то драйвера оказались неисправными в ходе проверки предыдущим решением, обновите их вручную до последней версии.
Первое, что нужно сделать, загрузить требуемые драйвера с официального сайта в указанную папку на диске и запустить их установку.
Выберите второй вариант обновления вручную.
Затем нажмите на кнопку «Обзор», перейдите в папку с загруженными драйверами. Следуйте инструкциям до завершения установки.
Обновите все устройства, драйверы которых были повреждены и перезагрузите компьютер. Если продолжаете сталкиваться с ошибкой Kernel_Mode_Heap_Corruption перейдите к следующему способу.
Fix 6. Run SFC or DISM
When the Kernel Mode Heap Corruption BSOD occurs, you should run SFC or DISM to check whether it is corrupt system files that cause the BSOD problem.
System File Checker is a tool built in Windows to replace damaged, lost, or changed system files with good system files. In addition, it can be used even if the computer can’t boot into Windows or Safe Mode. Please follow the steps below to run it:
Step 1: Open Command Prompt through the following two ways:
- When your PC can’t enter Windows or Safe Mode: Enter WinRE and then navigate to Troubleshoot > Advanced options > Command Prompt.
- When your PC can enter Windows or Safe Mode: Type “cmd” in Windows search box and right-click the Command Prompt Then, select Run as administrator.
Step 2: Type “sfc /scannow” and press the Enter key. Then, wait until the procedure ends.
DISM is a better tool that can restore corrupt system files. Usually, if SFC fails to repair system files, you can run DISM. However, it is only available when your computer can boot into Windows or Safe Mode. Please follow the steps below to run it:
Step 1: Boot into Windows or Safe Mode and then run Command Prompt as administrator.
Step 2: Type the following commands one by one and hit Enter.
- exe /Online /Cleanup-image /Scanhealth
- exe /Online /Cleanup-image /Restorehealth
Удаление несовместимых приложений
Очень часто синий экран с кодом Kernel_Mode_Heap_Corruption возникает по причине программного конфликта. Некоторые приложения могут внести изменения в основные параметры, что приведет к нестабильной работе Windows. Поэтому сначала нужно их определить. Это могут быть программы, установленные перед появлением ошибки или при запуске которых, отображается синий экран.
Откройте окно «Выполнить» нажатием на клавиши Windows + R, наберите команду appwiz.cpl и подтвердите ее выполнение на Enter.
Отобразится список всех программ, установленных на компьютере. Если уверены, что ошибка появилась после установки последней программы, отсортируйте список по дате, кликните на ней правой кнопкой мыши и выберите «Удалить».

Когда синий экран возникает при запуске определенной программы, также найдите ее в списке и удалить.
What causes Kernel Mode Heap Corruption Blue Screen in Windows 10/11?
The error occurs mostly when a PC is overloaded or used over a long period. Most often, it has to do with the system drivers of a computer. However, users have identified many other conditions that cause the issue.
- Hardware Malfunctions – A faulty hardware component in your computer, such as a corrupt RAM, can trigger the error.
- Driver Problems – According to reports by several Windows 10/11 users, the issue started after they updated their system drivers. In this case, all you need to do is to undo the updates. It’s also possible that the drivers might already be outdated.
- Software Compatibility Issues – Compatibility problems between specific software in your PC can lead to unstable system behaviors, causing the BSOD error.
- System Graphics Card – It might be that you attempted to open some graphics-intensive software too heavy for your graphics card to support.
- Corrupt Files – If there are corrupt files in your system, they can also trigger the Kernel mode heap corruption problem. Note that you must diagnose the cause of the issue using the in-built Event viewer.
To know more about the cause of the error, follow the guide below:
Press the Windows logo + R keys and hit Enter to open the Run dialog box.
- Type “eventvwr” (no quotes) in the Run dialog box and hit Enter.
- In the Event viewer window, navigate Windows logs>System.
- In the System window, find the Kernel Mode Heap Corruption BSOD log from the list table.
- Read the log description displayed under General and Details. The log should describe the cause of the issue, particularly the Event ID and Source information.
3. Выполните чистую загрузку.
Чистая загрузка – это эффективный способ диагностировать множество ошибок Windows. В нем компьютер загружается с отключенным всем сторонним ПО. Это может помочь вам сузить круг возможных причин появления синего экрана повреждения кучи режима ядра.
Кроме того, вы можете посмотреть, как выполнить чистую загрузку и диагностировать распространенные ошибки в Window 10.
Как очистить загрузку вашего ПК
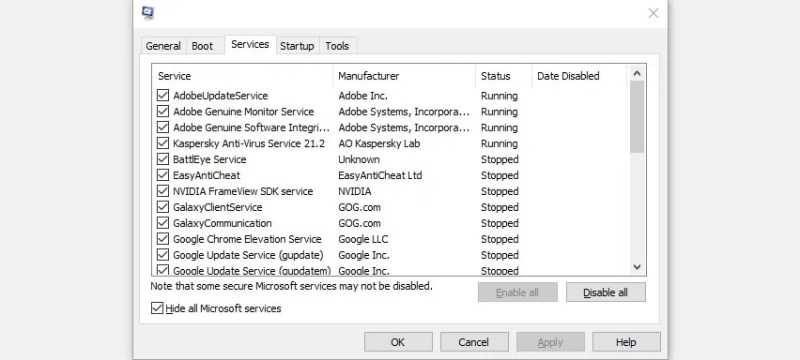
- Нажмите Windows Key + R, чтобы открыть команду «Выполнить». Введите msconfig и нажмите Enter.
- В окне « Конфигурация системы» перейдите на вкладку « Службы ».
- На вкладке «Служба» установите флажок « Скрыть все службы Microsoft» .
- Теперь проверьте все службы, перечисленные в окне, и нажмите Отключить все .
- Примените настройки и закройте конфигурацию системы .
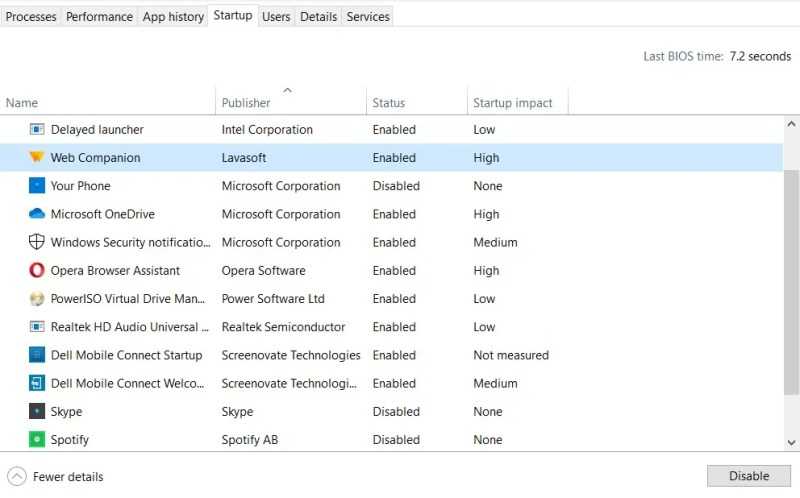
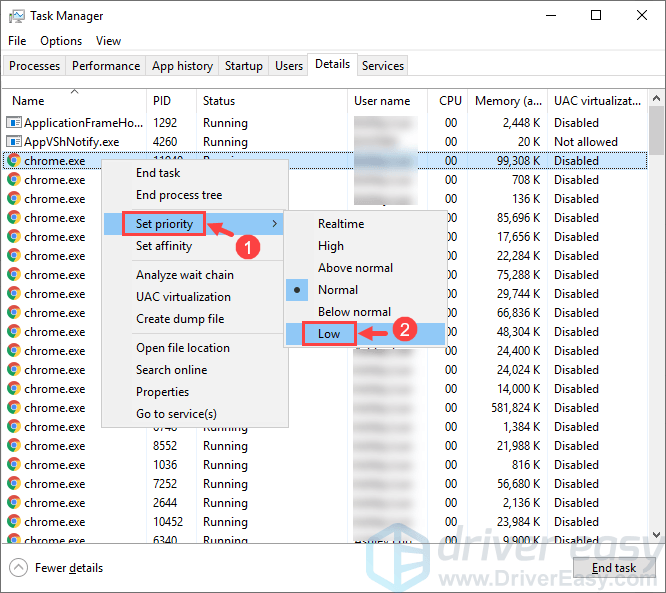
- Нажмите CTRL + Shift + ESC, чтобы запустить диспетчер задач .
- Щелкните вкладку « Автозагрузка ».
- Щелкните каждое приложение, а затем нажмите Отключить .
- После этого нажмите ОК и перезагрузите компьютер.
Когда ваш компьютер загрузится, все сторонние приложения будут отключены. Используйте свой компьютер как обычно. Если определенное действие привело к срабатыванию синего экрана раньше, повторите его и посмотрите, вызывает ли оно ошибку.
Опять же, для вашего компьютера может потребоваться больше времени, чем обычно, но если он вообще не выйдет из строя, лучше всего удалить все недавно установленные приложения, так как они могут мешать вашей системе.
Если вы недавно обновили компьютерное оборудование, убедитесь, что оно совместимо и правильно установлено. Неисправная ОЗУ также может вызвать проблему. Поэтому лучше проверить наличие проблем с памятью. Средство диагностики памяти Windows может помочь обнаружить и устранить распространенные проблемы с памятью на вашем компьютере.
Как запустить диагностику памяти Windows
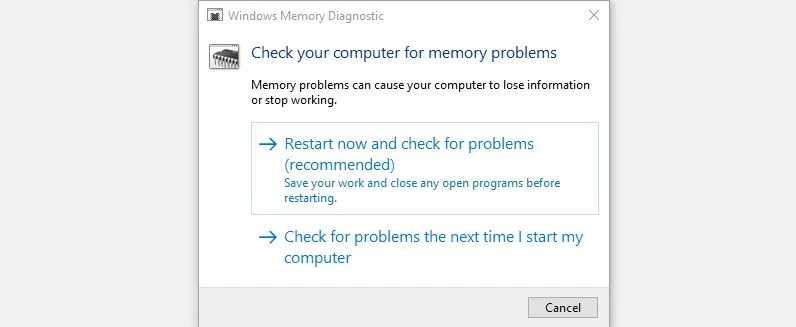
- Нажмите Windows Key + R, чтобы запустить команду «Выполнить». Введите mdsched.exe и нажмите Enter.
- В окне диагностики памяти Windows нажмите « Перезагрузить сейчас» и проверьте наличие проблем . Этот вариант рекомендуется.
- Подождите, пока Windows завершит определение и устранение проблем с памятью.
Другие исправления, которые стоит попробовать
- Убедитесь, что все оборудование установлено правильно. Лучше еще раз проверить и убедиться, что все вновь установленные компоненты плотно прилегают.
- Проверьте компоненты на предмет перегрева.
- Попробуйте переключить слоты при использовании двух модулей RAM.
- Переключитесь с двухканальной памяти на одноканальную или наоборот.
Fix 6. Run SFC or DISM
When the Kernel Mode Heap Corruption BSOD occurs, you should run SFC or DISM to check whether it is corrupt system files that cause the BSOD problem.
System File Checker is a tool built in Windows to replace damaged, lost, or changed system files with good system files. In addition, it can be used even if the computer can’t boot into Windows or Safe Mode. Please follow the steps below to run it:
Step 1: Open Command Prompt through the following two ways:
Step 2: Type «sfc /scannow» and press the Enter key. Then, wait until the procedure ends.
How to fix the issue SFC scannow not working? Here, this article focuses on two cases of SFC error. Try to use the following methods.
DISM is a better tool that can restore corrupt system files. Usually, if SFC fails to repair system files, you can run DISM. However, it is only available when your computer can boot into Windows or Safe Mode. Please follow the steps below to run it:
Step 1: Boot into Windows or Safe Mode and then run Command Prompt as administrator.
Step 2: Type the following commands one by one and hit Enter.
Kernel Mode Heap Corruption in Apex Legends
Apex Legend players using NVidia’s drivers might experience system failures when the drivers are outdated. In that case, upgrading the driver will allow them to enjoy their game without their PC crashing.
Before initiating the upgrade, make sure you’ve made a restore point. It will record the current way your PC works. If at any point your device has trouble working, you can return it to the restore point. It will use the programs and software the point has recorded. To set one up, follow these steps:
- Go to the taskbar and type “Create a restore point.” Select the option when it appears on-screen.
- Press “System Properties” and choose “System Protection.”
- Tap the “Create” option.
- Enter your restore point description.
- Click “Create” and select “OK.”
When you’ve established a restore point, you should perform a driver update:
- Press the “Windows” and “X” keys simultaneously and tap the “Device Manager” option.
- Expand the “Display adapters” tab.
- Hover the cursor above your NVidia driver and right-click.
- Choose “Uninstall.”
- Tap the “Delete the driver software for this device” option.
- Go to the NVidia website to download and install the latest driver version.
New driver releases come with updates that resolve issues users may have with the outdated versions. Once you’ve installed the newest version, you shouldn’t see the blue error screen anymore.
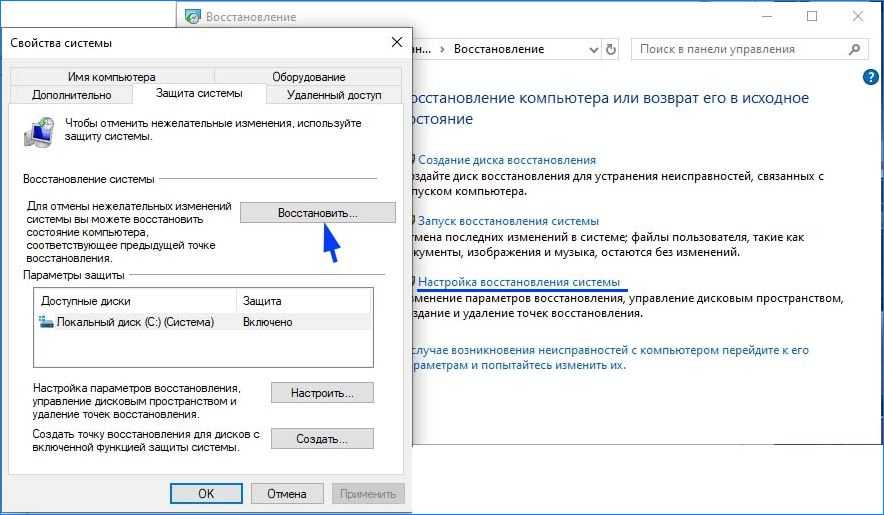
Запуск восстановления системы
Если не удалось устранить ошибку Kernel_Mode_Heap_Corruption перечисленными способами, попробуйте вернуть Windows в предыдущее состояние до возникновения синего экрана.
Нажмите Windows + S для вызова строки системного поиска, введите «восстановление» и кликните на найденный результат.

Перейдите в настройки восстановления, затем на вкладке «Защита системы» нажмите кнопку «Восстановить».

На первом экране нажмите на кнопку «Далее». На следующем отметьте флажком «Показать другие точки». Выберите точку восстановления, которая была создана до появления сбоя системы Kernel_Mode_Heap_Corruption.
![[solved] pc crashes with kernel mode heap corruption error](https://nephros-crimea.ru/wp-content/uploads/2/4/6/2462dbf02dcdfcd456bc1e21bcba0c47.jpeg)
![6 simple [solved] fixes for the kernel mode heap corruption error on windows 10](https://nephros-crimea.ru/wp-content/uploads/5/8/8/5886822634451ab5a4bba0ba62cc1343.png)

На экране подтверждения нажмите кнопку «Готово».
После начнется процесс восстановления. При успешном завершении проверьте, возникает ли ошибка.
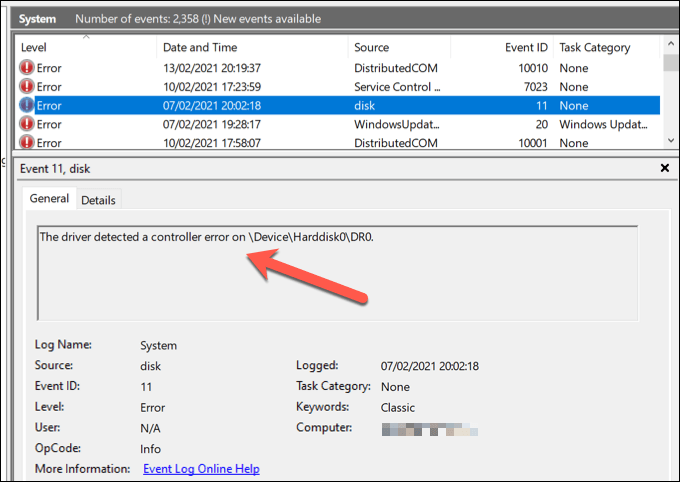
Fix 1. Check Event Viewer
When you encounter any error on Windows, the first thing you should do is checking Event Viewer. Event Viewer is a component built into the Microsoft Windows NT operating system that allows you to view all events of your computer as a system administrator. This helps solve computer problems.
However, this method can only be used when the computer can boot into Windows or Safe Mode. If your computer can’t enter Windows normally, please follow the steps below to enter Safe Mode first:
After booting into Windows or Safe Mode, please refer to the following steps to check Event Viewer:
Step 1: Press «Windows + R» keys simultaneously and then type «eventvwr» into the Run box. Then, hit Enter key to open Event Viewer.
Step 2: Navigate to Windows Logs > System to find the log about Kernel Mode Heap Corruption BSOD.
Step 3: After finding the log, you should pay attention to the log description because it may indicate the cause of the problem. Additionally, you should also note Source and Event ID information, which may also help you to solve this problem.
After checking Windows log, you can solve the problem accordingly. However, it’s possible that you still don’t know how to solve this problem because the description doesn’t tell you what you should do. If so, you can try the following methods.
Проверка драйверов на наличие ошибок
Драйвера являются основными компонентами, которые взаимодействуют между операционной системой и оборудованием. Если они повреждены, то будете сталкиваться с многочисленными ошибками, в частности, с Kernel_Mode_Heap_Corruption. Поэтому попробуем их обновить до последней сборки.
Прежде чем перейти к решению, сделайте точку восстановления на случай возникновения ошибок в работе утилиты.
Откройте строку поиска клавишами Windows + S и наберите «командная строка». Кликните на найденный результат правой кнопкой мыши и выберите «Запуск от имени администратора».
В окне командной строки наберите команду:
verifier
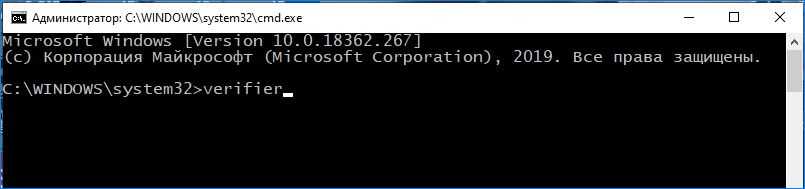
Выберите «Создать стандартные настройки»и нажмите Далее.
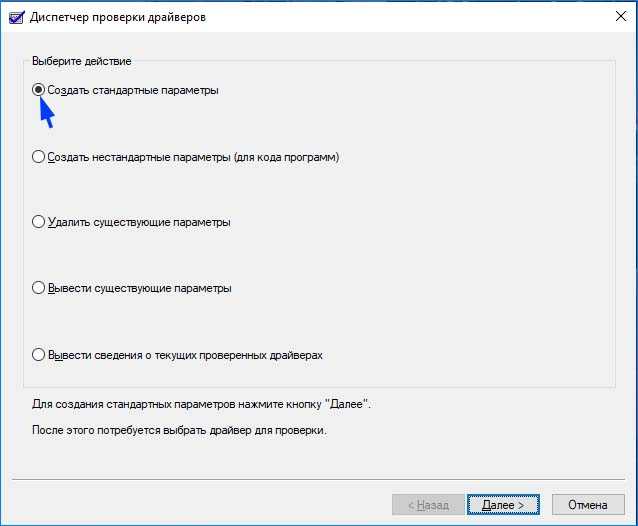
Затем выберите «Автоматически выбирать все драйверы, установленные на этом компьютере» и нажмите «Готово». Подтвердите перезагрузку компьютера.
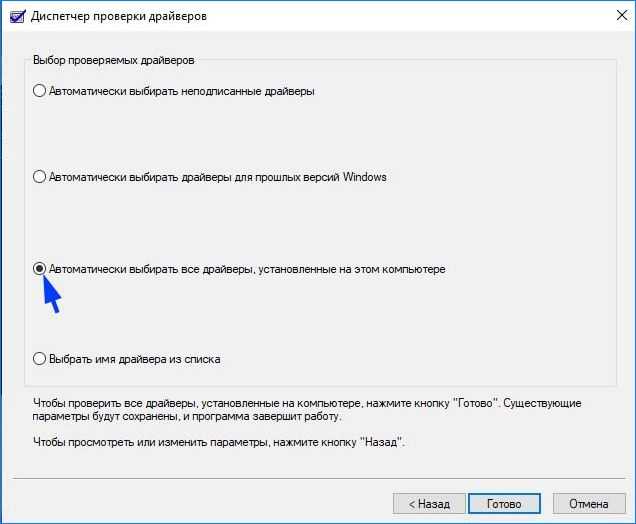
После перезагрузки сразу начнется проверка. При обнаружении неисправных их нужно обновить, выполнив следующие шаги.
Kernel Mode Heap Corruption on Startup
If the blue screen disables your desktop access, there’s a method to restore proper PC function.
- Turn on your PC.
- When you see the Windows logo, immediately press down on the “power” button to stop the booting process.
- Repeat these actions an additional two times.After the third boot disruption, Windows should display its “Advanced Startup.”
- Select “Advanced Startup.”
- Press the “Advanced options” icon and choose “System Restore” on the right-hand side.
- Confirm your account details.
- Hit “Continue” and select “Next.”
- Choose the latest restore point to resolve the corruption issue.
- To see which programs will be changed with the restore point, click “Scan for affected programs.”
- Press “Close” and choose “Next.”
- Select “Finish” to record your updates.
Как исправить: ошибка синего экрана повреждения кучи в режиме ядра
Пользователи сталкиваются с сообщением об ошибке «Ошибка повреждения кучи режима ядра» при обычном использовании своего компьютера или при выполнении операций с интенсивной загрузкой процессора. Этот синий экран смерти очень распространен и «обычно» не означает серьезной проблемы с вашей операционной системой.
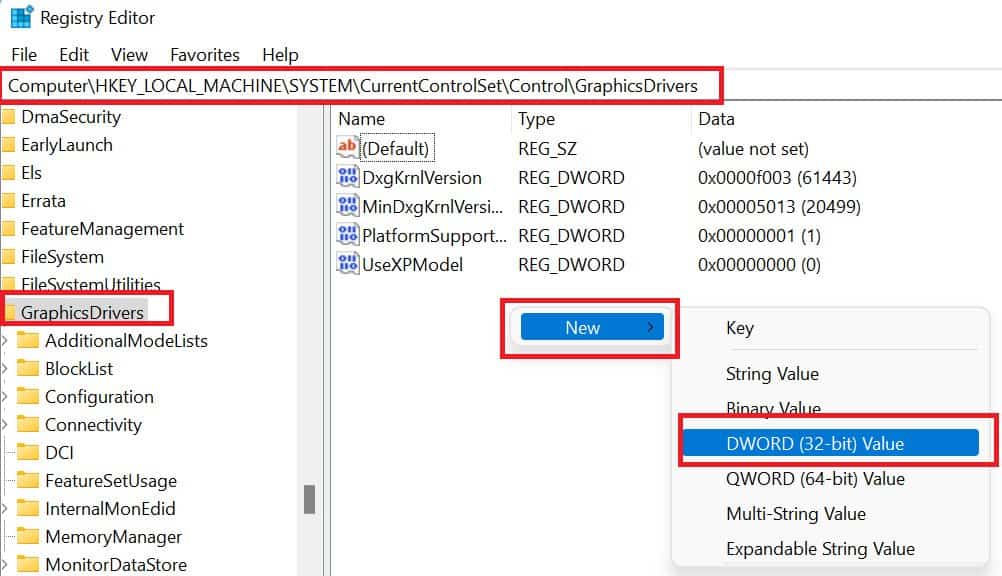
Проверка графики драйверы в случае проблем
- Нажмите Windows + R, чтобы открыть Run.
- Введите devmgmt.msc и нажмите ОК, чтобы открыть диспетчер устройств.
- В диспетчере устройств разверните раздел «Адаптеры дисплея».
- Щелкните правой кнопкой мыши видеокарту и выберите «Обновить драйвер».
- Нажмите на Автоматически проверить для водитель для обновления.
- Дождитесь, пока Windows выполнит поиск и загрузит предстоящее обновление для драйвера.
- Перезагрузите систему и проверьте улучшения.
Восстановление поврежденных системных файлов.
Возможно, что некоторые системные файлы на вашем компьютере повреждены, поэтому Ошибка BSOD, Чтобы их починить, нужно сделать две вещи:
Запустить средство проверки системных файлов
Проверка системных файлов (sfc) — это утилита Windows, которая проверяет наличие системных файлов. Вы можете использовать команду sfc / scannow для сканирования всех защищенных системных файлов и восстановления отсутствующих или поврежденных.